Category: Lunch

Easy lunch ideas for busy days. Simple, quick recipes with fresh flavor and satisfying meals you can enjoy at home or on the go.

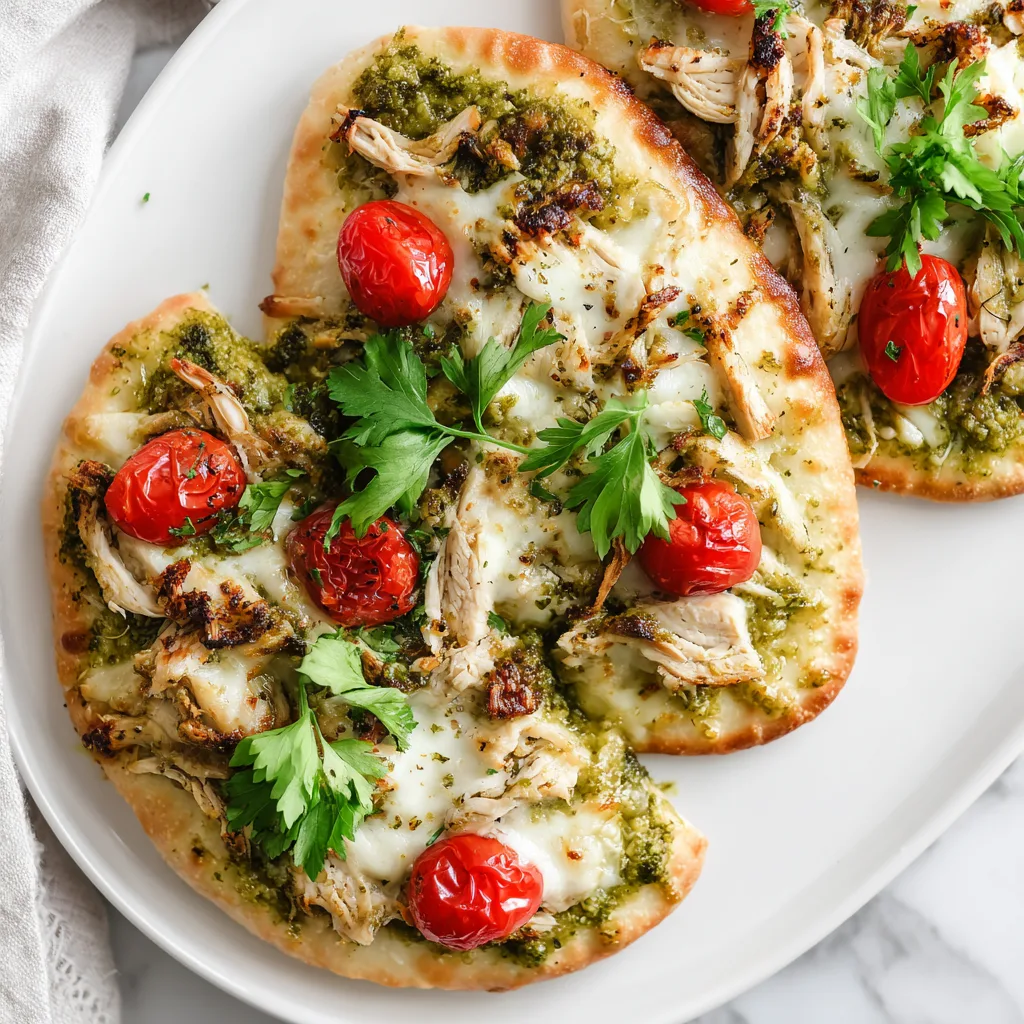
  • Pesto Chicken Flatbreads: Irresistibly Delicious & Ready Fast!

    Pesto Chicken Flatbreads: Irresistibly Delicious & Ready Fast!

    Pesto Chicken Flatbreads: Irresistibly Delicious & Ready Fast!

    Pesto Chicken Flatbreads are my absolute go-to when I need a quick yet impressive dinner that never fails to delight. There’s something magical about that first bite—warm, crispy flatbread topped with garlicky pesto, tender chicken, and melty cheese that stretches with each pull. I discovered this recipe during a hectic week when my kitchen creativity was running on empty, and it’s been a lifesaver ever since. The vibrant basil aroma fills my kitchen, instantly transporting me to sunnier days. Whether you’re hosting friends or craving a restaurant-quality meal at home, these flatbreads deliver big flavor with minimal effort.

    Recipe

    Why You’ll Love These Pesto Chicken Flatbreads

    Perfect Balance of Flavors and Textures

    The magic of these pesto chicken flatbreads lies in their perfect harmony of flavors. The herbaceous pesto creates a bright, garlicky base that pairs beautifully with juicy chicken and creamy mozzarella. I love how the edges of the flatbread crisp up while the center stays tender. That contrast between the crunchy crust and the soft, cheesy topping creates a textural wonderland in every bite. The first time I made these, my kitchen filled with the most intoxicating aroma of basil and roasted garlic—instantly transporting me to a little Italian café I once visited on vacation.

    Quick Weeknight Solution

    When life gets chaotic (which, let’s be honest, is most weeknights), these flatbreads are my time-saving hero. From start to finish, you can have them on the table in under 30 minutes. I often use rotisserie chicken to make the process even speedier. Last Wednesday, after a particularly exhausting workday, I managed to throw these together while simultaneously helping with homework and feeding the dog. The beauty is in their simplicity—store-bought flatbreads, pre-made pesto, and leftover chicken come together to create something that tastes like you spent hours in the kitchen. Pure weeknight magic.

    Essential Tips & Tricks

    Selecting the Perfect Ingredients

    Choosing the right components makes all the difference in elevating these flatbreads from good to absolutely unforgettable. For flatbreads, I recommend naan or pita as they provide the perfect sturdy base while still maintaining that lovely chew. When it comes to pesto, homemade is divine, but a high-quality store-bought version works beautifully when time is tight. Look for one with vibrant color and real Parmesan. For chicken, rotisserie is my go-to, but leftover grilled chicken brings a lovely smoky element. The cheese deserves attention too—fresh mozzarella offers those gorgeous melty puddles, while a sprinkle of aged Parmesan adds sharp complexity.

    Perfecting Your Technique

    The difference between good and great pesto chicken flatbreads often comes down to technique. First, don’t skip pre-toasting your flatbreads for 2-3 minutes before adding toppings—this prevents soggy centers. Spread your pesto thinly but completely to the edges for flavor in every bite. When arranging chicken, tear it into small pieces rather than large chunks for better distribution and easier eating. If adding vegetables like cherry tomatoes or red onions, slice them paper-thin so they cook quickly. Finally, a light drizzle of olive oil right before baking adds a beautiful sheen and helps everything caramelize perfectly.

    Serving Ideas & Creative Variations

    Complementary Side Dishes

    These flatbreads shine as the star of your meal, but the right sides can create a truly memorable spread. A simple arugula salad with lemon vinaigrette provides a peppery contrast to the rich flatbreads—the bright acidity cuts through the cheese beautifully. On cooler evenings, a small bowl of tomato soup makes for cozy dipping. For casual gatherings, I arrange the flatbreads alongside marinated olives, roasted red peppers, and a good balsamic glaze for drizzling. When I’m feeling extra, I’ll whip up some garlic butter and brush it on the edges of the flatbreads for a restaurant-worthy touch that makes everyone think I’ve spent hours in the kitchen.

    Creative Twists on the Classic

    While the classic pesto chicken flatbread is divine, experimenting with variations keeps this recipe exciting in your rotation. Try swapping traditional basil pesto for sun-dried tomato pesto paired with feta and kalamata olives for a Mediterranean twist. For a fall version, substitute sage-walnut pesto, roasted butternut squash, and chicken with a sprinkle of crispy pancetta. Vegetarian guests? Replace chicken with roasted portobello mushrooms or crispy chickpeas. I once made a breakfast version with pesto, scrambled eggs, and prosciutto that disappeared in minutes at a brunch gathering. The flatbread base is essentially a blank canvas—I encourage you to play with seasonal ingredients and whatever’s lingering in your fridge.

    Storage & Troubleshooting Guide

    Proper Storage Methods

    Storing these flatbreads properly ensures they remain just as delicious for round two. For leftover assembled flatbreads, let them cool completely before wrapping individual portions in aluminum foil and refrigerating for up to 3 days. Reheat in a 350°F oven for 7-8 minutes until warmed through—microwaving will make them soggy. If you’re meal prepping, I recommend storing components separately: keep cooked chicken, pesto, and grated cheese in separate containers, then assemble and bake when ready to eat. The pesto may darken slightly in storage, but a splash of lemon juice brightens it right up. For longer storage, freeze assembled but unbaked flatbreads flat on a baking sheet, then transfer to freezer bags.

    Troubleshooting Common Issues

    Even experienced cooks encounter the occasional flatbread fail, but most issues have simple solutions. If your flatbreads turn out soggy in the middle, you likely added too much pesto or didn’t pre-toast the bread. Next time, use a lighter hand with wet toppings and give the flatbread a 2-minute head start in the oven. For flatbreads that burn before the cheese melts, your oven temperature is likely too high—try 375°F instead of 425°F and position the rack in the middle of the oven.

    If your cheese isn’t browning nicely, a quick minute under the broiler works wonders, but watch carefully! Lastly, if toppings slide off when serving, let the flatbreads rest 2-3 minutes after baking to allow the cheese to set.

    Frequently Asked Questions

    Can I make these Pesto Chicken Flatbreads ahead of time?

    Absolutely! Prepare all components in advance and store separately. You can even assemble them on the flatbreads and refrigerate for up to 8 hours before baking. Just add an extra minute or two to the baking time if cooking from cold.

    What’s the best cheese to use for flatbreads?

    Fresh mozzarella offers that classic stretchy pull, but a combination of mozzarella and Parmesan creates wonderful depth. For something different, try provolone, fontina, or even a sprinkle of goat cheese for tangy contrast.

    Can I use homemade flatbread instead of store-bought?

    Definitely! Homemade flatbread adds a wonderful rustic touch. Just ensure it’s not too thin or it may become overly crisp. Par-bake homemade dough for about 5 minutes before adding toppings.

    How can I make these flatbreads gluten-free?

    Use gluten-free flatbreads or naan as your base. Many grocery stores now carry excellent options. Ensure your pesto is gluten-free (most are naturally) and double-check any pre-seasoned chicken ingredients.

    What’s the best way to reheat leftover pesto chicken flatbreads?

    Reheat in a 350°F oven for 5-7 minutes until warmed through. Avoid microwaving as it makes the flatbread soggy. A quick toast in a skillet over medium heat also works wonderfully.

    Final Thoughts

    These Pesto Chicken Flatbreads have rescued countless dinners in my home, transforming ordinary evenings into something special with minimal effort. There’s a certain magic in creating something so satisfying from such simple ingredients. I love how versatile they are—elegant enough for entertaining yet simple enough for a Tuesday night dinner. The bright herbaceous notes of the pesto, the savory chicken, and that irresistible melted cheese create a combination that never fails to bring smiles to the table. For more delicious inspiration, check out my Pinterest board where I’m always adding new flatbread variations and complementary recipes.
  • Juicy Chicken Shawarma Wraps That’ll Blow Your Taste Buds Away!

    Juicy Chicken Shawarma Wraps That’ll Blow Your Taste Buds Away!

    Juicy Chicken Shawarma Wraps That'll Blow Your Taste Buds Away!

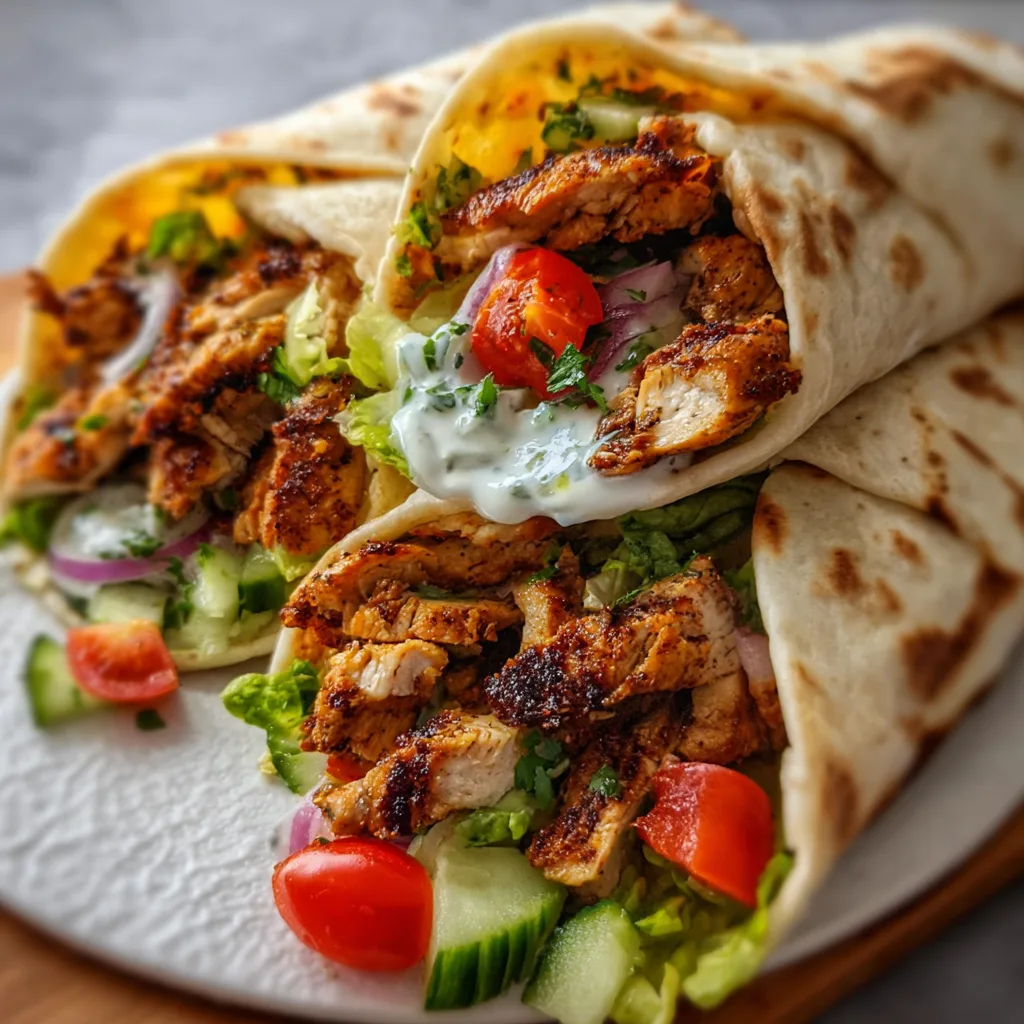
    Juicy Chicken Shawarma Wraps are my absolute weeknight dinner hero! There’s something magical about that tender, spice-infused chicken nestled in warm flatbread with creamy sauce dripping down your fingers. I discovered this recipe after a particularly chaotic Monday when takeout wasn’t an option, and now it’s on permanent rotation in our house. The aromatic blend of spices fills my kitchen with the most incredible scent that makes everyone drift in asking, “What smells so good?” Trust me, these homemade wraps deliver all the flavor of your favorite Mediterranean spot but with the satisfaction of making it yourself!

    Recipe

    Why You’ll Love This Juicy Chicken Shawarma Wraps

    Perfect Balance of Flavors and Textures

    The magic of these Juicy Chicken Shawarma Wraps lies in their perfect harmony of flavors. Tender chicken thighs marinated in a blend of warm spices like cumin, coriander, and smoked paprika create a depth that store-bought seasoning just can’t match. What I adore most is how the yogurt in the marinade works double-duty—tenderizing the meat while creating those irresistible charred edges when cooked. The contrast between the warm, spiced meat and the cool, tangy sauce creates a sensory experience that makes your taste buds dance with every bite!

    Quick and Customizable for Any Diet

    These wraps are incredibly versatile and can be adapted to fit practically any dietary preference. Need gluten-free? Swap the pita for lettuce wraps or gluten-free tortillas. Watching carbs? Serve the shawarma over a bed of crisp greens instead. The chicken itself takes just 25 minutes of actual hands-on time, with most of the magic happening during the marination. I’ve made these for picky eaters, health-conscious friends, and even my mother-in-law (the ultimate test!)—and they’re always a hit. The recipe scales beautifully for meal prep too!

    Essential Tips & Tricks

    Mastering the Marinade

    The key secret to truly juicy chicken shawarma is giving it proper marinating time. While you can get away with 30 minutes when you’re in a rush, letting those thighs bathe in the spice mixture overnight transforms them completely. I learned this the hard way after making a last-minute batch that was good but not great. The yogurt tenderizes the meat while the lemon juice adds brightness. For maximum flavor penetration, make small slits in larger chicken pieces before marinating. And don’t toss that marinade—strain it and reduce it down for an incredible drizzling sauce!

    Perfect Cooking Technique

    Finding the right cooking method makes all the difference between dry chicken and succulent, juicy shawarma. I prefer high-heat cooking to get those beautiful charred edges while keeping the inside tender. Whether you’re using a cast-iron skillet, grill pan, or outdoor grill, resist the urge to constantly flip the chicken—let it develop that beautiful crust. For the ultimate texture, try the sheet pan technique where you broil the marinated chicken for the final 2-3 minutes. This creates those authentic crispy edges that mimic traditional vertical rotisserie cooking!

    Serving Ideas & Creative Variations

    Building the Ultimate Shawarma Wrap

    The assembly process is where you can really make these wraps shine. Start by warming your flatbread—this step is non-negotiable! Cold pita with hot chicken is a missed opportunity. Layer a schmear of garlicky yogurt sauce first (this creates a moisture barrier), then add your shawarma chicken, followed by crisp vegetables for contrast. I love thinly sliced red onion soaked in ice water for 5 minutes to remove the bite, along with cucumber, tomatoes, and fresh herbs. For an extra touch, add pickled elements like turnips or banana peppers for brightness that cuts through the richness.

    Global Fusion Inspirations

    Don’t be afraid to take your shawarma in unexpected flavor directions! My favorite twist combines traditional shawarma with Mexican-inspired elements like avocado, lime crema, and pickled jalapeños. For a Greek variation, add feta, olives, and tzatziki. Asian-fusion shawarma works surprisingly well with sriracha mayo, pickled carrots, and cilantro. The beauty of these wraps is their adaptability—the spiced chicken provides a fantastic foundation for creative experimentation. I’ve even served the chicken over rice bowls with roasted vegetables for a heartier dinner option!

    Storage & Troubleshooting Guide

    Make-Ahead and Meal Prep Strategies

    These shawarma wraps are meal prep champions when properly stored. The marinated chicken (uncooked) keeps beautifully for up to 2 days in the refrigerator, actually improving in flavor. For cooked chicken, store in an airtight container for 3-4 days, but keep it separate from your fresh toppings and sauces. To reheat without drying out, sprinkle with a few drops of water before microwaving covered, or better yet, quickly sear in a hot pan to revive the exterior crispness. For the ultimate convenience, pre-portion your toppings in containers so you can assemble fresh wraps in minutes!

    Fixing Common Shawarma Mishaps

    Even the most experienced cooks encounter shawarma challenges occasionally. If your chicken turns out dry, it’s likely from overcooking—chicken thighs are forgiving but not invincible! Next time, use a meat thermometer and remove from heat at 165°F (74°C). For bland results, your marinade might need more time to penetrate or simply more seasoning—don’t be shy with those spices! Soggy wraps happen when hot chicken steams the bread; let the meat rest briefly before assembly and consider a thin layer of hummus as a moisture barrier. Lastly, if your wraps fall apart, double-wrap them in parchment paper for structural support!

    Frequently Asked Questions

    Can I make Juicy Chicken Shawarma Wraps with chicken breast instead of thighs?

    Yes! While thighs stay juicier, breasts work well if you don’t overcook them. Marinate longer (at least 3 hours), cook to just 165°F, and let rest before slicing against the grain for tenderness.

    What’s the best way to warm flatbread for shawarma?

    For perfect flatbread, lightly sprinkle with water and warm in a dry skillet for 30 seconds per side. Alternatively, wrap in foil and heat in a 300°F oven for 5 minutes until soft and pliable.

    Can I freeze the marinated chicken for later?

    Absolutely! Freeze marinated chicken for up to 3 months in freezer-safe bags. The marinade continues to tenderize slowly while frozen, and it makes for an incredibly quick dinner option.

    How can I make these wraps spicier?

    Add cayenne pepper or red pepper flakes to the marinade. For customizable heat, serve with harissa paste or hot sauce on the side so everyone can adjust to their preference.

    What sides pair well with Juicy Chicken Shawarma Wraps?

    Traditional accompaniments include tabbouleh, hummus, or a simple Greek salad. For a heartier meal, try roasted vegetables, lemon rice, or crispy chickpeas for added texture.

    Final Thoughts

    These Juicy Chicken Shawarma Wraps have become my go-to recipe when I want to impress without stressing. There’s something deeply satisfying about creating such bold, complex flavors with relatively simple ingredients. The way the spices bloom and the chicken caramelizes creates a meal that feels special, even on an ordinary Tuesday. I hope you’ll give these shawarma wraps a try and make them your own with whatever ingredients speak to you. Don’t forget to share your creations on Pinterest – I’d love to see your personal spin on this versatile favorite!

  • Crispy Chicken Parmesan Zucchini Boats: Irresistibly Delicious & Easy!

    Crispy Chicken Parmesan Zucchini Boats: Irresistibly Delicious & Easy!

    Crispy Chicken Parmesan Zucchini Boats: Irresistibly Delicious & Easy!

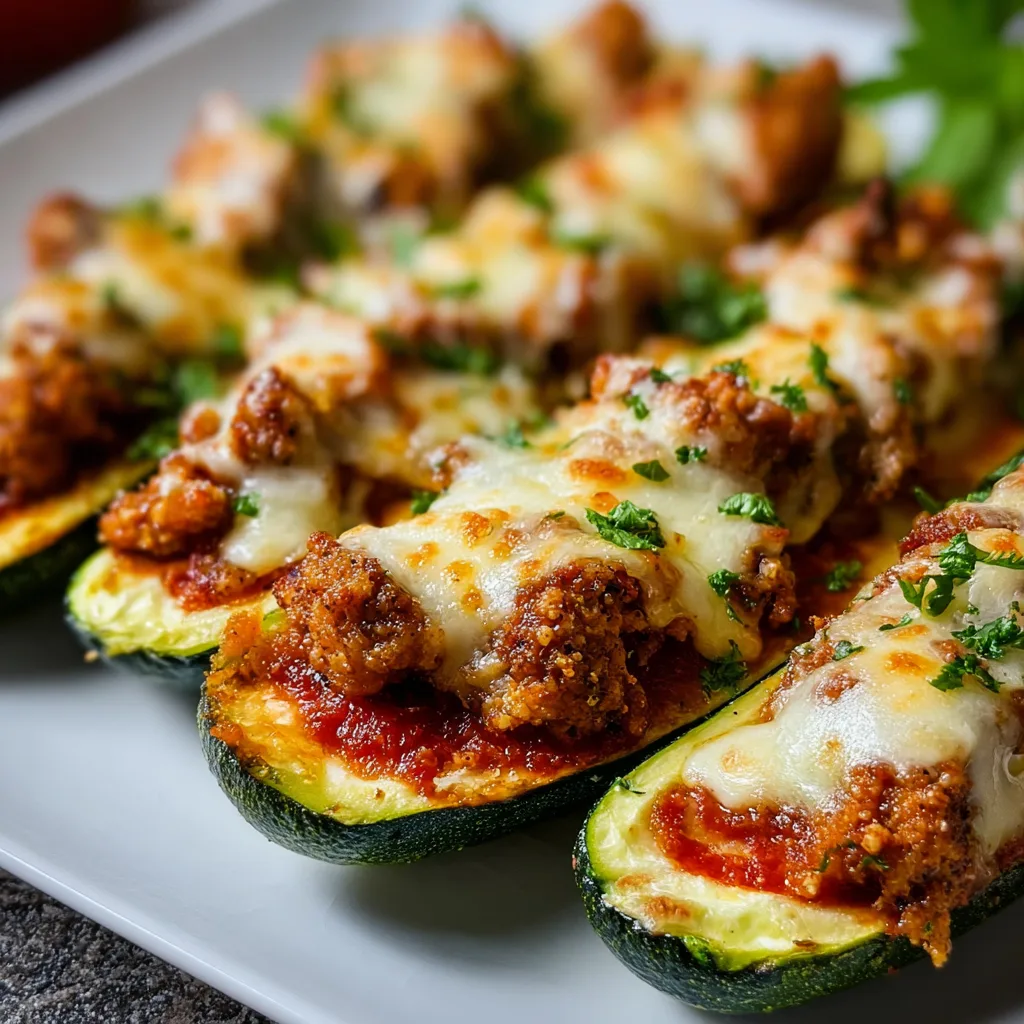
    Crispy Chicken Parmesan Zucchini Boats are the ultimate comfort food makeover that brings together two beloved classics in one irresistible dish. I’ve been obsessed with these little vessels of flavor ever since my sister-in-law brought them to our summer potluck last year. The tender zucchini cradles a perfect blend of crispy chicken, melted cheese, and robust marinara that satisfies without weighing you down. Perfect for those nights when you’re craving something indulgent but still want to sneak in some veggies. Trust me, these boats will sail straight into your regular dinner rotation!

    Recipe

    Why You’ll Love This Crispy Chicken Parmesan Zucchini Boats

    A Perfect Balance of Healthy and Indulgent

    There’s something magical about that first bite when the golden-brown breadcrumb topping gives way to juicy chicken and tender zucchini. I love how these boats deliver all the flavors of traditional chicken parm without the heaviness. The zucchini adds a subtle sweetness that perfectly complements the savory chicken and tangy marinara. Plus, you’re getting a generous serving of vegetables while still enjoying what feels like an indulgent meal. It’s that rare dish where healthy eating doesn’t feel like a compromise—my husband even requests these over traditional pasta dishes now!

    Quick Weeknight Wonder

    These zucchini boats have saved my weeknight dinner plans more times than I can count. The prep takes just 15 minutes, and while they bake, you can toss together a simple salad or set the table. I often use rotisserie chicken to make the process even faster. The versatility is another bonus—you can prep them ahead and just pop them in the oven when you’re ready. When life gets hectic (like when I’m also making Cinnamon Swirl Cookies for my daughter’s bake sale), having this reliable, crowd-pleasing recipe in my back pocket is a true sanity-saver.

    Essential Tips & Tricks

    Perfect Zucchini Prep

    Choosing the right zucchini makes all the difference in this recipe. Look for medium-sized ones that are firm and unblemished—about 7-8 inches long is ideal. Too small and they won’t hold enough filling; too large and they can be watery and bitter. When hollowing them out, leave about ¼-inch thickness around the edges to maintain structural integrity. I learned this the hard way after my first attempt collapsed mid-bake! Pat the hollowed boats dry with paper towels before filling to prevent soggy results. This simple step ensures that crispy, perfect texture we’re all craving.

    Achieving That Perfect Crispy Topping

    The secret to truly crispy chicken parmesan zucchini boats lies in the breading and baking technique. Mix your panko breadcrumbs with a touch of olive oil before sprinkling on top—this helps them brown beautifully without drying out. For extra flavor, add a tablespoon of grated parmesan to the breadcrumb mixture. Position your oven rack in the upper third of the oven and finish with a quick broil (just 1-2 minutes!) to get that restaurant-quality golden crust. Watch carefully though—I once got distracted by a phone call and ended up with charcoal instead of crunch! For more delicious crispy recipes, check out these Honey Garlic Butter Roasted Carrots.

    Serving Ideas & Creative Variations

    Perfect Pairings

    These Crispy Chicken Parmesan Zucchini Boats are a meal in themselves, but the right sides can elevate the experience even further. I love serving them with a simple arugula salad dressed with lemon and olive oil—the peppery greens and bright acidity cut through the richness perfectly. For heartier appetites, a side of garlic bread or cauliflower rice works beautifully. When entertaining, I arrange the boats on a large platter with fresh basil scattered on top and lemon wedges around the edges. The presentation always gets “oohs” and “aahs” from my guests before they’ve even taken a bite!

    Exciting Flavor Twists

    Don’t be afraid to put your own spin on these versatile boats! Swap the chicken for turkey meatballs or crumbled Italian sausage for a different protein experience. For a Mediterranean twist, use feta instead of mozzarella and add olives and roasted red peppers to the filling. My vegetarian friends love when I make these with seasoned chickpeas or lentils instead of chicken. You can even go Mexican-inspired with taco-seasoned chicken, pepper jack cheese, and salsa instead of marinara. For more creative meal ideas that transform classics, check out Mexican Corn Chicken Soup for another family favorite.

    Storage & Troubleshooting Guide

    Make-Ahead and Storage Solutions

    These zucchini boats are perfect for meal prep and actually taste amazing as leftovers. You can prepare the entire dish up to 24 hours ahead and refrigerate unbaked until you’re ready to cook. For longer storage, freeze the assembled boats (before baking) on a baking sheet until solid, then transfer to an airtight container. They’ll keep for up to 3 months! When reheating leftovers, cover with foil for the first 10 minutes to prevent over-browning, then uncover for the last 5 minutes to recrisp the top. I often make a double batch on Sunday for easy lunches throughout the week.

    Troubleshooting Common Issues

    If your zucchini boats turn out watery, there are a few easy fixes for next time. First, make sure to thoroughly scoop out the seedy middle portion, as that’s where most moisture hides. After hollowing, sprinkle the inside with a little salt and let sit for 10 minutes—this draws out excess moisture. Pat dry before filling. If your breadcrumbs aren’t crisping up, make sure your oven is fully preheated and consider placing the baking dish on the upper rack. For filling that keeps falling out, create a deeper channel in your zucchini while still maintaining sturdy walls, and pack the filling in more firmly.

    Frequently Asked Questions

    Can I use yellow squash instead of zucchini for these Crispy Chicken Parmesan Zucchini Boats?

    Absolutely! Yellow squash works beautifully as a substitute. The cooking time and technique remain the same, though yellow squash can sometimes be slightly sweeter than zucchini.

    How do I prevent my zucchini boats from becoming soggy?

    Salt the hollowed zucchini boats and let them sit for 10 minutes before patting dry. Pre-baking the empty boats for 5 minutes before adding filling also helps remove excess moisture.

    Can I make these vegetarian?

    Yes! Replace chicken with plant-based protein like chickpeas, lentils, or crumbled tofu. Season well with Italian herbs and add extra veggies like mushrooms for depth of flavor.

    What’s the best cheese to use for maximum meltiness?

    Fresh mozzarella provides the best melt and stretch. For extra flavor, use a combination of mozzarella, provolone, and freshly grated parmesan on top.

    How can I tell when my Crispy Chicken Parmesan Zucchini Boats are done?

    They’re ready when the zucchini is tender (but not mushy) when pierced with a fork, the filling is heated through, and the breadcrumb topping is golden brown.

    Final Thoughts

    These Crispy Chicken Parmesan Zucchini Boats have become my go-to recipe when I want to impress without spending hours in the kitchen. They bring together the comforting flavors we all crave with a lighter, veggie-forward approach that feels good to serve. Whether you’re cooking for picky eaters, health-conscious friends, or just treating yourself to something special, these boats deliver every time. Don’t forget to check out more delicious recipes on Pinterest for endless inspiration. Here’s to meals that make us feel like culinary stars without the celebrity chef effort!

  • Cheesy Garlic Bread Recipe That’ll Melt Your Heart Instantly!

    Cheesy Garlic Bread Recipe That’ll Melt Your Heart Instantly!

    Cheesy Garlic Bread Recipe That’ll Melt Your Heart Instantly!

    Cheesy Garlic Bread has been my weekend obsession lately, and I can’t wait to share this recipe with you! There’s something magical about pulling apart a loaf of warm, garlicky bread with strings of melted cheese stretching between each piece. The aroma alone is enough to draw my family to the kitchen before I can even call them for dinner. This homemade version beats anything you’ll find at restaurants, with its perfect balance of buttery garlic flavor and gooey cheese. Ready in just 20 minutes, it’s the ultimate comfort food side dish that disappears faster than I can make it!

    Recipe

    Why You’ll Love This Cheesy Garlic Bread

    Perfect Texture Every Time

    The secret to exceptional garlic bread lies in the contrast between textures. The outside gets deliciously crispy while the inside remains soft and pillowy. I brush the bread with garlic butter first, then add cheese for the last few minutes of baking. This prevents the cheese from burning while ensuring the bread gets that perfect crunch. My daughter once declared this “better than birthday cake,” which might be the highest compliment a 7-year-old can give! The butter seeps into every nook, creating pockets of garlicky goodness that make each bite absolutely irresistible.

    Simple Ingredients, Maximum Flavor

    You’ll need just a handful of pantry staples to create this crowd-pleaser: a good French or Italian loaf, butter, fresh garlic (please don’t use the pre-minced stuff!), Italian herbs, and quality cheese. I prefer a mix of mozzarella for that perfect melt and sharp cheddar for flavor depth. What makes this recipe special is how these humble ingredients transform into something extraordinary. I’ve made this for last-minute gatherings when I had nothing else planned, and it’s always the first thing to disappear from the table. The fresh garlic makes all the difference!

    Essential Tips & Tricks

    The Butter Mixture Magic

    Creating the perfect garlic butter is where the magic begins. I soften (not melt) the butter so it spreads easily without soaking the bread. Then I fold in freshly minced garlic, dried Italian herbs, and a pinch of salt. For an extra flavor boost, add a tablespoon of grated Parmesan directly to this mixture. Let this sit for 5 minutes before spreading to allow the garlic to infuse the butter. This small step makes a massive difference! I learned this trick from my Italian neighbor who insisted proper garlic bread needs “time to become friends with the butter.”

    Baking Technique Matters

    Don’t rush the baking process! Start by baking the buttered bread open-faced at 375°F for about 8 minutes until it’s just starting to turn golden. Then add your cheese and bake for another 3-5 minutes until melted and bubbly. For an extra-special finish, switch to the broiler for the final minute, watching carefully to get that perfect golden-brown top without burning. The two-stage baking ensures your bread gets crispy edges while the cheese melts perfectly without becoming tough or rubbery.

    Serving Ideas & Creative Variations

    Perfect Pairing Suggestions

    Cheesy Garlic Bread elevates nearly any meal from ordinary to memorable. It’s the ideal companion for pasta dishes like spaghetti or lasagna, where you can use it to soak up rich sauces. It also transforms a simple soup night into something special—try it alongside creamy tomato garlic pasta for a match made in heaven. For casual gatherings, I slice it into thin strips and serve with marinara dipping sauce. My family’s favorite way to enjoy it is alongside a big Caesar salad for a simple yet satisfying weeknight dinner.

    Exciting Flavor Twists

    While classic cheesy garlic bread is perfection, don’t be afraid to experiment! Add a layer of pesto under the cheese for an herbaceous twist, or sprinkle with crushed red pepper flakes for a spicy kick. For a loaded version, top with crispy bacon bits and sliced green onions after baking. My personal favorite variation includes thin slices of fresh tomato and basil leaves added just before the cheese goes on. For a fun party option, make mini versions using baguette slices topped individually—they disappear in seconds when I serve them at gatherings!

    Storage & Troubleshooting Guide

    Keeping It Fresh

    Though it’s best enjoyed immediately, you can store leftover cheesy garlic bread properly to maintain its deliciousness. Let it cool completely, then wrap in aluminum foil and refrigerate for up to 3 days. To reheat, place the wrapped bread in a 350°F oven for 5-7 minutes until warmed through. For freezing, slice the bread first, then freeze in a single layer before transferring to a freezer bag. This method allows you to grab individual pieces to reheat as needed. Avoid microwaving if possible—it makes the bread soggy rather than restoring that wonderful crispy texture.

    Solving Common Problems

    If your garlic bread turns out soggy, you likely used too much butter or didn’t bake it long enough before adding cheese. The fix: use a lighter butter coating and ensure the first bake properly crisps the bread. For burnt garlic taste (garlic’s nemesis!), remember that garlic burns easily. Mix it thoroughly into the butter rather than leaving pieces exposed on top. If your cheese isn’t stretchy enough, try using freshly grated cheese instead of pre-shredded, which contains anti-caking agents that affect melting. Fresh mozzarella should be patted dry first to prevent excess moisture from making the bread soggy.

    Frequently Asked Questions

    What’s the best bread for Cheesy Garlic Bread?

    Italian or French bread works best with their sturdy crusts and soft interiors. Sourdough adds a tangy flavor dimension, while ciabatta offers more nooks for the butter to settle into. Avoid very soft bread varieties as they’ll become soggy.

    Can I make Cheesy Garlic Bread ahead of time?

    Yes! Prepare the garlic butter mixture and slice the bread up to 24 hours ahead. Store separately in the refrigerator, then assemble and bake when needed for that fresh-from-the-oven experience.

    How do I know when my Cheesy Garlic Bread is done?

    Perfect cheesy garlic bread has golden-brown edges, melted cheese with some browned spots, and feels crisp on the outside while remaining soft inside. The aroma will be irresistible!

    Can I use margarine instead of butter?

    While butter provides the best flavor, margarine works in a pinch. For a dairy-free version, use olive oil mixed with garlic and herbs, though the texture and flavor profile will differ slightly.

    What cheese combinations work best for Cheesy Garlic Bread?

    A combination of mozzarella for stretch and another flavorful cheese like sharp cheddar, Gruyère, or Parmesan creates the perfect balance. Avoid very soft cheeses that release too much moisture.

    Final Thoughts

    This Cheesy Garlic Bread recipe has become my go-to for transforming ordinary meals into special occasions. There’s something deeply satisfying about serving something so simple yet so beloved by everyone at the table. The contrast between the crispy exterior and soft interior, the punch of garlic, and that perfect cheese pull creates an irresistible combination that never disappoints. Whether you’re hosting a dinner party or just craving comfort food, this recipe delivers every time. Don’t forget to check out more of my favorite bread recipes on Pinterest for endless inspiration!

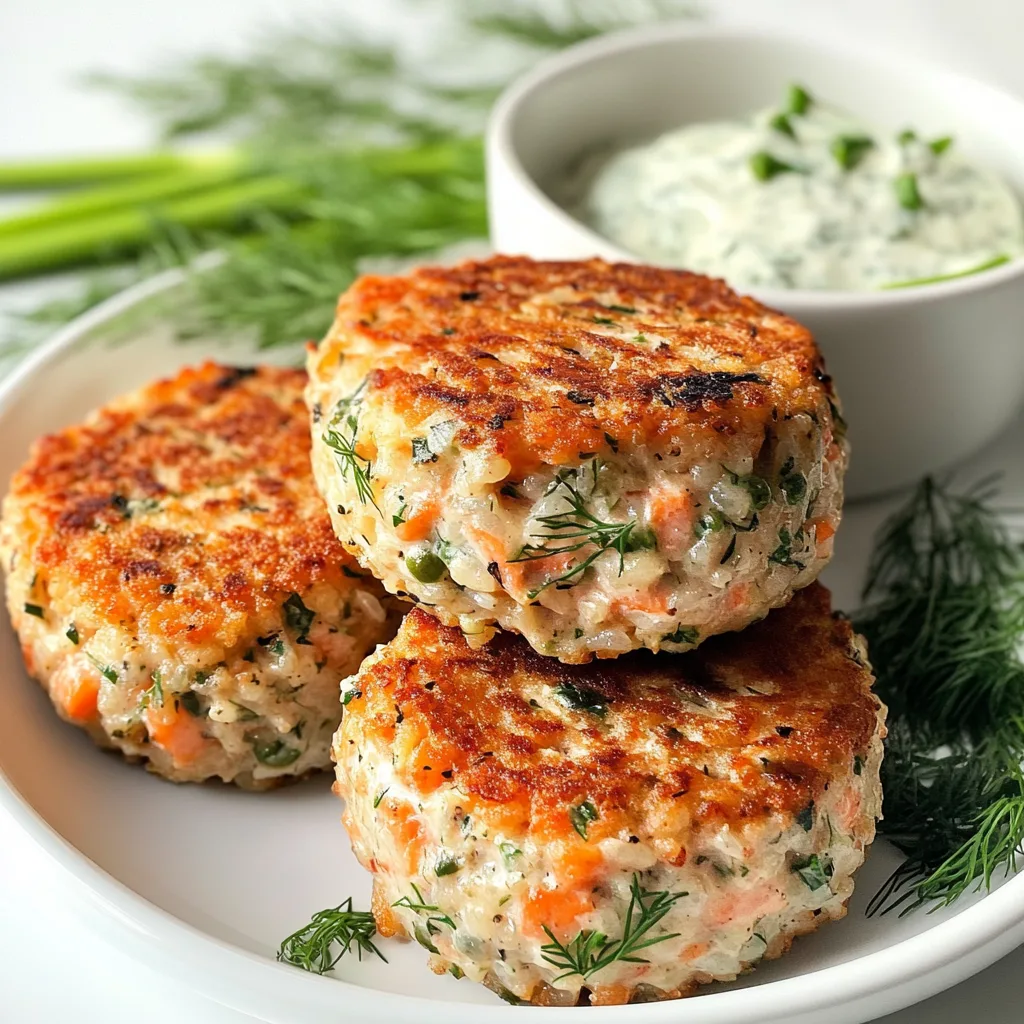
  • Sheet Pan Salmon Rice Cakes with Dill Aioli – Irresistibly Easy & Delicious!

    Sheet Pan Salmon Rice Cakes with Dill Aioli – Irresistibly Easy & Delicious!

    Sheet Pan Salmon Rice Cakes with Dill Aioli – Irresistibly Easy & Delicious!

    Sheet Pan Salmon Rice Cakes with Dill Aioli transform leftover rice and salmon into something magical that feels entirely new. The first time I made these for my family, my husband couldn’t believe they came from yesterday’s dinner! There’s something incredibly satisfying about the crispy exterior giving way to a tender, flavorful center. Paired with a creamy dill aioli that adds just the right amount of brightness, these rice cakes have become my go-to solution for reimagining leftovers into something everyone at the table eagerly devours.

    Recipe

    Why You’ll Love This Sheet Pan Salmon Rice Cakes with Dill Aioli

    Perfect Balance of Flavors and Textures

    These salmon rice cakes deliver the perfect balance of crispy edges and tender centers. The natural oils from the salmon keep everything moist while lending a delicate seafood flavor that isn’t overwhelming. I love how the lemon zest brightens everything up, while the herbs add freshness. The beauty is in the contrast – that satisfying crunch giving way to a soft interior. And the dill aioli? It’s the creamy, tangy complement that ties everything together, making each bite a perfect harmony of textures and flavors.

    Weeknight-Friendly and Versatile

    On those evenings when I’m staring at containers of leftover rice and salmon, these rice cakes are my saving grace. They come together in about 30 minutes, and the sheet pan method means I’m not standing over a skillet flipping each cake individually. While they’re baking, I can toss together a simple salad or prep some roasted vegetables. They’re equally perfect for a quick family dinner or dressed up with microgreens and extra sauce for casual entertaining. The recipe scales easily for hungry teenagers or intimate dinners.

    Essential Tips & Tricks

    Getting the Perfect Binding

    The key to salmon rice cakes that hold together beautifully is all about proper binding. Cold leftover rice works significantly better than freshly made rice because it’s less sticky and moist. I always make sure to thoroughly drain my canned salmon or pat dry any leftover cooked salmon. If your mixture feels too wet, add a tablespoon of panko at a time until it reaches a consistency where you can form patties that hold their shape. Too dry? A little extra mayo or even a splash of lemon juice can help without compromising flavor.

    Sheet Pan Success Strategies

    For the crispiest exterior, preheat your sheet pan in the oven before adding the rice cakes. This creates that immediate sear that locks in moisture and creates golden edges. Always line your pan with parchment and give the cakes a light spray of oil before baking. For even browning, rotate the pan halfway through cooking time. If you want extra crispiness, switch to broil for the final 1-2 minutes, but don’t walk away – they can go from perfectly golden to burnt in seconds!

    Serving Ideas & Creative Variations

    Complementary Side Dishes

    These salmon rice cakes pair beautifully with light, fresh sides that don’t compete with their flavor. My family’s favorite combination is a simple arugula salad with lemon vinaigrette and thinly sliced radishes for peppery crunch. For a heartier meal, roasted asparagus or crispy Brussels sprouts provide wonderful textural contrast. In summer, I serve them alongside sliced heirloom tomatoes with just a sprinkle of flaky salt. For a restaurant-worthy presentation, place the cakes on a smear of the dill aioli rather than dolloping it on top.

    Flavor Variations to Try

    While the classic version is delicious, don’t be afraid to play with flavors! For an Asian-inspired twist, swap the dill for cilantro, add grated ginger and a splash of soy sauce to the mixture, and serve with sriracha mayo instead of dill aioli. Mediterranean lovers can add chopped olives, feta, and sun-dried tomatoes to the base mixture. For a spicy kick, incorporate diced jalapeños and substitute the dill aioli with a chipotle cream sauce. You can even use canned tuna or leftover shredded chicken if salmon isn’t available.

    Storage & Troubleshooting Guide

    Make-Ahead and Storage Solutions

    These salmon rice cakes are perfect for meal prep! You can form the patties up to 24 hours ahead and refrigerate them, covered tightly, until ready to bake. Already baked cakes will keep in the refrigerator for 3-4 days in an airtight container. To reheat, avoid the microwave which makes them soggy – instead, place them on a baking sheet in a 350°F oven for 8-10 minutes until heated through. The dill aioli can be made up to 5 days ahead and actually improves in flavor after the first day.

    Common Issues and Quick Fixes

    If your salmon rice cakes are falling apart, the mixture may be too wet. Add more breadcrumbs one tablespoon at a time until the mixture holds together. Conversely, if they’re too dry and crumbly, add a little more mayonnaise or an extra egg. For cakes that aren’t browning properly, your oven temperature might be too low – use an oven thermometer to check accuracy. If the exterior is browning too quickly while the inside remains cold, lower the temperature and cover loosely with foil. Always let the mixture rest for 10 minutes before forming patties for better cohesion.

    Frequently Asked Questions

    Can I use fresh salmon instead of leftover cooked salmon?

    Yes! Cook and cool about 12 ounces of salmon first, then flake it. Remove any skin and bones before mixing with other ingredients.

    Are Sheet Pan Salmon Rice Cakes gluten-free?

    They can be! Simply substitute regular panko with gluten-free panko breadcrumbs and check that your mayonnaise is gluten-free.

    Can I freeze these salmon rice cakes?

    Absolutely. Freeze them after baking and cooling completely. Separate layers with parchment paper and reheat from frozen at 375°F for 15-20 minutes.

    What’s the best rice to use for salmon rice cakes?

    Medium or short-grain rice works best as it’s stickier. Long-grain rice can work but may require an extra egg for binding.

    How can I make the dill aioli lighter?

    Substitute half the mayonnaise with Greek yogurt for a lighter, tangier dill aioli that still complements the Sheet Pan Salmon Rice Cakes beautifully.

    Final Thoughts

    Sheet Pan Salmon Rice Cakes with Dill Aioli have transformed the way I approach leftovers in my kitchen. They’re the perfect example of how yesterday’s meal can become today’s star with just a little creativity and the right technique. The sheet pan method makes this recipe accessible even on busy weeknights, while the results feel special enough for company. I hope these crispy, flavorful cakes find a regular spot in your meal rotation too! For more seafood inspiration, check out my other recipes on Pinterest.

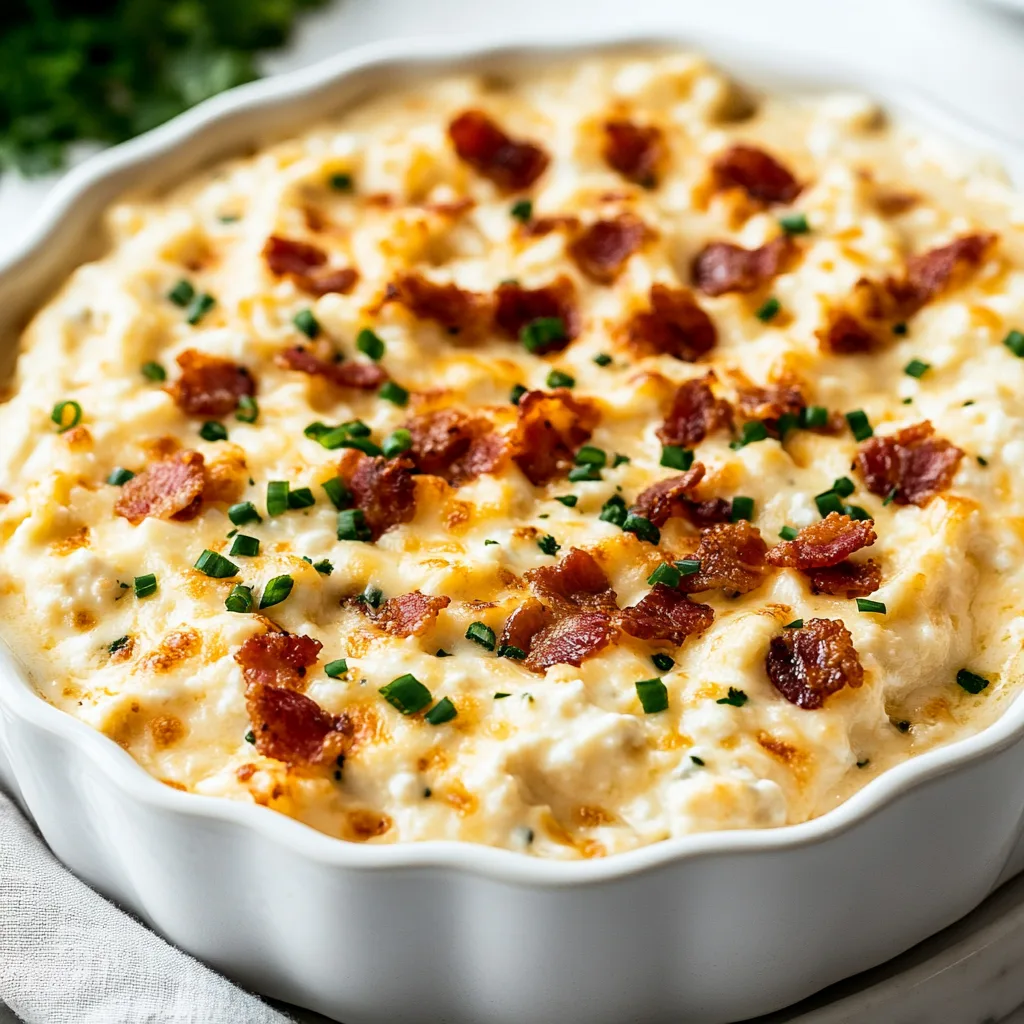
  • Crockpot Warm Cottage Cheese Dip: Hot, Creamy, Bacon Bliss!

    Crockpot Warm Cottage Cheese Dip: Hot, Creamy, Bacon Bliss!

    Crockpot Warm Cottage Cheese Dip: Hot, Creamy, Bacon Bliss!

    Crockpot Warm Cottage Cheese Dip with hot, creamy bacon goodness is the ultimate comfort appetizer that’ll have everyone hovering around your slow cooker. I discovered this recipe during a snowy game night when I needed something effortless yet impressive. The way the cheese melts into this velvety, savory blend while your kitchen fills with the irresistible aroma of bacon is pure magic. Perfect for gatherings or quiet evenings at home, this crowd-pleasing dip transforms humble cottage cheese into something extraordinarily crave-worthy. Trust me, you’ll want to bookmark this one.

    Recipe

    Why You’ll Love This Crockpot Warm Cottage Cheese Dip (Hot, Creamy, Bacon)

    Effortless Preparation with Maximum Flavor

    The beauty of this dip lies in its simplicity—just layer ingredients, set your crockpot, and walk away! The slow cooking process transforms ordinary cottage cheese into a creamy dream while infusing it with smoky bacon flavors. I love how the texture changes completely, becoming velvety smooth as it heats. The contrast between the tangy cheese base and savory bacon creates this perfect balance that keeps everyone coming back for more. Plus, your hands stay free for other party prep while your crockpot does the heavy lifting!

    Customizable for Any Occasion

    Whether you’re hosting a casual game day gathering or an elegant holiday party, this dip easily adapts to suit the mood. For everyday snacking, keep it classic with bacon and cheddar. For something more sophisticated, add caramelized onions and fresh herbs. I’ve served this at everything from backyard BBQs to Christmas Eve appetizer spreads, and it’s always the first dish emptied. The versatility extends to dietary preferences too—swap in turkey bacon or add extra veggies to lighten things up without sacrificing that indulgent feel.

    Essential Tips & Tricks

    Achieving the Perfect Texture

    The secret to this dip’s luxurious consistency is all in the technique. Start with full-fat cottage cheese for the creamiest results—trust me, this isn’t the place to cut calories! Stir gently halfway through cooking to ensure even melting. If your dip seems too thick, add a splash of milk or cream to reach your desired consistency. For extra smoothness, I sometimes pulse half the cottage cheese in a blender before adding it to the crockpot. This creates that silky-smooth texture that makes dips like this one absolutely irresistible.

    Ingredient Selection Matters

    Quality ingredients make all the difference in this simple recipe. Choose thick-cut bacon for heartier texture and more robust flavor—the extra fat renders beautifully into the dip. For cheese, a combination of sharp cheddar and something meltable like Monterey Jack creates the perfect balance. Fresh garlic always trumps powder here, and a dash of hot sauce adds complexity without overwhelming heat. I learned this the hard way after once using pre-shredded cheese (with anti-caking agents) that left my dip slightly grainy. Freshly grated is absolutely worth the extra minute!

    Serving Ideas & Creative Variations

    Perfect Pairings for Every Palate

    This versatile dip partners beautifully with nearly anything crunchy or dippable. Serve with toasted baguette slices, sturdy crackers, or fresh veggies for a textural contrast that highlights the dip’s creaminess. For a low-carb option, bell pepper wedges and cucumber rounds work wonderfully. My personal favorite pairing is with pretzel bites—the salty crunch against the creamy, bacon-studded dip creates an absolutely addictive combination that disappears in minutes at parties. Garnish with fresh chives or green onions for a pop of color and freshness.

    Exciting Flavor Variations

    While the classic version is incredible, don’t be afraid to experiment! Try adding roasted garlic for a deeper, sweeter flavor profile, or stir in chopped jalapeños for heat lovers. A Southwest version with corn, black beans and taco seasoning is always a hit during football season. For an elevated twist, fold in lump crab meat and Old Bay seasoning during the last 30 minutes of cooking. I once added caramelized onions and thyme for Thanksgiving, and my brother-in-law (who claims to hate cottage cheese) ate nearly half the batch himself!

    Storage & Troubleshooting Guide

    Proper Storage for Leftovers

    If you’re lucky enough to have leftovers (which rarely happens in my house!), store them properly to maintain that creamy texture. Transfer cooled dip to an airtight container and refrigerate for up to 3 days. Avoid freezing as this will compromise the consistency. When reheating, do so gently—either in the microwave at 50% power in short intervals, stirring between each, or in a small saucepan over low heat. Add a splash of milk if needed to restore creaminess, as the dip will thicken considerably when chilled.

    Fixing Common Issues

    Even experienced cooks occasionally encounter challenges. If your dip separates or looks curdled, don’t panic! Lower the heat setting and whisk vigorously to re-emulsify. Adding a tablespoon of cream cheese can help bind ingredients back together. For dips that are too thick, gradually incorporate warm milk or cream. Too thin? Mix a teaspoon of cornstarch with cold water and stir in, then cook for another 15-20 minutes. If you accidentally oversalt (easy to do with bacon), balance it with a squeeze of lemon juice or a dollop of sour cream.

    Frequently Asked Questions

    Can I make this Crockpot Warm Cottage Cheese Dip ahead of time?

    Absolutely! Prepare all ingredients up to 24 hours ahead and store separately. Combine in your crockpot 2-3 hours before serving. The flavors actually develop beautifully with a little extra time.

    Is there a vegetarian version of this dip?

    Yes! Skip the bacon and add smoked paprika for that smoky flavor. Mix in extra herbs like thyme and rosemary, plus some sautéed mushrooms for umami depth.

    How do I prevent the cheese from burning?

    Cook on LOW setting only, never HIGH. Stir occasionally and add a splash of milk if it looks too thick. A programmable crockpot that switches to “warm” after cooking is ideal.

    Can I use low-fat cottage cheese instead?

    You can, but the texture won’t be as creamy. If using low-fat, add 2-3 tablespoons of cream cheese to compensate for the missing richness.

    What’s the best way to serve this at a buffet?

    Keep the dip in your crockpot on the “warm” setting. Arrange dippers in a semicircle around it, and provide small plates and cocktail napkins nearby.

    Final Thoughts

    This Crockpot Warm Cottage Cheese Dip (Hot, Creamy, Bacon) has become my signature party offering for good reason. It transforms humble ingredients into something truly special with minimal effort. The combination of melty cheese, savory bacon, and subtle seasonings creates that perfect comfort food magic that brings people together. I love watching guests’ expressions change from skepticism (cottage cheese in a hot dip?) to delight with their first bite. Don’t forget to check out more delicious recipes on Pinterest for your next gathering!

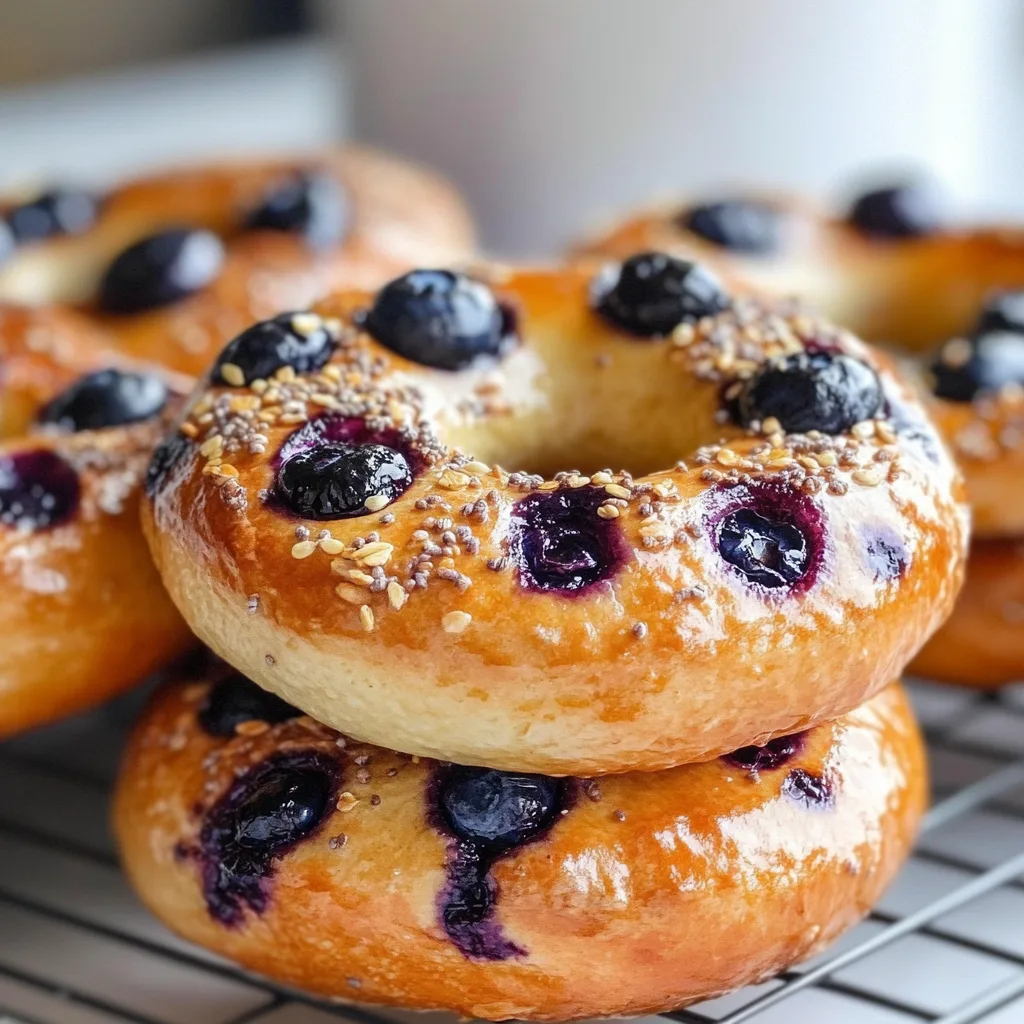
  • Gluten-Free High-Protein Blueberry Bagels You’ll Crave Today!

    Gluten-Free High-Protein Blueberry Bagels You’ll Crave Today!

    Gluten-Free High-Protein Blueberry Bagels You'll Crave Today!

    Gluten-free high-protein blueberry bagels have completely transformed my weekend breakfast routine. There’s something magical about biting into a warm, chewy bagel with sweet bursts of blueberry while knowing it’s actually supporting my health goals. When I first went gluten-free, I thought my bagel days were over until I discovered this recipe. These aren’t just any bagels – they’re packed with protein powder and almond flour, making them perfect for anyone looking to fuel their mornings without the gluten crash. Trust me, once you’ve tried these, store-bought alternatives will never quite measure up again.

    Recipe

    Why You’ll Love These Gluten-free High-Protein Blueberry Bagels

    Perfect Texture & Flavor Balance

    The biggest challenge with gluten-free baking is achieving that authentic chewy bagel texture, but these absolutely nail it! The combination of almond flour and protein powder creates a sturdy structure that holds up beautifully to toasting. I was genuinely shocked the first time I made these – they have that satisfying resistance when you bite in, followed by a tender interior that’s worlds away from the crumbly disappointment of most gluten-free breads. The blueberries add pockets of jammy sweetness that perfectly balance the slight tanginess from the yogurt in the dough. Your kitchen will smell like a bakery as they cook!

    Nutritional Powerhouse

    Unlike traditional bagels that can leave you feeling sluggish, these protein-packed beauties provide sustained energy throughout your morning. Each bagel contains approximately 15g of protein (depending on your protein powder), making them perfect for post-workout recovery or a satisfying breakfast. The almond flour adds healthy fats and fiber, while fresh blueberries contribute antioxidants and natural sweetness without excessive sugar. I love serving these to friends with dietary restrictions – they’re always amazed that something so delicious can also support their health goals. The best part? You’ll feel energized rather than weighed down after enjoying one.

    Essential Tips & Tricks

    Perfecting Your Dough

    The key to successful gluten-free bagels lies in the dough consistency. It should be tacky but not sticky – think playdough that slightly clings to your fingers but doesn’t leave residue. If your dough feels too wet, gradually add more protein powder, one tablespoon at a time. For the boiling step (what gives bagels their characteristic chewiness), make sure your water is at a rolling boil before adding the baking soda. I learned this the hard way when I once tried with just simmering water – the bagels fell apart! Allow each bagel exactly 45 seconds per side in the water for the perfect exterior, similar to how I make my lemon crinkle cookies with their perfect crackly top.

    Ingredient Selection Matters

    Not all protein powders perform equally in baking! I recommend using a whey-casein blend or a plant-based protein specifically formulated for baking. Pure whey can make the bagels too rubbery, while some plant proteins might make them too dry. For the blueberries, fresh is best, but if using frozen, don’t thaw them first – fold them in while still frozen to prevent purple streaking throughout your dough. The xanthan gum is non-negotiable here – it’s what replaces the gluten’s binding properties. I once skipped it thinking the protein would be enough, and ended up with bagels that crumbled at the slightest touch!

    Serving Ideas & Creative Variations

    Beyond Basic Toppings

    While cream cheese is the classic choice, these gluten-free high-protein blueberry bagels deserve some creative pairings! My absolute favorite combination is whipped ricotta with a drizzle of honey and a sprinkle of lemon zest – the creamy-tangy-sweet balance is heavenly with the blueberries. For a savory twist, try avocado with everything bagel seasoning, which creates a delightful contrast with the sweet blueberries. These bagels also make excellent sandwich bases – try almond butter with banana slices for a protein-packed lunch. For a special brunch, serve them alongside my deviled egg dip for a delicious contrast of flavors.

    Flavor Adaptations

    The beauty of this base recipe is how easily you can customize it! Replace blueberries with chocolate chips and add a teaspoon of cinnamon for a dessert-inspired version. For a zestier profile, fold in lemon zest along with the blueberries – the citrus brightens everything beautifully. Apple and cinnamon make a wonderful fall variation, while dried cranberries and orange zest create a holiday-worthy treat. You can also go savory by omitting the berries and adding herbs like rosemary and garlic powder. I’ve even made a “pizza bagel” version with sun-dried tomatoes and Italian herbs that was a huge hit at my last brunch gathering!

    Storage & Troubleshooting Guide

    Keeping Them Fresh

    These gluten-free high-protein blueberry bagels stay fresh at room temperature for up to 2 days when stored in an airtight container lined with paper towels (which absorb excess moisture). For longer storage, slice them before freezing – this allows you to toast individual pieces straight from frozen. Place parchment paper between slices to prevent sticking. When ready to enjoy, simply pop frozen slices directly into your toaster on a medium-high setting. I’ve found they actually maintain their texture better than many commercial gluten-free breads, which tend to crumble after freezing and reheating.

    Fixing Common Issues

    If your bagels spread too much during baking, the dough was likely too wet – next time, add a bit more protein powder or chill the shaped dough for 20 minutes before boiling. Bagels turning out too dense? You might be overworking the dough – mix just until combined, as gluten-free doughs don’t benefit from extended kneading like traditional bagels. If the blueberries keep bursting and making the dough too wet, try using dried blueberries instead of fresh, or freeze fresh berries before folding them in. For bagels that crack during baking, your oven might be too hot – try reducing the temperature by 25°F.

    Frequently Asked Questions

    Can I make these bagels without protein powder?

    Yes, you can substitute with additional almond flour, but you’ll lose some of the protein content and chewiness. Add an extra teaspoon of xanthan gum to maintain the structure.

    Why do my gluten-free high-protein blueberry bagels collapse after baking?

    This typically happens when there’s too much moisture. Make sure to pat blueberries completely dry before adding them, and consider reducing liquid ingredients by 1-2 tablespoons.

    Can I make these dairy-free?

    Absolutely! Use a plant-based protein powder and replace the Greek yogurt with coconut yogurt. The texture will be slightly different but still delicious.

    How long should I let the bagels cool before slicing?

    Allow at least 30 minutes cooling time. Gluten-free baked goods continue setting up as they cool, and slicing too early can make them gummy.

    Can I use a different flour instead of almond flour?

    Oat flour works well as a substitute, though the texture will be slightly different. Coconut flour is not recommended as it absorbs too much moisture.

    Final Thoughts

    These gluten-free high-protein blueberry bagels have become my weekend ritual – mixing the dough on Saturday morning while coffee brews, the satisfaction of shaping each ring, and that incredible aroma as they bake. There’s something deeply rewarding about creating something so delicious that also supports my health goals. Don’t be intimidated by the process; each batch gets better as you learn the feel of the dough. Share these with friends (gluten-free or not) and watch their surprise when they discover how amazing homemade protein bagels can be. For more inspiration, check out my other recipes on Pinterest.

  • Bacon Wrapped Tater Tot Bombs: Irresistibly Crispy Party Bites!

    Bacon Wrapped Tater Tot Bombs: Irresistibly Crispy Party Bites!

    Bacon Wrapped Tater Tot Bombs: Irresistibly Crispy Party Bites!

    Bacon Wrapped Tater Tot Bombs have completely transformed my appetizer game! These irresistible bite-sized morsels combine crispy tater tots, melty cheese, and savory bacon into what might be the most addictive party snack ever created. The first time I made these for my sister’s housewarming, they disappeared within minutes – I barely snagged one before the plate was empty! The combination of textures is pure magic: the crunchy exterior gives way to a fluffy potato center, all wrapped in that smoky, crispy bacon that makes everything better. If you’re looking for a crowd-pleaser that’s surprisingly simple to make, these Bacon Wrapped Tater Tot Bombs are absolutely unbeatable.

    Recipe

    Why You’ll Love This Bacon Wrapped Tater Tot Bombs

    Perfect Party Appetizer

    These little bombs of flavor are guaranteed crowd-pleasers at any gathering. The combination of familiar ingredients transformed into something special creates an irresistible pull that keeps everyone coming back for “just one more.” I love watching guests’ expressions when they take that first bite – eyes widening as the crispy bacon gives way to the soft potato and melty cheese center. They’re perfectly sized for cocktail parties, game days, or casual get-togethers, and they’re substantial enough that a few can actually satisfy hunger. Plus, they’re easy to eat standing up with just a toothpick, making them ideal for mingling situations where full plates aren’t practical.

    Simple Yet Impressive

    Despite their show-stopping appearance, these bacon-wrapped delights are surprisingly easy to prepare. The ingredient list is refreshingly short, focusing on quality rather than quantity. You’ll need frozen tater tots, bacon strips, cheese (I prefer sharp cheddar for maximum flavor), and a few seasonings. The assembly process is almost meditative – wrapping each cheese-topped tot in bacon creates a rhythm that I find strangely calming. Even kitchen novices can master these with minimal effort, yet the results look like something from a gourmet appetizer menu. The beauty lies in the transformation of humble ingredients into something that feels special and indulgent.

    Essential Tips & Tricks

    Perfect Bacon Selection

    Choosing the right bacon makes all the difference in this recipe. I recommend using regular-cut bacon rather than thick-cut, as it wraps more easily around the tots and crisps up perfectly in the oven. Look for bacon with a good fat-to-meat ratio – too lean and it won’t render that beautiful crispiness, too fatty and it might become greasy. At room temperature, bacon becomes more pliable and easier to wrap, so let it sit out for about 10 minutes before assembly. If you’re feeling adventurous, try a maple or peppered variety for an extra flavor dimension. Just be sure to secure each wrap with a toothpick to prevent unwrapping during baking, like in these Cheese-Filled Toasted Ravioli.

    Baking Technique Matters

    The secret to perfection lies in the baking method. Always preheat your oven thoroughly to ensure even cooking and maximum crispiness. Using a wire rack set over a baking sheet allows the bacon fat to drip away, preventing soggy bottoms and ensuring crispy bacon all around. For best results, flip the bombs halfway through cooking to achieve that golden-brown perfection on all sides. Watch them carefully during the final minutes – bacon can go from perfectly crisp to burnt surprisingly quickly. The internal temperature should reach 165°F, ensuring the cheese is melted to gooey perfection while the bacon achieves that ideal crispiness we’re all craving.

    Serving Ideas & Creative Variations

    Dipping Sauce Pairings

    The right dipping sauce elevates these bombs from delicious to absolutely unforgettable. My personal favorite is a simple sriracha mayo – just enough heat to complement the savory bacon without overwhelming it. For a more traditional approach, ranch dressing infused with fresh herbs adds a cooling contrast to the warm, crispy bites. Honey mustard brings a sweet-tangy element that plays beautifully against the salty bacon, while barbecue sauce adds a smoky dimension that enhances the bacon’s natural flavors. For something unexpected, try a jalapeño jelly for sweet heat or a maple-bourbon glaze that caramelizes slightly when served warm. These dips work equally well with Deviled Egg Dip for a complete appetizer spread.

    Flavor Variations

    Don’t be afraid to experiment with fillings to create your own signature version. Try stuffing the tots with different cheeses – pepper jack adds a spicy kick, while blue cheese creates a bold, tangy center. For a breakfast-inspired variation, add a tiny piece of scrambled egg inside each bomb. Vegetable additions can work beautifully too – a sliver of jalapeño brings welcome heat, while caramelized onions add sweetness. For a loaded baked potato vibe, top with a dollop of sour cream, chives, and bacon bits after baking. My personal favorite variation includes a small cube of cream cheese with chives wrapped inside – it creates an irresistibly creamy center that contrasts perfectly with the crispy exterior.

    Storage & Troubleshooting Guide

    Make-Ahead and Storage Solutions

    These bombs are at their absolute best when served fresh from the oven, but with a few tricks, you can prepare them in advance. Assemble completely up to 24 hours ahead, cover tightly with plastic wrap, and refrigerate until ready to bake. For longer storage, freeze the assembled (but unbaked) bombs on a baking sheet until solid, then transfer to a freezer bag for up to one month. When ready to serve, bake directly from frozen, adding about 5-7 minutes to the cooking time. Already baked leftovers can be refrigerated for 2-3 days and reheated in a 350°F oven for 8-10 minutes to restore crispiness – though the microwave works in a pinch, the bacon won’t retain that perfect texture.

    Troubleshooting Common Issues

    The most frequent problem is bacon that won’t stay wrapped. Secure it with toothpicks during baking, removing them just before serving. If your bacon isn’t crisping properly, your oven temperature might be too low – try increasing by 25 degrees. Soggy bottoms usually indicate the bombs weren’t elevated during baking; always use a wire rack over your baking sheet. If cheese is leaking excessively, you might be using too much – a small cube is sufficient. For bacon that’s burning before the tots are heated through, cover loosely with foil for part of the baking time. And if the finished bombs are greasy, try pre-cooking the bacon slightly (about 3-4 minutes) before wrapping to render some of the fat.

    Frequently Asked Questions

    Can I make Bacon Wrapped Tater Tot Bombs in an air fryer?

    Absolutely! Cook at 375°F for about 10-12 minutes, checking frequently. The air fryer creates extra crispy bacon while perfectly cooking the tots inside. Just be sure not to overcrowd the basket.

    What’s the best cheese to use?

    Sharp cheddar provides the best flavor-to-melt ratio, but pepper jack adds nice heat. Experiment with cheese blends for unique flavor profiles – just avoid soft cheeses that might leak too much.

    Can I make these vegetarian?

    Yes! Try plant-based bacon alternatives, which have improved dramatically. Just check the package directions as cooking times may vary slightly from traditional bacon.

    How do I keep the bacon from unwrapping during cooking?

    Secure each bacon-wrapped tot with a toothpick before baking. Remove toothpicks before serving or leave them in as convenient handles for your guests.

    Can I prepare these ahead for a party?

    Definitely! Assemble up to 24 hours ahead and refrigerate. Alternatively, freeze assembled bombs for up to a month and bake directly from frozen, adding 5-7 minutes to cooking time.

    Final Thoughts

    Bacon Wrapped Tater Tot Bombs represent everything I love about cooking – simple ingredients transformed into something truly special through a bit of creativity. They strike that perfect balance between comfort food familiarity and unexpected delight that makes people smile. Whether you’re hosting a casual game day gathering or an elegant cocktail party, these versatile bites adapt to any occasion. I hope you’ll give them a try and experience the joy of watching them disappear from the serving plate almost instantly! For more inspiration, check out my other recipes on Pinterest.