Blog

  • Panettone French Toast – Cozy and Irresistibly Golden

    Panettone French Toast – Cozy and Irresistibly Golden

    Panettone French Toast saved my chaotic holiday morning. I had guests, a sleepy stovetop, and a panettone staring at me like a dare. So I whisked a quick custard, dunked those lofty slices, and the whole kitchen turned into a bakery. Panettone French Toast is fluffy in the middle, caramelized at the edges, and pure comfort. My son ate his with mascarpone, my neighbor hoarded the maple, and I pretended not to notice the powdered sugar on the dog. Worth it.

    Panettone French Toast

    Recipe

    WHY YOU’LL LOVE THIS RECIPE

    What Makes This Panettone French Toast So Irresistible

    I first made Panettone French Toast after a snowstorm canceled brunch and my pantry begged for a homemade fix. Panettone French Toast brings bakery-level aroma with an easy recipe that flips fast and feeds a crowd. When that rich custard soaks the buttery, fruit-studded bread, you get comfort food magic—crispy edges, pillowy centers, and a golden glow that makes mornings feel special. This is the kind of cozy, one-pan meal that turns a kitchen into a hug.

    • Quick prep: whisk, dip, and griddle—brunch is ready in minutes.
    • Comforting flavor: orange, vanilla, and warm spice lift every bite.
    • Simple ingredients: pantry staples meet holiday panettone.
    • Family-friendly: adjustable sweetness and toppings for everyone.
    • Make-ahead friendly: dry the slices in advance for flawless texture.

    Panettone French Toast also plays beautifully with syrup, mascarpone, or berries—easy to plate, easy to love, and totally share-worthy. If you’re building a festive morning menu, try pairing it with my Wreath Crescent Roll Breakfast Ring or a cozy bowl of Slow Cooker Gingerbread Oatmeal. Ready to cook? Let’s flip to the recipe card!

    Holiday leftovers meet viral-worthy brunch. Panettone French Toast rescues that half loaf on your counter and turns it into an elevated, homemade version of a diner favorite. It’s a quick fix that feels luxurious—an easy recipe that tastes like you planned days in advance. The balance of custard and crumb means each slice is golden outside and creamy inside, the kind of texture that makes you close your eyes and grin.

    TIPS, TRICKS & EXPERT SECRETS

    Chef Tips for Perfect Panettone French Toast Every Time

    During a pop-up class, I learned a small move that changed my Panettone French Toast forever: dry your slices. That one cooking tip guarantees a custardy center without sogginess. Here’s how I keep this easy recipe foolproof and homemade-luxurious:

    • Air-dry the panettone for 15–30 minutes (or toast lightly) before dunking to help it soak evenly.
    • Whisk the custard just until smooth—overwhisking adds too much air and can dry out your Panettone French Toast.
    • Use medium heat and real butter for a golden, fragrant crust without scorching.
    • Work in batches and keep finished slices warm on a low oven rack to preserve that crisp-soft contrast.

    Smart Ingredient Swaps & Practical Cooking Advice

    • Dairy-free/vegan: swap milk and cream for full-fat coconut milk; use a flax “egg” or a vegan custard mix. Cook in coconut oil for a toasty twist.
    • Gluten-free: use a gluten-free brioche-style loaf with candied fruit; the same custard works beautifully for a GF Panettone French Toast vibe.
    • Lower fat: replace cream with half-and-half or evaporated milk; keep a touch of butter for flavor.
    • What not to do: don’t soak too long—10–15 seconds per side is plenty, or your Panettone French Toast can turn soggy and tear.

    With these quick fixes and practical swaps, your homemade version will stay consistent, craveable, and camera-ready—every single time.

    Panettone French Toast – Cozy and Irresistibly Golden

    SERVING IDEAS & CREATIVE VARIATIONS

    How to Serve Panettone French Toast for Maximum Enjoyment

    I once served Panettone French Toast on a big board with syrups, berries, and mascarpone—my guests assumed I catered. For easy serving ideas, plate two slices slightly overlapped, dust with powdered sugar, and add a citrus wedge for color. A warm mug of coffee or spiced tea makes it weekend-perfect. If you love a grazing setup, pair it with my Christmas Morning Charcuterie Breakfast Board for a mix-and-match brunch spread.

    • Pairings: maple syrup plus a swipe of mascarpone; or honey with toasted almonds for crunch.
    • Sauces: quick berry compote or orange-scented whipped cream to echo the panettone’s citrus.
    • Beverages: cappuccino, chai, or a splashy mimosa for celebratory mornings.

    Flavor Twists and Seasonal Variations

    • Chocolate-Hazelnut: swirl Nutella over warm slices; top with chopped toasted hazelnuts.
    • Cranberry-Orange: simmer cranberries with orange juice and a little sugar, then spoon over Panettone French Toast for a vivid seasonal twist.
    • Cinnamon-Maple Pecan: drizzle maple, add cinnamon, and finish with butter-toasted pecans for an autumn-forward flavor variation.

    Plating suggestion for content creators: stack slices at a slight angle, drizzle syrup from a small height, and add a bright garnish (thin orange peel curls look gorgeous). The shine, the drip, and the steam make Panettone French Toast irresistible on camera—and even more irresistible on your fork.

    STORAGE & TROUBLESHOOTING GUIDE

    How to Store and Reheat Panettone French Toast

    Leftovers rarely happen here, but when they do, I stash Panettone French Toast for quick weekday wins. To keep it fresh, cool slices on a rack first to prevent steam-sog.

    • Room temperature: keep up to 2 hours, loosely tented.
    • Fridge: store 3–4 days in an airtight container with parchment between slices.
    • Freezer: freeze up to 2 months; wrap individually, then place in a freezer bag to keep fresh.
    • Reheat: oven or toaster oven at 350°F for 6–8 minutes; skillet with a touch of butter for crisp edges; air fryer at 350°F for 3–4 minutes.

    Troubleshooting Common Panettone French Toast Issues

    • Too soggy: your soak was too long. Next time, dry slices slightly and dip just 10–15 seconds per side.
    • Too dry: add a splash more milk to the custard or lower the heat. Panettone French Toast should be creamy inside.
    • Uneven browning: preheat the pan, use enough butter, and avoid overcrowding.
    • Eggy streaks: whisk the custard thoroughly and let excess drip before cooking.

    With the right storage advice and quick fixes, your Panettone French Toast will reheat beautifully and taste fresh-baked. You’ve got this—fluffy mornings are ahead.

    FAQs

    Can I make Panettone French Toast ahead?

    Yes. Slice and dry the panettone the night before and whisk the custard. Dip and cook in the morning for best texture.

    What milk works best for Panettone French Toast?

    Whole milk plus a touch of cream gives rich results. Half-and-half is a great easy recipe swap.

    How do I prevent soggy slices?

    Dry the bread slightly, dip briefly, and cook over medium heat with butter. Let excess custard drip off before griddling.

    Can I bake instead of pan-fry?

    Yes. Arrange dipped slices on a buttered sheet, bake at 400°F for 10–12 minutes, flipping once, for a lighter homemade version.

    Conclusion

    Panettone French Toast is the golden cure for sleepy mornings and holiday leftovers—quick to make, joy to eat, and endlessly adaptable. With a silky custard, crisp edges, and citrus warmth, Panettone French Toast turns a simple slice into comfort food you’ll crave year-round. Keep the custard balanced, heat steady, and butter ready, and you’ll nail that bakery-style finish at home. For a full brunch spread, pair it with my celebratory Make-Ahead Christmas Combo Casserole and hot coffee. Try this Panettone French Toast at home and tag me—your table is about to be everyone’s favorite place.

  • “Wreath” Crescent Roll Breakfast Ring – Comforting and Easy

    “Wreath” Crescent Roll Breakfast Ring – Comforting and Easy

    “Wreath” Crescent Roll Breakfast Ring mornings always start with a laugh in my kitchen. The first time I baked a “Wreath” Crescent Roll Breakfast Ring, my timer went off just as the dog made off with a slice of cheddar. I parked a cooling rack on the highest shelf, wrangled the cheese, and still got brunch on the table in under an hour. This buttery ring looks fancy but it’s weeknight-easy, holiday-gorgeous, and totally kid-approved. If you love a playful kitchen victory that tastes like comfort, you’re home.

    Try it with my Christmas Morning Charcuterie Breakfast Board or make ahead alongside the Make-Ahead Christmas Combo Casserole for stress-free hosting.

    "Wreath" Crescent Roll Breakfast Ring,

    Recipe


    PART 1: WHY YOU’LL LOVE THIS RECIPE

    What Makes This “Wreath” Crescent Roll Breakfast Ring So Irresistible

    I still remember my first “Wreath” Crescent Roll Breakfast Ring on a snowy Saturday: I had a mug of coffee, a pile of half-grated cheese, and a cat sitting on my recipe notes. The “Wreath” Crescent Roll Breakfast Ring saved the morning, baking up golden while I played zig-zag with the grater and tried to keep paws off the counter. It’s an easy, homemade comfort food win that looks bakery-beautiful but cooks like a one-pan meal.

    • Buttery, bakery-style texture with melty cheese and savory sausage.
    • Quick prep with simple grocery staples — truly an easy recipe.
    • One-pan meal for minimal dishes and maximum comfort food vibes.
    • Family-friendly and endlessly customizable for picky eaters.
    • Holiday-worthy presentation without the stress.

    With the “Wreath” Crescent Roll Breakfast Ring, you’ll get a crisp, golden crust, creamy eggs, and that irresistible brunch aroma that shouts homemade. It’s the kind of easy brunch that tastes like a hug and frees you up to actually enjoy your morning. Ready to bake this cozy centerpiece? Keep scrolling for the full recipe card.

    It checks all the boxes: an easy recipe, quick fix for busy mornings, and a stunning shareable shape perfect for social media. The “Wreath” Crescent Roll Breakfast Ring delivers that warm, homemade look with zero fuss — exactly what we all crave when comfort food meets convenience.

    PART 2: TIPS, TRICKS & EXPERT SECRETS

    Chef Tips for Perfect “Wreath” Crescent Roll Breakfast Ring Every Time

    My turning point came during a community cooking class where our “Wreath” Crescent Roll Breakfast Ring sprang a cheese leak — right onto the instructor’s shoes. We laughed, then learned: seal well, season well, and don’t rush the bake. Here’s how to nail this easy, homemade version every time.

    • Soft-set the eggs: Cook until just custardy; the oven finishes them so your “Wreath” Crescent Roll Breakfast Ring stays creamy, not dry.
    • Seal the ring: Overlap dough generously and pinch seams on the inside; this prevents gaps and keeps fillings snug.
    • Butter + seasoning: A quick brush of butter and Everything Bagel seasoning gives a bakery-level crust and flavor pop.
    • Let it rest: Five to ten minutes post-bake helps the cheese set and slices hold together.

    Smart Ingredient Swaps & Practical Cooking Advice

    • Gluten-free swap: Use gluten-free crescent dough if available; bake a few minutes longer for crisp edges.
    • Lighten it up: Use turkey sausage, part-skim cheese, and extra peppers/spinach for a leaner easy breakfast.
    • Vegetarian: Skip sausage and add sautéed mushrooms, spinach, and sun-dried tomatoes.
    • What not to do: Don’t overfill or overmix the eggs — too much filling bulks the wreath and can underbake the center.

    With these cooking tips, your “Wreath” Crescent Roll Breakfast Ring becomes a reliable quick fix meal that tastes homemade and looks impressive every single time.

    PART 3: SERVING IDEAS & CREATIVE VARIATIONS

    How to Serve “Wreath” Crescent Roll Breakfast Ring for Maximum Enjoyment

    When I served this to friends, I placed the “Wreath” Crescent Roll Breakfast Ring on a wooden board, tucked parsley sprigs between slices, and set out tiny bowls of salsa and hot honey. It was gone in minutes, photos first, forks second. For easy plating suggestions and pairing wins, try these:

    • Serve with a simple arugula salad tossed in lemon vinaigrette for a bright counterpoint.
    • Add bowls of pico de gallo, sour cream, or hot honey for sweet-heat balance.
    • Beverages: Fresh coffee, spiced chai, or a citrusy mimosa for brunch sparkle.

    Planning a bigger spread? Pair it with my Fluffy Gingerbread Pancakes for a cozy seasonal twist.

    Flavor Twists and Seasonal Variations

    • Southwest Sunrise: Add pepper jack, black beans, corn, and a dash of cumin; finish with avocado and cilantro.
    • Garden Spinach & Feta: Sautéed spinach, roasted red peppers, and tangy feta for a Mediterranean feel.
    • Holiday Ham & Gruyère: Diced ham, Gruyère, and a swipe of Dijon under the filling for a rich, party-ready wreath.

    These serving ideas and flavor variations keep your “Wreath” Crescent Roll Breakfast Ring fresh, seasonal, and camera-ready. If you’re sharing on social, style with a light linen, overhead slice fan, and a small dish of herbs near the frame for instant Pinterest appeal.

    PART 4: STORAGE & TROUBLESHOOTING GUIDE

    How to Store and Reheat “Wreath” Crescent Roll Breakfast Ring

    Leftovers rarely survive at my house, but when they do, I stash slices like treasure. To keep your “Wreath” Crescent Roll Breakfast Ring fresh, follow this storage advice:

    • Room temperature: Up to 2 hours for serving.
    • Refrigerator: Store in an airtight container up to 3 days. Separate layers with parchment to protect the crust.
    • Freezer: Wrap slices tightly in plastic, then foil; freeze up to 2 months. Thaw overnight in the fridge.
    • Reheat: Oven or air fryer at 350°F for 6–10 minutes until warmed and crisp. Skillet on low works in a pinch; cover to heat through, then uncover to re-crisp.

    Troubleshooting Common “Wreath” Crescent Roll Breakfast Ring Issues

    • Too dry: Soft-set your eggs before baking and don’t overbake. Add a light swirl of cream cheese for moisture.
    • Watery center: Drain sautéed vegetables well and avoid overfilling. Bake on a preheated sheet for extra crisp.
    • Uneven browning: Rotate the pan halfway; tent with foil if the top browns too fast.
    • Gummy dough: Increase bake time by 3–5 minutes or lower oven rack; check that seams are sealed to contain moisture.

    With these quick fixes, your “Wreath” Crescent Roll Breakfast Ring will reheat beautifully and keep its bakery-style texture, every time.

    FAQs

    Can I assemble the wreath the night before?

    Yes. Assemble without baking, cover tightly, and refrigerate up to 12 hours. Bake straight from the fridge, adding 3–5 minutes to the cook time.

    What if I don’t eat pork?

    Swap in turkey sausage or crumbled plant-based sausage. Season with extra paprika and fennel to mimic breakfast sausage flavor.

    How do I keep the center from getting soggy?

    Pre-cook and drain veggies, soft-set eggs, and avoid overfilling. Bake on parchment and ensure seams are well sealed.

    Can I use crescent dough sheets instead of triangles?

    Absolutely. Cut into wide strips and overlap to form the ring, then proceed as directed. It’s a tidy, homemade hack.

    Conclusion

    If you’re craving an easy, homemade brunch centerpiece that feels like a hug, the “Wreath” Crescent Roll Breakfast Ring is your new signature bake. Buttery layers, creamy eggs, savory sausage, and melty cheese turn a simple one-pan meal into true comfort food. This “Wreath” Crescent Roll Breakfast Ring looks festive for holidays yet fits any cozy weekend morning. Pair it with bright sides or seasonal flavors and you’ve got an effortless showstopper. Give it a spin, then explore more make-ahead comfort on the blog: the Make-Ahead Christmas Combo Casserole and my Christmas Morning Breakfast Board. Try it at home and tag me — I can’t wait to see your beautiful wreaths!

  • Slow Cooker Gingerbread Oatmeal – Creamy, Cozy Comfort

    Slow Cooker Gingerbread Oatmeal – Creamy, Cozy Comfort

    Slow Cooker Gingerbread Oatmeal saved my holiday morning sanity. I’m Darleen Vance, and the first time I made Slow Cooker Gingerbread Oatmeal, my mixer was whirring, kids were “taste-testing” sprinkles, and I needed breakfast that didn’t need me. I tossed everything into the crock, set it, and woke up to a kitchen that smelled like a cozy bakery. The molasses and spice make it taste like dessert, but it’s hearty, not fussy. This is the kind of homemade comfort food that loves you back when life gets delightfully chaotic.

    Slow Cooker Gingerbread Oatmeal – Creamy, Cozy Comfort

    Recipe

    Why You’ll Love This Slow Cooker Gingerbread Oatmeal

    What Makes This Slow Cooker Gingerbread Oatmeal So Irresistible

    I still remember the first time I whisked molasses and ginger into my slow cooker and thought, “Please let this work.” Slow Cooker Gingerbread Oatmeal rewards that tiny leap of faith with big, cozy flavor. It’s the homemade comfort food my family asks for when they want something warm, nostalgic, and easy. With this easy recipe, you set it and forget it—then wake up to a kitchen that smells like a gingerbread bakery. Slow Cooker Gingerbread Oatmeal is creamy, gently sweet, and wonderfully spiced, and it puts holiday magic into a weekday morning.

    • Set-and-forget simplicity: quick prep, let the crockpot do the rest.
    • Cozy gingerbread flavors: molasses, ginger, cinnamon, and cloves in every spoonful.
    • Steel-cut oats for hearty texture and a creamy finish.
    • Make-ahead and family-friendly: great for meal prep and busy mornings.
    • Flexible ingredients for dairy-free, vegan, or low-sugar options.

    If you love warm, easy comfort food, this homemade version belongs in your breakfast rotation. Ready for the recipe? Let’s dive in.

    Between overnight oatmeal trends and the return of cinnamon-and-ginger everything, Slow Cooker Gingerbread Oatmeal hits that sweet spot of nostalgic flavor and modern convenience. It’s a one-pot breakfast win that feels like a festive hug, without any fuss. If you’re planning a holiday morning spread, pair it with my Christmas Morning Charcuterie Breakfast Board for a buffet that looks as good as it tastes. For more cozy, set-it-and-forget-it inspiration, check out my Slow Cooker Red Lentil Curry or satisfy a ginger craving with Fluffy Gingerbread Pancakes. Now, let’s get this crockpot going.

    Slow Cooker Gingerbread Oatmeal Tips, Tricks & Expert Secrets

    Chef Tips for Perfect Slow Cooker Gingerbread Oatmeal Every Time

    My most memorable “lesson learned” came from a late-night batch where I forgot to grease the crock—scrubbing oatmeal at 7 a.m. is not my favorite arm workout. Since then, I’ve collected a few cooking tips that make Slow Cooker Gingerbread Oatmeal foolproof.

    • Grease first: A quick swipe of butter or spray keeps edges from sticking and overbrowning.
    • Use steel-cut oats: They hold their texture in the slow cooker and create a creamy, not mushy, finish.
    • Low and slow is best: Cook on Low 6–8 hours. If you’re short on time, High for 3–4 hours works, but stir once halfway for even texture.
    • Balance the liquid: Start with 6 cups total liquid for 1 1/2 cups oats. Adjust with a warm splash of milk or water at the end for your ideal creaminess.

    Smart Ingredient Swaps & Practical Cooking Advice

    • Dairy-free/vegan: Use almond, oat, or coconut milk and coconut oil; sweeten with maple syrup.
    • Lighten it up: Reduce brown sugar and add extra vanilla; top with fresh fruit for natural sweetness.
    • Quick fix for spice: If ginger feels bold, add a spoonful of yogurt or a drizzle of cream to mellow it out.
    • What not to do: Don’t use quick or instant oats here—they can turn gluey in a slow cooker.

    These cooking tips keep this easy recipe on repeat and your homemade version consistently delicious. With a few smart tweaks, Slow Cooker Gingerbread Oatmeal becomes your favorite fuss-free breakfast.

    Slow Cooker Gingerbread Oatmeal
    Slow Cooker Gingerbread Oatmeal

    Serving Ideas & Creative Variations

    How to Serve Slow Cooker Gingerbread Oatmeal for Maximum Enjoyment

    When I serve Slow Cooker Gingerbread Oatmeal to guests, I set up a little topping bar—because everyone loves choices. It turns a simple, comforting bowl into a custom creation and looks beautiful on the table.

    • Plating suggestion: Spoon oatmeal into warm bowls and top with a dollop of Greek yogurt or cream, a drizzle of maple syrup, and diced pears.
    • Pairings: Serve with hot coffee, chai tea, or a vanilla steamer to echo the cozy spices.
    • Brunch board: Offer nuts, dried fruit, cacao nibs, and citrus zest—great for a weekend spread.

    For food photography or social sharing, sprinkle a pinch of cinnamon over the yogurt, add a few glossy pomegranate arils, and shoot near a window for natural light—those warm tones are the soul of this comfort food.

    Flavor Twists and Seasonal Variations

    • Apple Cider Twist: Replace 1 cup water with apple cider and add sautéed cinnamon apples at the end.
    • Chocolate-Ginger: Stir in 2 tablespoons cocoa powder and top with dark chocolate shavings.
    • Pumpkin Patch: Add 1/2 cup pumpkin puree and a pinch of allspice for a fall-forward flavor variation.

    Whether you keep it classic or try a seasonal twist, Slow Cooker Gingerbread Oatmeal is endlessly customizable and always crowd-pleasing.

    Storage & Troubleshooting Guide

    How to Store and Reheat Slow Cooker Gingerbread Oatmeal

    I’m all about cooking once and enjoying it all week. After we dig in, I portion leftovers into glass containers so mornings stay calm and cozy.

    • Room temperature: Keep out for no more than 2 hours for food safety.
    • Refrigerator: Store in airtight containers for up to 4 days. Add a splash of milk before reheating.
    • Freezer: Freeze in portioned, freezer-safe containers up to 3 months. Thaw overnight in the fridge.
    • Reheat: Microwave with 1–2 tablespoons milk or water, stirring halfway; or warm on the stovetop over low heat with a splash of liquid.

    Troubleshooting Common Slow Cooker Gingerbread Oatmeal Issues

    • Too thick: Whisk in warm milk or water a few tablespoons at a time until creamy.
    • Too thin/watery: Cook uncovered on High for 15–20 minutes, stirring, to reduce; or mix in 1–2 tablespoons additional oats and simmer a bit longer.
    • Edges dry or overcooked: Grease the crock next time and use Low heat; a water bath (placing the crock in a larger vessel with a bit of water) can also help for older models.
    • Spice too strong: Swirl in plain yogurt or cream to soften the flavors; add a touch of extra brown sugar to balance.

    With the right storage advice and a few quick fixes, your Slow Cooker Gingerbread Oatmeal stays creamy, cozy, and ready when you are. You’ve got this, and breakfast will be beautiful tomorrow.

    FAQs

    Can I use rolled oats instead of steel-cut?

    You can, but reduce the cook time significantly (about 2–3 hours on Low) and use slightly less liquid. Steel-cut oats give the best creamy-yet-textured result in a slow cooker.

    Is Slow Cooker Gingerbread Oatmeal vegan?

    Use plant milk and coconut oil instead of butter, and sweeten with maple syrup. With those swaps, the recipe becomes a delicious vegan, homemade version.

    Can I make this overnight safely?

    Yes. Cook on Low for 6–8 hours in a reliable slow cooker and keep the lid on. In the morning, stir and adjust consistency with a splash of milk or water.

    How can I reduce the sugar?

    Cut the brown sugar in half or skip it, then sweeten individual bowls with maple syrup or fruit. The molasses still brings classic gingerbread flavor.

    Conclusion

    There’s a special kind of magic in waking up to Slow Cooker Gingerbread Oatmeal—the kitchen smells like the holidays, breakfast is ready, and everyone feels cared for. This cozy, homemade comfort food blends warm spices, molasses, and steel-cut oats into a creamy bowl that’s both nostalgic and nourishing. It’s an easy recipe you’ll return to again and again, whether you’re feeding a crew or meal-prepping for the week. Try Slow Cooker Gingerbread Oatmeal, play with the seasonal twists, and make it your own. When you do, tag me so I can see your bowls of cozy, spiced joy!

  • Holiday Red & Green Veggie Strata – Cozy, Irresistible Flavor

    Holiday Red & Green Veggie Strata – Cozy, Irresistible Flavor

    Holiday Red & Green Veggie Strata is my festive secret for getting breakfast, brunch, or an easy dinner on the table without panic. One holiday morning, I tried whisking eggs while shooing the dog away from the bread cubes, and somehow the spinach fell into the pan at just the right moment. Magic! This Holiday Red & Green Veggie Strata bakes up puffed, golden, and beautifully speckled with red peppers and greens—comfort food that still feels fresh and homemade. If you love one-pan meals, this strata is your new favorite.

    Holiday Red & Green Veggie Strata

    Recipe

    Why You’ll Love This Holiday Red & Green Veggie Strata

    What Makes This Holiday Red & Green Veggie Strata So Irresistible

    I first baked this Holiday Red & Green Veggie Strata after misreading my own scribbled notes—classic Darleen—and accidentally tossing in sun-dried tomatoes with the spinach. It turned out so gorgeous and delicious that now I do it on purpose. The Holiday Red & Green Veggie Strata is the homemade, one-pan meal that lets you sip coffee while the oven does the heavy lifting. It’s comfort food with color, crisp edges, and a custardy interior that never feels heavy. If you love an easy dinner that doubles as a show-stopping brunch, this Holiday Red & Green Veggie Strata has your back.

    • Quick prep and hands-off baking for an easy dinner or holiday brunch.
    • Simple, affordable ingredients you likely have—bread, eggs, veggies, cheese.
    • Make-ahead friendly: assemble the night before for a no-stress morning.
    • Family-friendly and crowd-pleasing, with cozy, savory flavor and golden edges.
    • One-pan meal that’s homemade, comforting, and perfect for sharing.

    We’re all craving colorful, feel-good comfort food that’s still practical. With festive red peppers and greens, the Holiday Red & Green Veggie Strata looks celebratory without fussy steps. It’s the kind of easy recipe you can post on Instagram at 8 a.m. and serve at noon. If you’re planning a full spread, pair it with my Christmas Morning Charcuterie Breakfast Board for a beautiful, stress-free table. Ready to bake? Let’s jump into the recipe card next.

    Tips, Tricks & Expert Secrets for Holiday Red & Green Veggie Strata

    Chef Tips for Perfect Holiday Red & Green Veggie Strata Every Time

    During a cooking class, I learned that toasting the bread is the difference between soggy and spectacular. Since then, I’ve never skipped it. For a reliable, easy recipe, these smart cooking tips keep your Holiday Red & Green Veggie Strata light, custardy, and flavorful.

    • Dry your bread: Lightly toast cubes so the Holiday Red & Green Veggie Strata soaks up custard without getting mushy.
    • Season in layers: Salt the veggies as they sauté and season the egg mixture—this cooking tip boosts depth.
    • Rest before baking: A 10–15 minute soak (or overnight) helps the homemade version bake evenly.
    • Check doneness: Aim for 165°F in the center; the strata should be puffed with set edges and a slight wobble.

    Smart Ingredient Swaps & Practical Cooking Advice

    • Vegan: Use sturdy vegan bread, dairy-free cheeses, and a plant-based egg alternative; swap milk for unsweetened oat or almond milk.
    • Gluten-free: Use gluten-free crusty bread; reduce liquid by 2–4 tablespoons if bread is very soft—a quick fix for excess moisture.
    • Lighter: Swap half the cheese for part-skim mozzarella and 2% milk; the Holiday Red & Green Veggie Strata still tastes rich.
    • What not to do: Don’t overpack the pan or oversoak with extra liquid; that can cause a dense, watery center.

    With these tips, your Holiday Red & Green Veggie Strata will bake like a pro-level, easy dinner or brunch centerpiece—no culinary school required.

    Holiday Red & Green Veggie Strata

    Serving Ideas & Creative Variations for Holiday Red & Green Veggie Strata

    How to Serve Holiday Red & Green Veggie Strata for Maximum Enjoyment

    I once served this Holiday Red & Green Veggie Strata on my biggest wooden board with simple greens and sparkling cider, and the table suddenly looked styled for a magazine. Presentation is a quick win, and the flavor is already there.

    Flavor Twists and Seasonal Variations

    • Roasted Veggie Twist: Swap broccoli for roasted Brussels sprouts and add caramelized onions—still classic Holiday Red & Green Veggie Strata vibes.
    • Southwest Flair: Add green chiles, pepper jack, and a salsa drizzle—an easy serving idea that changes the mood while keeping it homemade.
    • Caprese Holiday: Layer in cherry tomatoes and fresh mozzarella; finish the Holiday Red & Green Veggie Strata with basil and a balsamic glaze.

    Plating suggestion: Use a sharp knife for clean squares and garnish with basil, green onions, and pomegranate arils. Natural light and a simple white plate help the red-and-green colors pop in photos. For a sweet side, my Fluffy Gingerbread Pancakes make a dreamy pairing.

    Storage & Troubleshooting Guide for Holiday Red & Green Veggie Strata

    How to Store and Reheat Holiday Red & Green Veggie Strata

    I love making a double pan so there are leftovers for hectic weekdays. The Holiday Red & Green Veggie Strata keeps beautifully if you store it right.

    • Room temperature: Keep the baked Holiday Red & Green Veggie Strata out for up to 2 hours, then refrigerate.
    • Fridge: Store slices in airtight containers for 3–4 days; place parchment between layers to keep edges crisp.
    • Freezer: Wrap individual pieces tightly, then store in freezer bags for up to 2 months. Thaw overnight in the fridge.
    • Reheat: Oven at 325°F for 12–15 minutes (best texture), skillet with a lid for 6–8 minutes, or air fryer at 320°F for 6–8 minutes. The Holiday Red & Green Veggie Strata should be hot in the center.

    Troubleshooting Common Holiday Red & Green Veggie Strata Issues

    • Watery center: Bread too soft or too much liquid. Fix by toasting bread longer next time and reducing milk by 2–4 tablespoons.
    • Too dry: Overbaked or bread too stale. Add a splash of milk to leftovers before reheating to restore moisture.
    • Uneven texture: Let the Holiday Red & Green Veggie Strata rest 10–15 minutes before baking so the custard distributes evenly.
    • Browning too fast: Tent with foil and lower oven by 15°F; extend bake time as needed.

    With these storage tips and quick fixes, your Holiday Red & Green Veggie Strata will stay fresh, reheat beautifully, and taste just as comforting on day three as it did on day one.

    FAQs

    Can I assemble Holiday Red & Green Veggie Strata the night before?

    Yes. Assemble, cover tightly, and refrigerate up to 24 hours. Let it sit at room temperature for 20–30 minutes while the oven preheats, then bake as directed. This make-ahead method deepens flavor and ensures an easy morning.

    What bread works best for Holiday Red & Green Veggie Strata?

    Use sturdy, day-old bread like sourdough, Italian, or French. The slightly dry texture soaks up custard for a tender, not soggy, homemade strata. Avoid very soft sandwich bread unless you toast it extra well.

    How do I know when Holiday Red & Green Veggie Strata is fully baked?

    Look for a puffed, golden top, set edges, and a center that jiggles slightly but isn’t liquid. An instant-read thermometer should read 165°F in the middle. If it’s browning too quickly, tent with foil.

    Can I add meat to Holiday Red & Green Veggie Strata?

    Absolutely. Cooked crumbled sausage, diced ham, or bacon are popular additions. Reduce the cheese slightly if adding salty meats and keep the vegetable ratio similar to maintain the custardy texture.

    Conclusion

    The Holiday Red & Green Veggie Strata delivers everything we crave in comfort food: cozy flavors, crisp edges, and a custardy, homemade interior. It’s an easy dinner that doubles as a festive brunch, a one-pan meal that looks beautiful without extra effort. Whether you assemble it the night before or bake it on a whim, the Holiday Red & Green Veggie Strata never fails to impress. For more cozy inspiration, peek at my hearty soups and slow-cooker comfort like the Slow Cooker Red Lentil Curry. Ready to bake? Try the Holiday Red & Green Veggie Strata at home and tag me—I can’t wait to see your colorful, golden pans!

  • Make-Ahead “Christmas Combo” Casserole – Cozy, Irresistible

    Make-Ahead “Christmas Combo” Casserole – Cozy, Irresistible

    Make-Ahead “Christmas Combo” Casserole is my go-to when December turns into a juggling act. One year, the timer failed, the doorbell rang early, and my nephew decided to “help” by rearranging the oven racks. I slid in this casserole anyway, and it came out bubbling, golden, and absolutely perfect. The Make-Ahead “Christmas Combo” Casserole is built for real-life kitchen chaos, with creamy comfort and a festive flair.

    Make-Ahead “Christmas Combo” Casserole

    Recipe

    Why You’ll Love This Make-Ahead “Christmas Combo” Casserole

    What Makes This Make-Ahead “Christmas Combo” Casserole So Irresistible

    I first built this Make-Ahead “Christmas Combo” Casserole after a holiday potluck where I brought rolls and somehow left with the job of main dish. I raided the fridge—leftover turkey, the end of the ham, green beans, and the last box of stuffing—and a cozy, creamy, one-pan meal practically made itself. The Make-Ahead “Christmas Combo” Casserole is irresistibly simple, boldly comforting, and a total easy dinner win on hectic days. Even my picky niece called it “the Christmas lasagna.” I took that as a compliment and never looked back.

    • Make-ahead magic: Assemble up to 48 hours in advance or freeze—holiday timing solved.
    • Creamy comfort: A silky homemade sauce hugs tender turkey, ham, and vegetables.
    • Simple ingredients: Pantry-friendly and flexible—use what you have.
    • Family-friendly: A cozy comfort food casserole everyone will actually eat.
    • One dish, big flavor: A true homemade, one-pan meal—minimal fuss, major reward.

    Because the Make-Ahead “Christmas Combo” Casserole layers classic holiday flavors in one bubbly pan, you get speed, flavor, and nostalgia in every forkful. Ready to cook? Let’s slide into the recipe card.

    Craving more cozy mains for the season? Try my Slow Cooker Pot Roast or my ultra-creamy Crockpot Creamy Chicken & Wild Rice Soup.

    Tips, Tricks & Expert Secrets for Make-Ahead “Christmas Combo” Casserole

    Chef Tips for Perfect Make-Ahead “Christmas Combo” Casserole Every Time

    I once taught a mini-class for my cousins on “how not to panic when guests arrive early.” The star was this Make-Ahead “Christmas Combo” Casserole. My discovery: the stuffing top loves a little extra butter, and the creamy base shines with just a touch of Dijon. Here’s how to nail this easy recipe every time.

    • Season in layers: Salt the veggies, season the sauce, then taste again after adding meats and cheese. Each layer boosts overall flavor.
    • Keep it glossy: Let the flour cook 1 minute before whisking in broth and milk; simmer until the sauce coats a spoon for a silky, homemade version of “cream of” goodness.
    • Top for texture: Lightly moisten stuffing so it crisps without drying. A drizzle of melted butter equals golden, crunchy magic.
    • Make-ahead smart: Assemble cold; if baking straight from the fridge, add 10–15 minutes and tent with foil if the top browns too fast.

    Smart Ingredient Swaps & Practical Cooking Advice

    • Gluten-free: Use a GF flour blend for the roux and gluten-free stuffing or buttered crushed rice crackers for the topping.
    • Lighter option: Swap sour cream for Greek yogurt and use part-skim cheese; the sauce stays creamy with a fresher finish.
    • Vegetarian: Replace turkey and ham with roasted mushrooms and white beans; sub vegetable broth—an easy quick fix that keeps it hearty.
    • What not to do: Don’t overmix once the stuffing goes on. Keep it loose so steam escapes and the top stays crisp.

    When you follow these cooking tips, the Make-Ahead “Christmas Combo” Casserole bakes up creamy in the center with an irresistibly crunchy crown—holiday harmony in one pan.

    Serving Ideas & Creative Variations

    How to Serve Make-Ahead “Christmas Combo” Casserole for Maximum Enjoyment

    I served this Make-Ahead “Christmas Combo” Casserole on my grandmother’s platter once and my aunt asked if I’d hired a caterer. Presentation matters! For cozy serving ideas and simple plating suggestions, try these:

    • Pairings: A crisp green salad with lemon vinaigrette, roasted Brussels sprouts, or a bright cranberry relish to balance the creamy casserole.
    • Sauces: A drizzle of warm turkey gravy or a spoon of garlicky yogurt sauce for a tangy lift.
    • Beverages: Sparkling cider, pinot noir, or a rosemary gin spritz complements the savory richness.

    Flavor Twists and Seasonal Variations

    • Cheesy Herb: Mix Parmesan into the stuffing and add fresh thyme and chives for a bistro-style twist.
    • Harvest Veg: Swap green beans for roasted butternut squash and add kale ribbons for a fall-forward seasonal twist.
    • Smoky Holiday: Use smoked gouda and a pinch of paprika; stir in fire-roasted corn for a cozy, rustic vibe.

    Sharing on social? Photograph the Make-Ahead “Christmas Combo” Casserole in diffused daylight, slice with a sharp knife after resting 10 minutes, and sprinkle fresh parsley for contrast. For more winter warmers, peek at my Dill Pickle Soup—quirky, bright, and addicting.

    Storage & Troubleshooting Guide

    How to Store and Reheat Make-Ahead “Christmas Combo” Casserole

    Leftovers of Make-Ahead “Christmas Combo” Casserole are a gift that keeps on giving—especially when the holiday dishes pile up. Here’s how to store, reheat, and keep it fresh:

    • Room temperature: Keep out no longer than 2 hours.
    • Fridge: Store in an airtight container or covered baking dish for up to 4 days.
    • Freezer: Wrap tightly in plastic + foil; freeze up to 3 months. Label with date and baking directions.
    • Reheat: Oven at 350°F (175°C) 20–25 minutes (covered, then uncover to crisp). Air fryer at 325°F for 8–12 minutes for individual squares. Microwave works in a pinch—cover and heat in 60–90-second bursts, then crisp topping under the broiler.

    Troubleshooting Common Make-Ahead “Christmas Combo” Casserole Issues

    • Too watery: Simmer the sauce longer so it thickens before assembling; if baked and loose, return to oven uncovered 10 minutes.
    • Too dry: Stir 1/4–1/3 cup warm broth into the filling and bake covered for 10 minutes to rehydrate.
    • Uneven texture: Cut veggies uniformly and avoid overmixing after adding stuffing—keep that top loose and craggly.
    • Over-browned top: Tent with foil midway; if cold from the fridge, bake covered for the first 20 minutes, then uncover to crisp.

    With these storage advice tips, your Make-Ahead “Christmas Combo” Casserole keeps its creamy center and crisp crown day after day. You’ve got this—holiday calm, served hot.

    FAQs

    Can I assemble Make-Ahead “Christmas Combo” Casserole two days early?

    Yes. Assemble, cool, and refrigerate up to 48 hours. Add 10–15 minutes to bake time and tent with foil if the top browns too quickly.

    What can I use instead of ham in the casserole?

    Use more turkey, cooked chicken sausage, or roasted mushrooms for a hearty, flavorful swap.

    How do I keep the stuffing topping crunchy?

    Lightly moisten stuffing, don’t pack it down, and finish uncovered to crisp. A drizzle of butter helps a golden finish.

    Can I make this without dairy?

    Yes. Use olive oil, dairy-free milk, and a thick unsweetened dairy-free yogurt or cashew cream; choose dairy-free cheese or omit.

    Conclusion

    The Make-Ahead “Christmas Combo” Casserole brings together everything we love about holiday comfort food: creamy filling, savory meats, bright veggies, and a crunchy, herby topping. It’s an easy dinner that respects your time, a homemade classic that’s flexible, and a one-pan meal that earns repeat requests. Whether you’re feeding a crowd or stashing a meal for a busy weeknight, the Make-Ahead “Christmas Combo” Casserole delivers cozy joy on schedule. Try it at home, share it with your favorite people, and tag me so I can see your golden, bubbly pans. I can’t wait to cheer you on from my happily flour-dusted kitchen.

  • Christmas Morning Charcuterie Breakfast Board – Cozy, Bold

    Christmas Morning Charcuterie Breakfast Board – Cozy, Bold

    Christmas Morning Charcuterie Breakfast Board is my secret to making the most joyful chaos feel effortless. One year, I dropped a whole tray of mini waffles while the dog chased a ribbon—still, the Christmas Morning Charcuterie Breakfast Board saved the day. I’m Darleen Vance, and I love that this cozy board lets everyone graze, mingle, and make a plate that feels homemade. It’s fast, flexible, and impossibly festive—without keeping you trapped at the stove. Now let’s build a board that looks like a picture and tastes like comfort food in pajama form.

    Christmas Morning Charcuterie Breakfast Board

    Recipe

    WHY YOU’LL LOVE THIS RECIPE

    What Makes This Christmas Morning Charcuterie Breakfast Board So Irresistible

    I built my first Christmas Morning Charcuterie Breakfast Board while my kids debated which pajamas were more “festive” and my husband searched for batteries. The beauty of a Christmas Morning Charcuterie Breakfast Board is that it keeps the holiday calm and the flavors bold. You can assemble this homemade spread fast, like an easy dinner but for breakfast—without hovering over a one-pan meal. It’s comfort food in a picture-perfect package, and it’s endlessly flexible. If you love a cozy, homemade vibe, this board will become your new tradition.

    • Quick prep: most elements are no-cook or low-effort with simple ingredients.
    • Family-friendly: sweet and savory bites let everyone build a plate they love.
    • Make-ahead friendly: prep cheeses and fruit the night before for an easy recipe win.
    • Perfect balance: warm waffles and bacon meet cool fruit and creamy cheese—pure comfort food.
    • Gorgeous presentation: looks like a boutique brunch, tastes like homemade.

    From cozy waffles to brie and berries, the Christmas Morning Charcuterie Breakfast Board hits every note you crave in a festive, homemade version of brunch. Ready to build yours? Let’s head to the recipe card!

    Across Pinterest and Instagram, festive boards are the new brunch centerpiece. A Christmas Morning Charcuterie Breakfast Board photographs beautifully, satisfies picky eaters, and frees the cook from the stove. It’s the ultimate quick fix for busy holidays, and it’s as customizable as any easy dinner spread—just sweeter, cozier, and sparkly with seasonal touches.

    TIPS, TRICKS & EXPERT SECRETS

    Chef Tips for Perfect Christmas Morning Charcuterie Breakfast Board Every Time

    During a cooking class, I learned that even simple boards sing when textures are planned. My tiny mishap? I stacked hot waffles under berries—hello, soggy town. This Christmas Morning Charcuterie Breakfast Board gets better with strategy. Try these cooking tip gems for an easy recipe that feels pro-level yet homemade:

    • Temperature zones: group warm items (waffles, bacon, sausage) together and add them last so steam doesn’t wilt fruit or cheese.
    • Anchor with bowls: set small bowls of maple syrup, jam, and yogurt first; arrange cheeses and fruit around them for a polished layout.
    • Texture trio: aim for tender (eggs), crunchy (granola, nuts), and creamy (brie) for a balanced, comfort food feel.
    • Knife-ready cheese: pre-slice or score rinds so guests can easily serve themselves—no traffic jams.

    Smart Ingredient Swaps & Practical Cooking Advice

    • Gluten-free: swap in GF waffles, crackers, and pastries. Most cheeses and jams are naturally GF—easy, quick fix!
    • Vegetarian: skip bacon/sausage and offer plant-based patties, extra nuts, and more fruit. The board still feels rich and homemade.
    • Lighter option: add cottage cheese, Greek yogurt, and whole fruit for a fresh balance.
    • What not to do: don’t overcrowd hot items on the board. Overstacking traps steam and makes everything soggy.

    With these tips, your Christmas Morning Charcuterie Breakfast Board will shine—an easy recipe that’s both festive and foolproof, from homemade waffles to store-bought shortcuts.

    SERVING IDEAS & CREATIVE VARIATIONS

    How to Serve Christmas Morning Charcuterie Breakfast Board for Maximum Enjoyment

    When friends dropped by in pajamas, I went full brunch mode: the Christmas Morning Charcuterie Breakfast Board on the kitchen island, mugs of cocoa, and a sparkle of powdered sugar. Presentation matters. For serving ideas, add a small stack of warm plates and napkins at one end, then a carafe of coffee or a pitcher of orange juice. For a seasonal twist, pair the board with my Hot Cocoa Pancakes with Marshmallows or a cozy pan of Eggnog French Toast Casserole—both make the spread feel extra special.

    • Pairings: hot cocoa, spiced chai, or coffee for warmth; sparkling cider or mimosas for celebration.
    • Plating suggestion: start with cheese and fruit, add a waffle, then top with bacon, honey, and a rosemary sprig.
    • Photography tip: cluster items in odd numbers and repeat colors (reds from berries/oranges from clementines) for a shareable shot.

    Flavor Twists and Seasonal Variations

    • Gingerbread Glow: add gingerbread cookies and serve alongside Fluffy Gingerbread Pancakes for a deep, cozy spice note.
    • Grinchy Green: include kiwi, green grapes, and pistachios, plus a side of Grinch Green Pancakes for a playful color pop.
    • Berry Brunch: swap in cranberry-orange jam, add pomegranate arils, and a drizzle of orange blossom honey for a bright seasonal twist.

    These serving ideas and flavor variation options turn your Christmas Morning Charcuterie Breakfast Board into a tailored holiday moment—festive, flexible, and irresistibly photogenic.

    STORAGE & TROUBLESHOOTING GUIDE

    How to Store and Reheat Christmas Morning Charcuterie Breakfast Board

    After everyone eats, I slide leftovers into labeled containers—future cozy snacks guaranteed. For safe storage advice on your Christmas Morning Charcuterie Breakfast Board: keep perishable items (eggs, meat, cheese, yogurt) out for no more than 2 hours at room temperature. Refrigerate promptly.

    • Fridge: store cheeses, meats, and eggs in airtight containers up to 3–4 days; fruit up to 2–3 days; waffles and pastries up to 2 days.
    • Freezer: freeze waffles and bacon in zip-top bags up to 2 months. Thaw overnight in the fridge.
    • Reheat: warm waffles in a toaster or 350°F oven for 5–8 minutes; re-crisp bacon/sausage in a skillet or air fryer at 350°F for 3–5 minutes.

    Troubleshooting Common Christmas Morning Charcuterie Breakfast Board Issues

    • Cheese sweating: chill the board and add cheeses last; slice just before serving.
    • Soggy waffles: toast right before assembly; keep on a wire rack in a low oven until serving.
    • Dry pastries: tent with foil while warming; serve with jam, butter, or honey to add moisture.
    • Watery fruit: pat berries dry after rinsing; place in clusters, not on hot items.
    • Bland bites: finish with a sprinkle of flaky salt on eggs and a drizzle of honey over cheese for instant flavor lift.

    With these keep fresh pointers, your Christmas Morning Charcuterie Breakfast Board stays gorgeous and delicious, from the first toast to the last nibble. You’ve got this—merry, cozy, and confident!

    FAQs

    Can I assemble the Christmas Morning Charcuterie Breakfast Board the night before?

    Partially. Slice cheeses and wash/dry fruit; cover tightly. Add apples/pears and all warm items (waffles, bacon) just before serving.

    What size board should I use for this Christmas Morning Charcuterie Breakfast Board?

    A large wooden board or sheet pan works for 6–8 people. For a crowd, use two medium boards to keep warm and cold items separate.

    How do I keep items warm on the Christmas Morning Charcuterie Breakfast Board?

    Hold waffles, bacon, and sausage in a 200°F oven until just before serving. Add them to the board last to prevent wilting.

    Can this Christmas Morning Charcuterie Breakfast Board be made vegetarian or gluten-free?

    Yes. Use plant-based sausage/bacon, extra nuts and fruit, and swap in gluten-free waffles and pastries.

    Conclusion

    The Christmas Morning Charcuterie Breakfast Board brings cozy energy, bold flavor, and a homemade look without stress. It’s an easy recipe that channels comfort food magic and lets everyone graze while presents are opened and stories are told. With simple ingredients, smart prep, and festive serving ideas, your Christmas Morning Charcuterie Breakfast Board becomes the heart of holiday brunch. Make it your way—classically cozy, gingerbread-spiced, or Grinchy green—and share the joy. Try it at home and tag me so I can see your beautiful boards!

  • Grinch Green Pancakes – Cozy and Irresistible

    Grinch Green Pancakes – Cozy and Irresistible

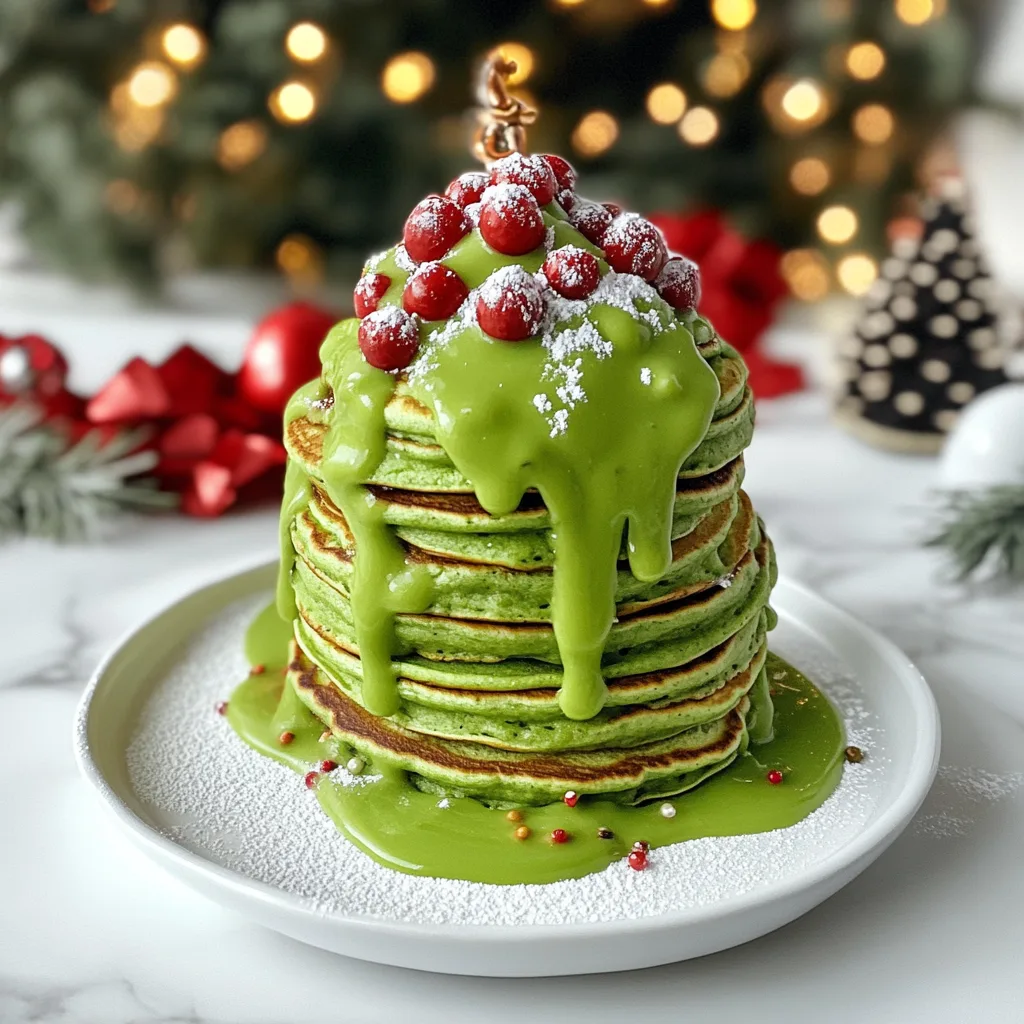
    Grinch Green Pancakes were born on a snowy morning when my mixer went missing (my teenager had it in the garage for a “science project”). So I pulled out the blender, tossed in spinach for that signature Grinch green, and flipped the fluffiest batch of Grinch Green Pancakes I’ve ever made. My kitchen looked like a festive tornado hit it, but the stack—topped with a tiny red candy heart—made everyone giggle and eat breakfast without a nudge.

    Grinch Green Pancakes were born on a snowy morning when my mixer went missing (my teenager h

    Recipe

    Why You’ll Love Grinch Green Pancakes

    What Makes This Grinch Green Pancakes So Irresistible

    I created Grinch Green Pancakes on a whim during a holiday breakfast rush, and now they’re a tradition. Grinch Green Pancakes are fluffy, bright, and wildly fun—like a cozy, homemade brunch wrapped in a green sweater. The color is festive, the texture is soft, and the flavor is pure comfort food. These are the easy breakfast you can make on a weekday, yet special enough for Christmas morning. They’re a kid magnet and a content creator’s dream.

    • Quick prep: one bowl plus a blender—on the table fast.
    • Fluffy texture: a tender crumb thanks to buttermilk and baking powder.
    • Simple ingredients: a homemade version using pantry staples.
    • Kid-friendly and photogenic: that Grinch green gets cheers every time.
    • Flexible: natural spinach, matcha, or a quick food coloring option.

    Use these Grinch Green Pancakes for holiday brunch, weekend comfort food, or an easy dinner when breakfast-for-dinner is calling. Ready to flip?

    Across social feeds, Grinch Green Pancakes are trending because they’re equal parts delicious and delightful. They’re an easy recipe that looks like a gourmet, one-pan meal moment—without the stress. Families love the homemade vibe, brunch hosts love the color pop, and creators love how forgiving the batter is for close-up shots and stacks. The green hue is a conversation starter, while the classic vanilla-buttermilk flavor keeps it familiar. If you want a dish that sparks joy but stays practical, Grinch Green Pancakes do it—fast.

    Craving more cozy breakfast inspo? Try my Overnight French Toast Casserole for make-ahead mornings or this reader-fave Crockpot Cinnamon Roll Casserole that perfumes the whole house.

    Tips, Tricks & Expert Secrets for Grinch Green Pancakes

    Chef Tips for Perfect Grinch Green Pancakes Every Time

    I once taught a mini-class to my niece who insisted pancakes “need constant whisking.” Spoiler: her first batch turned rubbery. Here’s the quick fix that makes Grinch Green Pancakes reliably fluffy and vibrant.

    • Blend the spinach fully: A silky puree gives even, bright color without green flecks.
    • Rest the batter 5–10 minutes: This simple cooking tip hydrates flour and boosts rise.
    • Medium heat is magic: Too hot scorches the color; medium ensures a gentle, golden cook.
    • Flip once: Wait for bubbles to set around the edges—then flip for the best texture.

    Smart Ingredient Swaps & Practical Cooking Advice

    • Vegan swap: Use plant milk + 1 tablespoon lemon juice (buttermilk effect), 1 flax egg (1 tbsp ground flax + 3 tbsp water), and oil instead of butter.
    • Gluten-free: A 1:1 gluten-free all-purpose blend works in this easy recipe—let the batter rest a full 10 minutes for a better homemade version.
    • Matcha route: For a subtle tea note, 1–2 teaspoons matcha gives color and a gentle flavor twist.

    What not to do: Don’t overmix. Overmixing makes Grinch Green Pancakes tough and deflates the lift from baking powder and baking soda.

    These quick tips keep your Grinch Green Pancakes fluffy, evenly colored, and brunch-worthy—every single time.

    Serving Ideas & Creative Variations

    How to Serve Grinch Green Pancakes for Maximum Enjoyment

    When I served Grinch Green Pancakes to friends, I plated a tall, whimsical stack with a single heart sprinkle on top. The table went silent, then everyone grinned. For serving ideas that feel like a holiday hug, try these pairing and plating suggestions:

    • Classic cozy: Warm maple syrup, a dollop of whipped cream, and a red heart candy.
    • Brunch board: Fresh berries, vanilla yogurt, chocolate chips, and crushed candy canes.
    • Beverage pairing: Hot cocoa or a creamy latte to complement the fluffy, sweet, homemade pancakes.

    For content creators: plate in odd-number stacks, drizzle syrup slowly for a glossy cascade, and shoot near a window for that soft, festive glow.

    Flavor Twists and Seasonal Variations

    • Mint-chocolate chip: Stir in mini chocolate chips and a few drops peppermint extract for a winter wonderland flavor variation.
    • Matcha latte: Use matcha for color and add a splash of almond milk and honey—gentle, earthy, and soothing.
    • Strawberry heart compote: Serve with quick strawberry sauce for a red-and-green seasonal twist.

    For more family-style comfort, peek at my Crockpot Gluten-Free Breakfast Casserole—a hearty side that turns Grinch Green Pancakes into a full brunch spread.

    Grinch Green Pancakes – Cozy and Irresistible
    Grinch Green Pancakes – Cozy and Irresistible

    Storage & Troubleshooting Guide

    How to Store and Reheat Grinch Green Pancakes

    Leftover Grinch Green Pancakes are a gift. I stash a stack between parchment layers so weekday breakfasts feel like Sunday. Here’s how to keep Grinch Green Pancakes fresh and fluffy:

    • Room temperature: Up to 2 hours for serving—keep loosely covered.
    • Refrigerator: 3–4 days in an airtight container with parchment between pancakes.
    • Freezer: 2–3 months, wrapped in parchment-stacked layers inside a freezer bag. Press out excess air.
    • Reheat: Skillet with a dab of butter (best texture), toaster for crisp edges, air fryer at 320°F for 3–4 minutes, or oven at 300°F for 8–10 minutes.

    Troubleshooting Common Grinch Green Pancakes Issues

    • Too dense: Batter was overmixed or not rested. Next time, mix gently and rest 10 minutes.
    • Pale color: Pan too cool or not enough green. Preheat properly and use a full spinach puree or a touch more matcha/food coloring.
    • Green fading or browning: Heat too high. Cook over medium to keep color vibrant.
    • Watery batter: Measure liquids carefully; add 1–2 tablespoons flour to fix texture.
    • Spinach flavor peeking through: Add 1 teaspoon extra vanilla and a bit more sugar; cook gently to avoid bitterness.

    You’ve got this. With a few easy store-and-reheat moves, Grinch Green Pancakes stay soft, bright, and ready for joy—on repeat.

    Grinch Green Pancakes Recipe

    See the full recipe card and schema below. Flip on!

    FAQs

    Can I make Grinch Green Pancakes without spinach?

    Yes. Use 1–2 teaspoons matcha for a natural hue or a few drops of green gel food coloring for a neutral flavor and bold color.

    Can I make the batter ahead?

    Mix the dry and wet separately the night before. Combine in the morning. If fully mixed, rest no more than 1–2 hours in the fridge; leaveners lose power over time.

    How do I make Grinch Green Pancakes gluten-free or vegan?

    Use a 1:1 gluten-free flour blend and rest the batter longer. For vegan, use plant milk + lemon juice, a flax egg, and oil instead of butter.

    Can I turn this batter into waffles?

    Yes. Add 1 extra tablespoon oil, and cook in a preheated waffle iron until crisp and golden.

    Conclusion

    Grinch Green Pancakes are a cozy, homemade celebration—festive enough for holiday brunch yet simple enough for an easy breakfast or breakfast-for-dinner. With a bright green glow and a tender, fluffy crumb, Grinch Green Pancakes deliver comfort food joy without complicated steps. Use spinach for a natural hue, matcha for an earthy twist, or gel coloring for a vivid look. Serve with maple syrup and a tiny red heart for a grin-worthy plate. Try Grinch Green Pancakes at home, share your stack, and tag me so I can cheer on your delicious creation. Let this sweet, playful recipe bring a little extra sparkle to your morning—one irresistibly green bite at a time!

  • Snowman Pancake Stack – Cozy and Irresistibly Easy

    Snowman Pancake Stack – Cozy and Irresistibly Easy

    Snowman Pancake Stack mornings are my favorite kind of chaos. The last time I made a Snowman Pancake Stack, my son declared he was “Head of Button Placement,” which is why one snowman had eight buttons and no scarf. I flipped pancakes with one hand, negotiated chocolate chips with the other, and somehow the dog ended up with a pretzel arm. That’s the joy: these fluffy pancakes are cozy, quick, and totally homemade—perfect for winter weekends or cozy holiday mornings.

    Snowman Pancake Stack

    Recipe

    WHY YOU’LL LOVE THIS RECIPE

    What Makes This Snowman Pancake Stack So Irresistible

    I once promised these pancakes to my niece if she cleaned up the sprinkles. She cleaned the sprinkles by generously relocating them onto each Snowman Pancake Stack. The truth is, a Snowman Pancake Stack turns a simple homemade breakfast into a cozy moment, and the kitchen becomes a stage for giggles and creative decorating. With one pan, a quick batter, and a little imagination, this comfort food feels like a winter wonderland. The Snowman Pancake Stack is fluffy, golden, and so easy you can make a whole batch while hot cocoa steams. If you’re craving an easy recipe that tastes like a weekend hug, you’re in the right place.

    • Quick prep: pantry staples and a fast, homemade batter.
    • One-pan ease: use a griddle or nonstick skillet for minimal cleanup.
    • Family-friendly: kids love decorating their own snowman pancakes.
    • Cozy comfort food: fluffy, vanilla-kissed pancakes perfect for winter mornings.
    • Festive and flexible: adapt toppings to taste or dietary needs.

    Craving more cozy breakfast vibes? Try my Eggnog French Toast Casserole for a holiday bake, or my crowd-favorite Crockpot Cinnamon Roll Casserole when you want a no-fuss, homemade treat. For overnight magic, peek at Overnight French Toast Casserole too. Ready to build your snowmen? Let’s head to the recipe card.

    Because the Snowman Pancake Stack is irresistibly photogenic and wonderfully cozy, it’s trending as the easy, homemade winter brunch that doubles as a family activity. The Snowman Pancake Stack feels like a crafty, one-pan breakfast where kids can design faces and scarves while you keep pancakes flipping. In a season of comfort food and quick fixes, this easy recipe brings pure joy to the table.

    TIPS, TRICKS & EXPERT SECRETS

    Chef Tips for Perfect Snowman Pancake Stack Every Time

    During a cooking class, I learned the great pancake truth: the first one is a tester. When I brought that lesson home, my griddle went from chaos to calm, and every Snowman Pancake Stack turned out fluffy and evenly golden. Here’s how to nail it like a pro.

    • Heat control: medium heat is your friend. A Snowman Pancake Stack cooks best around 375°F—edges set, center puffs, no scorching.
    • Do not overmix: whisk until just combined. A few lumps keep the crumb tender and the stack fluffy.
    • Rest the batter: 5 minutes hydrates flour and reduces toughness—your homemade version will be noticeably lighter.
    • Oil then butter: wipe a thin film of neutral oil, then add a touch of butter for flavor without smoking.
    • Size planning: pour large, medium, and small pancakes in quick succession so each Snowman Pancake Stack assembles neatly and stays warm.

    Smart Ingredient Swaps & Practical Cooking Advice

    • Gluten-free: use a 1:1 GF flour and add 1–2 tablespoons extra milk for the same easy recipe flow.
    • Dairy-free: swap buttermilk for oat milk with 1 teaspoon lemon juice or vinegar; use neutral oil instead of butter.
    • No buttermilk on hand: mix 1 1/4 cups milk with 1 tablespoon lemon juice, rest 5 minutes—a quick fix that keeps your Snowman Pancake Stack tender.
    • Flavor boost: a pinch of cinnamon or nutmeg adds cozy depth to this comfort food classic.

    What not to do: Don’t crank the heat. A scorched exterior with a raw center ruins the balance and flattens your Snowman Pancake Stack. Keep it steady and golden for the fluffiest, homemade result.

    Snowman Pancake Stack – Cozy and Irresistibly Easy
    Snowman Pancake Stack – Cozy and Irresistibly Easy

    SERVING IDEAS & CREATIVE VARIATIONS

    How to Serve Snowman Pancake Stack for Maximum Enjoyment

    When I serve a Snowman Pancake Stack to guests, I set up a little “snowman station” with toppings in bowls—buttons, noses, scarves, and “snow” (powdered sugar). It’s like a brunch craft session. The result is an easy, homemade centerpiece that tastes even better than it looks.

    • Plating suggestion: stack large to small, add a whipped cream “glue” dot, and finish with a snowy dusting of powdered sugar.
    • Pairings: hot cocoa with a cinnamon stick, or fresh-squeezed orange juice for brightness. Coffee with a touch of maple syrup is dreamy.
    • Sauces: warm maple syrup is classic, but a quick berry compote adds a tart, seasonal twist.

    Flavor Twists and Seasonal Variations

    • Gingerbread Snowman: add 1 teaspoon ground ginger, 1/2 teaspoon cinnamon, and a pinch of cloves to the batter; serve with vanilla yogurt “snow.”
    • Chocolate-Chip Snowman: fold 1/3 cup mini chips into the batter for a kid-approved, comfort food treat.
    • Blueberry Blizzard: scatter fresh blueberries on the batter as it sets; top with lemon zest for a bright, wintery finish.

    Content creators: for irresistibly shareable photos, plate on a dark board so the Snowman Pancake Stack pops, angle light from the side for soft shadows, and add a maple drizzle shot mid-pour. These serving ideas and flavor variations keep your homemade pancake moment feeling fresh and festive.

    STORAGE & TROUBLESHOOTING GUIDE

    How to Store and Reheat Snowman Pancake Stack

    I always make extra because tomorrow’s breakfast-me is grateful. Leftover Snowman Pancake Stack layers keep beautifully with a few simple storage tips that help them stay soft, fluffy, and ready for a quick reheat.

    • Room temperature: keep cooked pancakes (undecorated) up to 2 hours.
    • Refrigerator: layer pancakes between parchment in an airtight container for 3–4 days. Store toppings separately.
    • Freezer: freeze single layers on a sheet pan, then pack in freezer bags up to 2 months. Squeeze out air to keep fresh.
    • Reheat: for best texture, warm in a 300°F oven for 8–10 minutes, or toast in a dry skillet 1–2 minutes per side. Microwave 15–20 seconds per pancake in a pinch.

    Troubleshooting Common Snowman Pancake Stack Issues

    • Too dry: batter may be overmixed. Next time, whisk less and add 1–2 tablespoons more buttermilk.
    • Watery batter: add 1–2 tablespoons flour until the batter ribbons slowly from the spoon.
    • Uneven browning: heat is too high or surface is dry. Lightly oil the pan and lower heat for steady, even color.
    • Flat pancakes: check that your baking powder is fresh. Batter should rest 5 minutes for a fluffier Snowman Pancake Stack.
    • Toppings slide: use a pea-sized dollop of whipped cream as “glue” between layers.

    With this storage advice and quick fixes, your Snowman Pancake Stack stays tender, warm, and picture-ready even after reheating. You’ve got this—your winter breakfast just found its forever happy place.

    FAQs

    Can I make the batter ahead?

    Yes. Mix the dry ingredients the night before. Whisk in wet ingredients in the morning for the fluffiest Snowman Pancake Stack. Fully mixed batter can rest up to 1 hour refrigerated.

    What can I use instead of fruit leather for scarves?

    Thinly sliced strawberries, ribboned apple peels, or even crispy bacon. For a vegetarian Snowman Pancake Stack, stick with fruit.

    How do I keep pancakes warm while I cook the rest?

    Place finished pancakes on a wire rack set over a sheet pan in a 200°F oven so they stay fluffy—not soggy—until assembly.

    Can I double the recipe?

    Absolutely. Cook in batches, keep warm in the oven, and decorate right before serving for a crowd-pleasing Snowman Pancake Stack.

    Conclusion

    The Snowman Pancake Stack is a cozy, homemade celebration of winter mornings—fluffy layers, sweet maple, and playful toppings that turn breakfast into a memory. With one-pan ease, quick prep, and comfort food flavor, a Snowman Pancake Stack fits busy weekdays, slow Sundays, and festive brunch alike. Use the tips above to keep each stack golden and tender, swap ingredients to suit your needs, and try seasonal twists whenever inspiration strikes. Ready to make your table sparkle? Try it at home and tag me so I can see your snowmen come to life!