Author: Sara Maren

  • Glazed Carrots – Irresistibly Easy and Comforting

    Glazed Carrots – Irresistibly Easy and Comforting

    Glazed Carrots are my weeknight peace treaty. The first time I made Glazed Carrots, I was juggling a wobbly cutting board, a timer that wouldn’t stop beeping, and my son asking if butter counts as a vegetable. I tossed carrots in a pan with brown sugar and honey, and the glossy, sweet glaze saved dinner and my mood. Now I keep this easy side in rotation because it’s fast, family-approved, and tastes like a warm hug on a plate.

    Glazed Carrots

    Recipe

    WHY YOU’LL LOVE THIS RECIPE

    What Makes This Glazed Carrots So Irresistible

    I learned the magic of Glazed Carrots on a Tuesday when the roast was a little dry and the clock was not my friend. A quick swirl of butter, brown sugar, and honey turned a simple pan of carrots into a glossy, sweet-salty side that the whole table grabbed first. Glazed Carrots instantly elevate even a basic dinner, and they come together with pantry staples. This easy dinner side is comfort food without fuss—polished enough for holidays, but perfect for any night you need a homemade win.

    • Quick prep: From stove to table in about 20–25 minutes—ideal for busy nights.
    • Simple ingredients: Carrots, butter, brown sugar, and honey you probably already have.
    • One-pan ease: Minimal cleanup and maximum flavor—an easy, homemade favorite.
    • Family-friendly: Naturally sweet, tender, and glossy, loved by kids and adults.
    • Flexible flavor: Add orange zest, cinnamon, or thyme for a cozy seasonal twist.

    Glazed Carrots bring big flavor with little effort, a true one-pan meal helper that pairs with everything from roasted chicken to weeknight pasta. If you’re craving more cozy sides and soups, you’ll love my best creamy mushroom soup and these hearty sweet potato recipes. Ready to cook? Let’s get to the recipe card.

    They’re the ultimate easy recipe upgrade: a homemade version of your favorite steakhouse side that tastes luxurious but requires zero chef training. With glossy edges and buttery sweetness, Glazed Carrots are photogenic for social sharing, comforting for weeknights, and impressive for guests. That balance of speed, flavor, and comfort keeps this side trending—especially around holidays when simple, make-ahead-friendly sides are gold.

    TIPS, TRICKS & EXPERT SECRETS

    Chef Tips for Perfect Glazed Carrots Every Time

    I once taught a quick cooking class where my burner ran hotter than the sun. The carrots still came out dreamy because the method is forgiving—if you know a few smart cooking tips. Here’s how to nail Glazed Carrots like a pro.

    • Cut evenly: Slice carrots on a bias about 1/2 inch thick so they cook at the same rate and glaze beautifully.
    • Par-simmer first: Briefly simmer in a splash of water with a pinch of salt until tender-crisp before adding sugar and butter. This keeps them vibrant and not mushy.
    • Reduce to gloss: Let the brown sugar, honey, and butter bubble until syrupy; the glaze should coat the back of a spoon.
    • Finish with acid: A teaspoon of apple cider vinegar or lemon juice brightens the sweetness for a balanced, restaurant-style finish.

    Smart Ingredient Swaps & Practical Cooking Advice

    • Vegan swap: Use vegan butter and maple syrup instead of honey for a fully plant-based, homemade version.
    • Lower sugar option: Reduce brown sugar to 2 tablespoons and add orange zest for a fragrant, easy fix.
    • Spice it right: A pinch of cinnamon or ginger adds cozy depth; fresh thyme brings a savory edge.
    • What not to do: Don’t walk away once the glaze starts reducing. Over-reduction turns sticky fast; if that happens, add a tablespoon of water and swirl to loosen.

    This easy recipe loves a medium skillet, steady heat, and a little patience during the glaze phase. If the texture seems off, remember: you can always add a splash of water to fix it, or cook 1–2 minutes more to thicken. Glazed Carrots reward attention with that perfect glossy finish.

    SERVING IDEAS & CREATIVE VARIATIONS

    How to Serve Glazed Carrots for Maximum Enjoyment

    I once arranged Glazed Carrots in a shallow bowl with extra glaze and a shine of orange zest, and my friend thought I secretly hired a caterer. Presentation matters! For a pretty plating suggestion, spoon the carrots onto a warm platter, drizzle with pan glaze, and finish with flaky salt and fresh herbs. Pair Glazed Carrots with cozy mains like lemon herb chicken and rice or weeknight favorites such as slow cooker Mongolian beef. For a comforting soup-and-side moment, serve alongside my creamy mushroom soup.

    • Holiday sideboard: Pile Glazed Carrots into a wide, shallow dish so the glaze shows; sprinkle with chopped parsley or thyme.
    • Weeknight bowl: Add to grain bowls with quinoa, rotisserie chicken, and a squeeze of lemon for a quick, homemade dinner.
    • Elegant plate: Fan the carrots next to roasted salmon; finish with a touch of orange zest and toasted almonds.

    Flavor Twists and Seasonal Variations

    • Orange-Maple Glazed Carrots: Swap honey for maple syrup and add 1 teaspoon orange zest plus 1 tablespoon orange juice for a bright, seasonal twist.
    • Brown Butter Sage: Brown the butter first and toss in a few sage leaves; this adds nutty depth and autumn comfort-food vibes.
    • Spicy Honey: Add a pinch of red pepper flakes or a drizzle of hot honey for a sweet-heat flavor variation that’s amazing with pork chops.

    For photos, keep a little extra glaze in the pan and spoon it over right before shooting; that mirror-shine reads beautifully on camera and social feeds. Glazed Carrots are naturally vibrant, so choose a neutral plate and let the color pop.

    STORAGE & TROUBLESHOOTING GUIDE

    How to Store and Reheat Glazed Carrots

    I’m a leftovers loyalist. When I batch-cook Glazed Carrots, I stash them in shallow containers so they cool quickly and keep that silky texture. Here’s how to store, keep fresh, and reheat without losing the glaze.

    • Room temperature: Keep Glazed Carrots out no longer than 2 hours.
    • Fridge: Store in an airtight container up to 4 days. Press parchment onto the surface to minimize moisture loss.
    • Freezer: Freeze up to 2 months. For best texture, undercook carrots by 1–2 minutes before freezing.
    • Reheat: Warm gently in a skillet over medium-low with a splash of water to loosen the glaze. You can also reheat covered in a 325°F oven for 10–12 minutes, or in an air fryer at 300°F for 5–6 minutes, shaking once.

    Troubleshooting Common Glazed Carrots Issues

    • Too watery: Simmer uncovered for 1–3 minutes to reduce, or add 1 teaspoon butter to help emulsify.
    • Too thick/sticky: Stir in 1–2 tablespoons water and gently reheat to loosen the glaze.
    • Overcooked/mushy: Next time, cut carrots thicker and reduce simmer time; for now, fold gently and serve warm—they’ll still taste great.
    • Not sweet enough: Add 1–2 teaspoons honey or a pinch more brown sugar and simmer briefly to incorporate.
    • Flat flavor: Brighten with 1 teaspoon apple cider vinegar or lemon juice and a pinch of salt.

    You’ve got this! With a few quick fixes, your Glazed Carrots will keep their glossy finish and comforting flavor—ready to rescue any dinner plate.

    FAQs

    Can I use baby carrots for Glazed Carrots?

    Yes. Baby carrots work well—just simmer a bit longer until tender-crisp before glazing, since they’re thicker and often colder from the fridge.

    How do I make Glazed Carrots without honey?

    Use maple syrup or add an extra tablespoon of brown sugar plus 1 teaspoon water. The glaze will still be shiny and delicious.

    Can I prep Glazed Carrots ahead?

    Par-cook the carrots up to 24 hours ahead. Reheat in the glaze, reducing to a glossy finish right before serving for best texture.

    Are Glazed Carrots gluten-free?

    Yes, this recipe is naturally gluten-free. Always check labels on butter substitutes and spices if you’re cooking for strict diets.

    Conclusion

    Glazed Carrots are the cozy, homemade side that turns any plate into comfort food. With a buttery-sweet glaze and simple pantry ingredients, Glazed Carrots deliver big flavor fast—perfect for holiday tables and weeknight cravings. Use the tips above to customize your easy recipe with orange zest, maple syrup, brown butter, or thyme, and serve alongside family favorites for a well-rounded meal. I hope you love this glossy, crowd-pleasing classic as much as we do in my kitchen. Try it at home and tag me so I can see your Glazed Carrots shine!

  • Creamy Reuben Soup – Cozy, Irresistible Comfort

    Creamy Reuben Soup – Cozy, Irresistible Comfort

    Creamy Reuben Soup is what I make when my kitchen looks like a deli collided with a dairy aisle. The first time I made Creamy Reuben Soup, I was out of rye bread, my sauerkraut wouldn’t drain, and my corned beef fell off the cutting board—straight into the dog’s line of duty. Still, the pot simmered into pure, cozy magic. If a Reuben sandwich is your comfort food love language, this creamy, tangy, Swiss-cheesy bowl will speak fluently to your weeknights.

    The first time I made Creamy Reuben Soup, I was out of rye bread, my sauerkraut wouldn’t drain,

    Recipe

    WHY YOU’LL LOVE THIS RECIPE

    What Makes This Creamy Reuben Soup So Irresistible

    I was halfway through shredding Swiss when my youngest declared the fridge “a cheese cave,” and that’s when I knew dinner was going to be legendary. Creamy Reuben Soup brings the nostalgic zing of sauerkraut, the savory bite of corned beef, and the melty comfort of Swiss into one velvety, homemade pot. Creamy Reuben Soup is my quick fix for an easy dinner that tastes like it simmered all day. And when I say it’s a one-pot comfort food moment, I mean the kind that solves a Tuesday.

    • Ultra-comforting, deli-classic flavor in a cozy bowl of soup.
    • Simple, affordable ingredients you probably have or can find easily.
    • One-pot, easy recipe with quick prep and smooth cleanup.
    • Family-friendly yet impressive enough for guests.
    • Customizable: make it lighter, gluten-free, or extra cheesy.

    What seals it? That signature Reuben tang. Creamy Reuben Soup swirls in Thousand Island, dill, and caraway for a bold, homemade version that’s spectacularly satisfying. Ready to stir up your new favorite weeknight soup? Let’s ladle into the recipe card.

    People love a sandwich-in-a-bowl moment, and Creamy Reuben Soup delivers. It’s the comfort food mashup we crave during chilly months, a quick one-pot meal that satisfies a hoagie-level appetite with half the dishes. On social media, this easy dinner is showing up alongside other cozy bowls like Gluten-Free Lasagna Soup and our creamy White Lasagna Soup (Crockpot)—because big flavor and simplicity always trend.

    TIPS, TRICKS & EXPERT SECRETS

    Chef Tips for Perfect Creamy Reuben Soup Every Time

    My “aha” moment came when I learned to add cheese off the heat—one of those tiny cooking tips that turns an easy recipe silky instead of stringy. Here’s how to nail Creamy Reuben Soup like a pro, every time.

    • Toast your caraway: Blooming caraway seeds in butter amplifies that signature rye-bread aroma in the homemade version.
    • Roux right: Stir flour for 1–2 minutes to cook off raw flavor before whisking in broth—this gives the soup a lush, creamy base without lumps.
    • Dairy last, low heat: After sauerkraut and corned beef simmer, reduce heat and add cream, cream cheese, and Swiss gently. Do not boil after dairy is added.
    • Season late: Sauerkraut and corned beef are salty. Taste after adding cheese and dressings, then adjust salt and pepper.

    Smart Ingredient Swaps & Practical Cooking Advice

    • Gluten-free swap: Use rice flour instead of all-purpose, and choose gluten-free rye-style bread or skip croutons altogether.
    • Lighter option: Use half-and-half instead of heavy cream and reduce Swiss slightly; add extra potato for body.
    • Keto-inspired: Omit the potato and flour; thicken with a small pinch of xanthan gum and melt in a bit more cheese.
    • What not to do: Don’t crank the heat after adding dairy. Boiling can break the emulsion and make the texture grainy or oily.

    These quick fixes and cooking tips keep Creamy Reuben Soup balanced, velvety, and weeknight-ready—an easy dinner that tastes like a chef made it.

    SERVING IDEAS & CREATIVE VARIATIONS

    How to Serve Creamy Reuben Soup for Maximum Enjoyment

    I once served Creamy Reuben Soup in mini mugs for game night and watched a tray disappear in three minutes flat. For cozy gatherings or a homemade weeknight treat, presentation and pairings make this comfort food shine.

    • Top with rye croutons, a drizzle of Thousand Island, extra Swiss, and a sprinkle of dill and caraway for the full Reuben experience.
    • Pair with a crisp dill pickle spear and a simple green salad with lemon vinaigrette to cut through the richness.
    • Beverage ideas: A malty amber ale or a lightly chilled Riesling complements the tang and savoriness.

    For creators, a plating suggestion: serve in white or matte-black bowls to make the creamy soup pop, and stack a few toasted croutons on the rim for height. Overhead shots catch the sheen of the melted Swiss beautifully.

    How to Serve Creamy Reuben Soup for Maximum Enjoyment

    Flavor Twists and Seasonal Variations

    • Smoky twist: Add a pinch of smoked paprika and a handful of chopped pastrami along with the corned beef.
    • Spicy deli: Stir in diced pickled jalapeños or a splash of hot giardiniera brine for heat and brightness.
    • Oktoberfest style: Replace 1 cup of broth with a mild lager; finish with extra mustard and fresh chives.
    • Slow-cooker companion: Make the base earlier in the day and finish with dairy before serving—pair with crowd-pleasers like Slow Cooker Korean BBQ Beef for a party buffet.

    Whether you lean classic or playful, Creamy Reuben Soup invites flavor variation and seasonal twist experiments—all while staying wonderfully easy and homemade.

    STORAGE & TROUBLESHOOTING GUIDE

    How to Store and Reheat Creamy Reuben Soup

    Leftovers rarely survive long in my house, but when they do, Creamy Reuben Soup keeps beautifully with a little care.

    • Room temperature: Up to 2 hours max.
    • Fridge: 3–4 days in an airtight container. Glass containers help keep odors at bay.
    • Freezer: 2–3 months. Dairy may separate; for best results, freeze the soup base before adding cream and cheese. Add them fresh when reheating.
    • Reheat: Warm slowly on the stovetop over low heat, stirring often. Do not boil. Add a splash of broth or cream to loosen as needed.

    Troubleshooting Common Creamy Reuben Soup Issues

    • Too thin: Simmer uncovered a few minutes, mash a few potato cubes in the pot, or whisk 1 teaspoon cornstarch with 2 teaspoons cold broth and stir in.
    • Too thick: Add warm broth in small splashes until silky.
    • Too salty: Balance with a diced boiled potato, a splash of cream, or a tiny squeeze of lemon to brighten. Rinse and squeeze sauerkraut extra well next time.
    • Split or grainy: The dairy likely overheated. Remove from heat, whisk gently, and add a bit more cream cheese to re-emulsify.
    • Cheese clumping: Always melt Swiss off the heat and add in small handfuls while stirring.

    With these storage tips and texture fixes, your Creamy Reuben Soup will stay delicious from first bowl to last.

    FAQs

    Can I make Creamy Reuben Soup ahead?

    Yes. Cook through the simmering stage, cool, and refrigerate. Reheat gently and add cream and cheese just before serving for the silkiest texture.

    What can I use instead of corned beef?

    Pastrami, roast beef, or even shredded rotisserie chicken work. For a vegetarian twist, try sautéed mushrooms and extra potato.

    How do I make Creamy Reuben Soup gluten-free?

    Use rice flour for the roux and skip or swap rye croutons for gluten-free bread. Everything else is naturally gluten-optional.

    Can I lighten the soup without losing creaminess?

    Use half-and-half and add a little extra potato for body. Stir in Greek yogurt off the heat for tangy richness.

    Conclusion

    Creamy Reuben Soup proves that comfort food can be both nostalgic and weeknight-easy. With tangy sauerkraut, tender corned beef, and melty Swiss, this homemade, one-pot dinner wraps you in cozy deli flavors without the pile of dishes. Whether you’re cooking for family or friends, the caraway-kissed aroma and velvety spoonfuls make every bowl feel special. If you loved this, you’ll also enjoy my hearty soups like Gluten-Free Lasagna Soup. Try Creamy Reuben Soup at home, share your twist, and tag me—I can’t wait to see your delicious bowls!

  • Easy Potsticker Soup Recipe – Cozy, Irresistible Comfort

    Easy Potsticker Soup Recipe – Cozy, Irresistible Comfort

    Easy Potsticker Soup Recipe nights are my love language. Last week, the dog stole a potsticker right off the counter while I hunted for the ladle—classic Darleen chaos—and this Easy Potsticker Soup Recipe still turned out dreamy. With a bag of frozen dumplings and a bright, savory broth, dinner lands in bowls faster than I can find matching lids. It’s the homemade, weeknight comfort food I lean on when schedules are wild and everyone’s hungry. If you love cozy, soup-y dinners, check out my Gluten-Free Lasagna Soup next, or bookmark my super-satisfying Slow Cooker Mongolian Beef for a future easy dinner.

    Easy Potsticker Soup Recipe

    Recipe

    WHY YOU’LL LOVE THIS RECIPE

    What Makes This Easy Potsticker Soup Recipe So Irresistible

    I made this Easy Potsticker Soup Recipe on a Tuesday when the dishwasher blinked “error,” the kids asked for snacks mid-stir, and I ran out of fresh garlic. And you know what? This Easy Potsticker Soup Recipe still tasted like a hug in a bowl. It’s the kind of easy dinner you build from a handful of pantry staples and one frozen shortcut, and somehow the final bowl feels homemade and special. The broth is silky, the dumplings are pillowy, and the aroma makes everyone meander into the kitchen asking when we’re eating. It’s comfort food without fuss—an easy recipe you can trust even when timing is tight and the day’s been long.

    • Speedy prep: From fridge to table in about 25 minutes—perfect weeknight fix.
    • One-pot convenience: Minimal cleanup for maximum flavor and a stress-free, homemade vibe.
    • Customizable comfort: Add vegetables, adjust heat, and make it your own.
    • Family-friendly: Gentle broth for kids; spice boost for grown-ups.
    • Pantry-smart: Uses a bag of frozen potstickers for bold, satisfying results.

    Another reason I adore this Easy Potsticker Soup Recipe: it’s a reliable one-pan meal that tastes like you simmered all day, yet it’s quick and flexible enough to fit any schedule. Ready to stir the pot? Let’s get to the recipe card and simmer up something cozy.

    It’s a social share darling because it looks restaurant-worthy with minimal effort. The Easy Potsticker Soup Recipe brings a steamy, photogenic bowl to the table—glistening broth, bright greens, and dumplings that beckon. It satisfies the craving for takeout-style comfort with a homemade twist, and it’s tailor-made for busy nights when you still want a nourishing, easy dinner. Friends tell friends about it because it works, it’s quick, and it’s delicious.

    TIPS, TRICKS & EXPERT SECRETS

    Chef Tips for Perfect Easy Potsticker Soup Recipe Every Time

    The first time I taught this Easy Potsticker Soup Recipe to my cousin, we spent five minutes arguing about whether to add the greens before or after the dumplings. The discovery: timing is everything. Here are the cooking tips that make this easy recipe a repeat winner.

    • Heat gently, flavor deeply: Sauté aromatics (onion, garlic, ginger) just until fragrant—don’t brown. This keeps the broth clean and comforting.
    • Simmer, don’t boil: Slide frozen potstickers into a low simmer to keep skins tender and intact.
    • Season in layers: Soy or tamari for savoriness; a splash of rice vinegar for brightness; sesame oil at the end for rich aroma.
    • Finish fast: Add bok choy and edamame at the end so they stay crisp-tender and vibrant.

    Smart Ingredient Swaps & Practical Cooking Advice

    • Gluten-free fix: Use gluten-free potstickers and tamari. The Easy Potsticker Soup Recipe stays just as tasty and approachable.
    • Vegan version: Choose vegetable broth and veggie potstickers, and add mushrooms for depth. It’s a homemade version that still feels indulgent.
    • Lighter broth: Swap some broth for water and add a dash more soy to balance. This quick fix reduces sodium while keeping flavor.
    • What not to do: Don’t vigorously stir after adding potstickers—overmixing can tear the wrapper and cloud the soup.

    With these easy cooking tips, the Easy Potsticker Soup Recipe stays silky, savory, and perfectly balanced every time. For another cozy pot of comfort, peek at my White Lasagna Soup (Crockpot)—a weeknight favorite with the same homemade heart.

    SERVING IDEAS & CREATIVE VARIATIONS

    How to Serve Easy Potsticker Soup Recipe for Maximum Enjoyment

    I once plated this Easy Potsticker Soup Recipe for last-minute guests by ladling the broth first, nestling in dumplings, then crowning each bowl with seared potsticker halves. Everyone swore I’d worked all afternoon. The serving ideas below make the most of that steamy, inviting bowl.

    • Pairing suggestions: Serve with a simple cucumber salad or roasted broccoli. A pot of jasmine rice on the side turns this into a heartier one-pot meal.
    • Saucy swirl: Offer chili crisp, a drizzle of chili oil, or a spoon of miso paste at the table so each eater customizes their bowl.
    • Cozy beverage: Green tea or a ginger-lime spritz brightens the rich, comforting broth.
    Serve Easy Potsticker Soup Recipe for Maximum Enjoyment

    Flavor Twists and Seasonal Variations

    • Garlic-miso broth: Whisk a tablespoon of white miso into a ladle of hot broth, then stir back into the pot for extra umami.
    • Autumn harvest: Stir in thin-sliced kale and cubes of roasted squash for a seasonal twist that complements the Easy Potsticker Soup Recipe.
    • Spicy coconut: Replace 1 cup of broth with light coconut milk and add curry paste for a creamy, warming variation.

    Plating suggestion for content creators: Stack two dumplings on one edge of the bowl, add sliced green onions and cilantro in a neat cluster, and finish with a few sesame seeds. Shoot overhead with steam rising for a Pinterest-friendly snap. For more weeknight inspiration to pair with this Easy Potsticker Soup Recipe, try my bright and cozy Lemon Herb Chicken and Rice.

    STORAGE & TROUBLESHOOTING GUIDE

    How to Store and Reheat Easy Potsticker Soup Recipe

    When I stash leftovers, I separate dumplings and broth so the wrappers don’t soak up every last drop. It’s my secret to keeping the Easy Potsticker Soup Recipe fresh and slurpable the next day.

    • Room temperature: Keep out no longer than 2 hours for food safety.
    • Fridge: Store broth and dumplings separately in airtight containers for 3–4 days. Add greens fresh when reheating, if possible.
    • Freezer: Freeze broth (without potstickers or greens) for up to 3 months. Add fresh dumplings when reheating.
    • Reheat: Simmer broth over medium heat. Add dumplings and warm gently 3–5 minutes. Microwave in short bursts if needed, but avoid boiling.
    • Best containers: Use glass containers or freezer-safe bags to keep flavors clean and the texture appealing. Label with date for easy tracking.

    Troubleshooting Common Easy Potsticker Soup Recipe Issues

    • Too salty: Add unseasoned broth or hot water, then rebalance with a splash of rice vinegar.
    • Watery flavor: Simmer 5 more minutes to concentrate or add 1 teaspoon soy/tamari and a drizzle of sesame oil.
    • Dumplings falling apart: The soup boiled too hard. Next time, maintain a gentle simmer and stir minimally.
    • Cloudy broth: Overmixing can cause tearing. Strain if desired and add fresh greens for a clean look.
    • Overcooked greens: Add leafy veggies in the last 2–3 minutes only.

    With a few storage tips and easy fixes, your Easy Potsticker Soup Recipe will keep tasting homemade and comforting, even on day two. Keep calm, keep it cozy, and enjoy every bowl.

    FAQs

    Can I cook the potstickers separately?

    Yes. Pan-sear a few in a teaspoon of oil for a crispy garnish, then simmer the rest directly in the broth for a tender bite.

    What potstickers work best for this Easy Potsticker Soup Recipe?

    Frozen pork, chicken, or veggie potstickers all work. Choose your favorite brand and add directly from frozen to a gentle simmer.

    How do I make the broth spicier without overpowering it?

    Stir in chili-garlic sauce or a light drizzle of chili oil at the end. Start small and taste as you go.

    Can I meal-prep this Easy Potsticker Soup Recipe?

    Yes. Prep the aromatics and broth base in advance, then add frozen potstickers and greens when reheating for a fresh, quick dinner.

    Conclusion

    The Easy Potsticker Soup Recipe is the weeknight hero you’ll make on repeat: fast, fragrant, and deeply comforting. It’s an easy dinner that leans on a smart shortcut while still tasting homemade, with a sesame-forward broth, bright veggies, and dumplings that feel like a treat. Whether you’re cooking for family, friends, or just yourself, this cozy, one-pot meal delivers comfort food energy without the stress. If you loved this bowl, try it alongside my make-ahead Slow Cooker Korean BBQ Beef for a fun mix-and-match dinner night. Now it’s your turn—make the Easy Potsticker Soup Recipe, share a steamy photo, and tag me so I can cheer you on!

  • Slow Cooker Mongolian Beef – Irresistible and Comforting

    Slow Cooker Mongolian Beef – Irresistible and Comforting

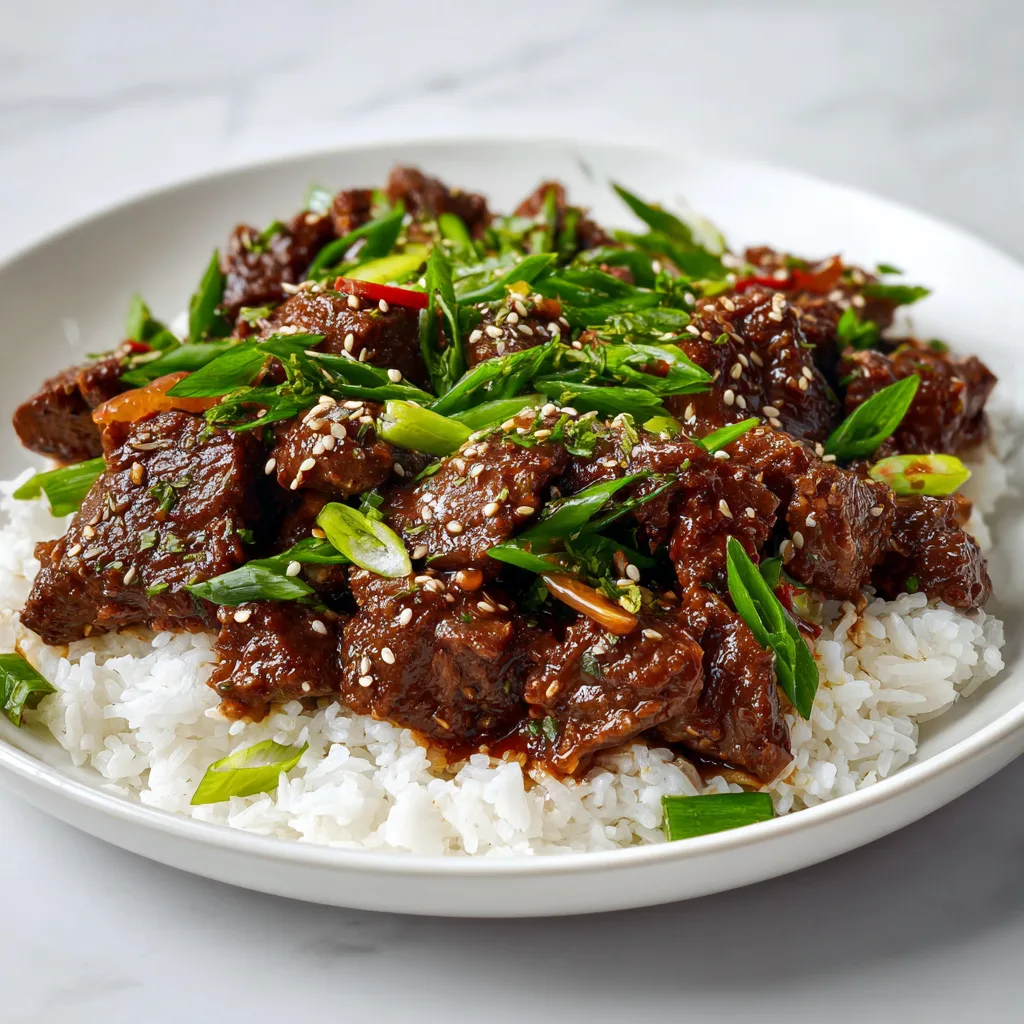
    Slow Cooker Mongolian Beef is my secret weapon on days when the sink is full and my apron strings are mysteriously tied to the dishwasher handle. The first time I made Slow Cooker Mongolian Beef, my timer went off just as my kids decided the rice measured itself. Spoiler: it didn’t. Still, dinner was a cozy, saucy triumph. I’m Darleen Vance, and I love a good easy dinner that forgives real-life kitchen chaos. This homemade comfort food tastes like takeout, but it’s calmer, richer, and slow-cooked to tenderness you can’t rush. Let’s get that set-and-forget magic working for you.

    Slow Cooker Mongolian Beef

    Recipe

    WHY YOU’LL LOVE THIS RECIPE

    What Makes This Slow Cooker Mongolian Beef So Irresistible

    I once filmed a quick reel of my Slow Cooker Mongolian Beef while a rogue spatula slid off the counter and my dog wandered through the shot like an extra with union rates. Real life! And yet, the dish still stole the show. Slow Cooker Mongolian Beef perfumes the kitchen with garlicky-ginger comfort and gives you that homemade takeout feel with almost no effort. This is the kind of easy dinner that respects your time and rewards you with deeply savory, sweet-leaning flavor and fork-tender texture. When I want one-pan meal energy without babysitting a skillet, I reach for this comforting, family-friendly classic.

    • Quick prep: Slice, whisk, and let the slow cooker do the work—true set-and-forget.
    • Comfort food satisfaction: A glossy, restaurant-style sauce hugs every bite.
    • Simple ingredients: Pantry staples like soy sauce, brown sugar, and garlic deliver big flavor.
    • Weeknight easy recipe: Perfect for busy schedules, school nights, or low-effort weekends.
    • Family-approved homemade version: Balanced sweetness and spice kids enjoy, with customizable heat.

    Slow Cooker Mongolian Beef brings a cozy, bold, homemade experience to your table with zero fuss. If you love slow-cooked comfort, bookmark my Slow Cooker Korean BBQ Beef and creamy White Lasagna Soup (Crockpot) for your next easy dinner rotation. Ready to cook? Let’s dive into the recipe.

    Short videos, shorter attention spans, and an endless craving for comfort food—no wonder Slow Cooker Mongolian Beef keeps trending. It’s a one-pot, hands-off path to a homemade meal that tastes like you called your favorite takeout spot. The glossy sauce is made for sharing on social—steam rising, sesame seeds sparkling—and the results are reliably tender. That repeatable success is why this easy dinner has become everyone’s weeknight hero.

    TIPS, TRICKS & EXPERT SECRETS

    Chef Tips for Perfect Slow Cooker Mongolian Beef Every Time

    The best cooking tip I ever learned came from a chef who watched me crowd a skillet and said, “Let heat do the heavy lifting.” The same applies here. Slow Cooker Mongolian Beef rewards patience and smart prep. These expert secrets keep your homemade version luscious and consistent.

    • Pat and dust: Pat beef very dry, then lightly toss with cornstarch. This creates a silky, thickened sauce without clumps.
    • Sauce balance: Taste the sauce before it goes in. Soy is salty; brown sugar should round it out. Add a splash more broth if needed.
    • Cut consistency: Slice flank steak thinly and evenly against the grain for a tender bite and even cooking.
    • Heat timing: High for 3–4 hours or Low for 6–7. Low-and-slow brings melt-in-your-mouth texture, but High is a great quick fix.

    Smart Ingredient Swaps & Practical Cooking Advice

    • Gluten-free: Use tamari or certified gluten-free soy sauce. Everything else stays the same.
    • Lower sugar: Swap half the brown sugar for a sugar substitute designed for cooking, or add 1–2 tablespoons orange juice for brightness.
    • Vegan option: Replace beef with seared, thick-cut portobello strips and use vegetable broth; shorten cook time to preserve texture.
    • Veggie boost: Add broccoli florets in the last 30 minutes or steam separately and stir in for an easy dinner upgrade.
    • What not to do: Don’t skip drying the beef before cornstarch. Wet beef equals gummy coating and a thin sauce.

    With these tips, your Slow Cooker Mongolian Beef lands squarely in the comfort food hall of fame—homemade, reliable, and deeply satisfying.

    SERVING IDEAS & CREATIVE VARIATIONS

    How to Serve Slow Cooker Mongolian Beef for Maximum Enjoyment

    When I served Slow Cooker Mongolian Beef to friends, I piled it high over jasmine rice, added a confetti of scallions, and my neighbor asked if I secretly picked it up curbside. The plating suggestion that always wins: big bowls, big spoonfuls, and a glossy finish of sauce. For easy entertaining, let the slow cooker double as your serving vessel—lift the lid and the aroma does the rest.

    • Classic pairing: Steamed jasmine rice or brown rice with a side of garlicky green beans.
    • Noodle night: Toss with lo mein or rice noodles; finish with sesame oil and extra scallions.
    • Low-carb route: Serve over cauliflower rice or a bed of sautéed cabbage for a lighter, still-cozy plate.
    How to Serve Slow Cooker Mongolian Beef for Maximum Enjoyment
    How to Serve Slow Cooker Mongolian Beef for Maximum Enjoyment

    For beverages, try a crisp ginger beer or a light red like pinot noir. Want share-worthy photos? Plate a neat mound of rice, drape Slow Cooker Mongolian Beef over top, drizzle extra sauce, and finish with sesame seeds. Shoot near a window for natural light and a mouthwatering shine.

    Flavor Twists and Seasonal Variations

    • Spicy-garlic kick: Add chili-garlic sauce or gochujang to the base for a bolder flavor variation.
    • Orange-ginger twist: Zest 1 orange into the sauce and swap 2 tablespoons broth for orange juice—a bright, seasonal twist.
    • Veg-forward: Add bell peppers in the last hour for color and crunch; stir in snow peas during the final 10 minutes.

    Make it a party spread with Crockpot Cranberry Meatballs for appetizers and a sweet finish like Baked Apple Fritters. This lineup keeps your menu stress-free and irresistibly shareable.

    STORAGE & TROUBLESHOOTING GUIDE

    How to Store and Reheat Slow Cooker Mongolian Beef

    I’m the queen of planned leftovers, and Slow Cooker Mongolian Beef tastes even better the next day. Here’s how to keep it fresh.

    • Room temperature: Keep out no longer than 2 hours.
    • Fridge: Store in airtight containers up to 4 days. Use shallow containers to cool quickly and keep texture.
    • Freezer: Freeze in meal-size portions up to 3 months. Leave headspace for expansion.
    • Reheat: Skillet over medium heat with a splash of water or broth to loosen the sauce; stir until warmed. Microwave in 60–90 second bursts, stirring between. For larger amounts, a gentle oven reheat at 325°F in a covered dish works beautifully.

    Troubleshooting Common Slow Cooker Mongolian Beef Issues

    • Too watery: Thicken with a cornstarch slurry (1 tablespoon cornstarch + 1 tablespoon cold water) and cook 10–15 minutes more.
    • Too salty: Add 1–2 tablespoons brown sugar and a splash of water or unsalted broth; serve over extra rice to balance.
    • Too sweet: Add 1–2 teaspoons rice vinegar or a squeeze of lime for lift; a pinch of red pepper flakes helps, too.
    • Beef too tough: It likely needs more time. Continue cooking on Low in 30-minute increments until tender.
    • Sauce too thick: Whisk in warm broth, a tablespoon at a time, until silky.

    With these storage tips and quick fixes, your Slow Cooker Mongolian Beef stays delicious beyond night one. You’ve got this—and your future self will thank you when the fridge opens to easy dinner magic.

    FAQs

    Can I make Slow Cooker Mongolian Beef ahead?

    Yes. Slice and toss the beef with cornstarch and refrigerate up to 12 hours. Whisk the sauce, store separately, then combine in the slow cooker when ready.

    What cut works best for Slow Cooker Mongolian Beef?

    Flank steak is classic for tenderness and thin slicing. Skirt steak or thinly sliced sirloin also work well.

    How do I reduce the sweetness without losing flavor?

    Cut brown sugar by a third and add 1–2 teaspoons rice vinegar or orange zest. The acidity balances the sauce beautifully.

    Can I add vegetables to Slow Cooker Mongolian Beef?

    Absolutely. Add carrots or mushrooms at the start; stir in broccoli or snow peas near the end to keep them crisp-tender.

    Conclusion

    Slow Cooker Mongolian Beef brings everything we want in an easy dinner: homemade comfort food, a glossy, savory-sweet sauce, and tender beef that practically melts. With simple prep and set-it-and-forget-it cooking, this slow cooker hero guarantees cozy satisfaction night after night. Use my tips for a quick fix if the sauce needs thickening, try a flavorful variation like orange-ginger, and serve it over rice or noodles for the ultimate weeknight win. I’m Darleen Vance, and I can’t wait for your kitchen to smell amazing. Make Slow Cooker Mongolian Beef today—then try my other slow-cooker favorites on RecipesDarleen. Try it at home and tag me!

  • Gluten Free Cinnamon Coffee Cake – Deliciously Easy Comfort

    Gluten Free Cinnamon Coffee Cake – Deliciously Easy Comfort

    Gluten Free Cinnamon Coffee Cake is my go-to when Saturday morning turns into sweet chaos. I once dropped the cinnamon bowl while the coffee overflowed—classic Darleen Vance energy—and the kitchen smelled like a holiday candle. Worth it. This Gluten Free Cinnamon Coffee Cake bakes up soft and tender with a buttery crumb, a bold cinnamon swirl, and a cozy vanilla glaze. It’s a homemade, one-bowl comfort food moment you can whip up for brunch, bake sales, or late-night cravings.

    Gluten Free Cinnamon Coffee Cake

    Recipe

    Why You’ll Love This Gluten Free Cinnamon Coffee Cake

    What Makes This Gluten Free Cinnamon Coffee Cake So Irresistible

    I developed this Gluten Free Cinnamon Coffee Cake after a friend texted, “We’re 20 minutes away.” I had 45 minutes, stale coffee, and a stubborn oven. The result? A Gluten Free Cinnamon Coffee Cake that’s fluffy, fragrant, and foolproof—my kind of homemade comfort food. It tastes like a bakery treat but uses simple pantry ingredients, and the one-bowl batter is a true easy recipe win.

    • Buttery, chunky crumb topping with a bold cinnamon ribbon throughout.
    • Moist, tender crumb—no grit—thanks to the right gluten-free blend.
    • Quick prep and one-bowl mixing for minimal cleanup.
    • Family-friendly and brunch-perfect; equally great as a dessert or snack.
    • Customizable with dairy-free swaps or an optional vanilla glaze.

    Whether you’re planning a cozy brunch or craving late-night comfort food, this homemade cake slides into your routine like it’s always belonged. Ready to bake the best-smelling pan in your kitchen? Let’s get to the recipe card just below.

    Short, shareable videos have put classic crumb cakes back in the spotlight, and this Gluten Free Cinnamon Coffee Cake is winning hearts with its crackly top and bakery-style slice. It’s a one-bowl cake that doesn’t taste “gluten-free”—a quick fix you can serve proudly to everyone at the table.

    Tips, Tricks & Expert Secrets for Gluten Free Cinnamon Coffee Cake

    Chef Tips for Perfect Gluten Free Cinnamon Coffee Cake Every Time

    In a pastry class, I learned that gluten-free batter behaves like a delicate truce—treat it gently and it rewards you with tenderness. When I overmixed once, my lovely Gluten Free Cinnamon Coffee Cake baked up dense. Lesson learned. Use these cooking tips for a consistent homemade version every time:

    • Measure right: Spoon and level the gluten-free flour to avoid a dry, crumbly cake.
    • Room-temp ingredients: Butter, eggs, and sour cream blend smoothly for a softer crumb.
    • Chill the crumb: A quick 5–10 minute chill keeps streusel clumpy and crisp.
    • Marble lightly: Drag a knife once or twice; over-swirling blends the cinnamon into the batter.

    Smart Ingredient Swaps & Practical Cooking Advice

    • Dairy-free: Use vegan butter, plant milk, and dairy-free yogurt or sour cream. The cake stays plush.
    • Egg-free: 2 flax eggs (2 tbsp ground flax + 6 tbsp water) work; expect a slightly denser crumb.
    • Sugar tweaks: Sub half the granulated sugar with coconut sugar for deeper caramel notes.
    • What not to do: Don’t overmix. Once dry ingredients are in, mix just until smooth to prevent gumminess.

    Keep this Gluten Free Cinnamon Coffee Cake in your easy recipe rotation; it’s a reliable, bakery-style comfort food that looks as good as it tastes. For more cozy bakes, peek at my Baked Apple Fritters—they’re a fall favorite.

    Serving Ideas & Creative Variations for Gluten Free Cinnamon Coffee Cake

    How to Serve Gluten Free Cinnamon Coffee Cake for Maximum Enjoyment

    When neighbors stop by, I slice this Gluten Free Cinnamon Coffee Cake thick and warm, then plate it with a drizzle of glaze and a dusting of cinnamon. It’s simple, but it feels special. For a cozy spread, pair a pan of Gluten Free Cinnamon Coffee Cake with big mugs of coffee or spiced chai. If you’re hosting brunch, add a savory anchor like my White Lasagna Soup (Crockpot)—sweet and savory always win together.

    • Pairings: Hot coffee, chai latte, maple-sweetened yogurt, or fresh berries.
    • Serving ideas: Warm slices with a scoop of vanilla ice cream; or top with cinnamon-kissed whipped cream.

    Flavor Twists and Seasonal Variations

    • Apple Orchard Twist: Fold in 1 cup finely diced apples and a pinch of nutmeg for a fall vibe. Try beside my Spiced Apple Cider Donut Loaf.
    • Maple Pecan Crunch: Add 1/2 cup chopped pecans to the crumb and finish with a maple glaze.
    • Cream Cheese Ribbon: Dollop a lightly sweetened cream cheese layer between batter halves for extra richness.

    Content creators: For social-worthy slices, cut with a hot knife, wipe between cuts, and shoot near a window. A little crumb on the plate makes that texture pop—perfect for Pinterest and Instagram.

    Storage & Troubleshooting Guide for Gluten Free Cinnamon Coffee Cake

    How to Store and Reheat Gluten Free Cinnamon Coffee Cake

    I hide leftover Gluten Free Cinnamon Coffee Cake behind the spinach—don’t judge—so it lasts more than a day. Keep fresh with this storage advice:

    • Room temperature: 1–2 days, wrapped in parchment and stored in an airtight container.
    • Refrigerator: Up to 5 days, tightly sealed to prevent drying.
    • Freezer: 2–3 months. Wrap slices individually, then place in a freezer bag.
    • Reheat: Oven at 300°F for 8–10 minutes; air fryer at 320°F for 3–4 minutes; or microwave 10–15 seconds for a quick fix.

    Troubleshooting Common Gluten Free Cinnamon Coffee Cake Issues

    • Too dry: Likely excess flour or overbaking. Spoon-and-level flour and start checking at 33 minutes.
    • Gummy center: Underbaked or overmixed. Bake until a tester shows a few moist crumbs; mix just until combined.
    • Sunken middle: Oven temp too low or cake underdone. Use an oven thermometer and bake fully in the center of the oven.
    • Crumb topping sank: It was too warm. Chill the crumb for 5–10 minutes before topping.

    With the right storage, reheat method, and a few quick tweaks, your Gluten Free Cinnamon Coffee Cake will stay bakery-fresh. You’ve got this! And if you’re craving more cozy sweets, my Salted Caramel Apple Bars are a must-try.

    FAQs

    Can I bake this Gluten Free Cinnamon Coffee Cake in a 9×13 pan?

    Yes. Double the recipe for a 9×13 pan and bake 40–48 minutes, checking at 38 minutes. The crumb will be slightly thinner per slice.

    What gluten-free flour works best?

    Use a 1:1 gluten-free all-purpose blend with xanthan gum. If your blend doesn’t include it, add 1/2 teaspoon xanthan to the batter ingredients.

    Can I make it dairy-free?

    Yes. Use vegan butter, plant milk, and dairy-free yogurt or sour cream. The cake stays moist and tender.

    Does it freeze well?

    Beautifully. Freeze slices wrapped individually for up to 3 months. Thaw at room temp and reheat briefly to refresh.

    Conclusion

    This cozy Gluten Free Cinnamon Coffee Cake delivers everything you love: a fluffy, homemade crumb, a bold cinnamon swirl, and a buttery streusel that crackles. It’s an easy recipe, truly one-bowl, and pure comfort food—perfect for brunch spreads, after-school treats, or a late-night slice. Bake this Gluten Free Cinnamon Coffee Cake once and it becomes a forever favorite, simple enough for weekdays yet special enough for guests. I can’t wait to see your version. Try it at home, share a warm slice, and tag me so I can cheer you on!

  • angel chicken crock pot – Creamy and Irresistible Comfort

    angel chicken crock pot – Creamy and Irresistible Comfort

    angel chicken crock pot is my go-to “save dinner” recipe. The night I locked my keys in the car and the dog stole a dinner roll, I tossed everything into the slow cooker and let it work its magic. When we finally sat down, this creamy angel chicken crock pot dinner turned the chaos into a cozy win. The sauce hugs every noodle, the chicken is tender, and the whole house smells like a hug.

    angel chicken crock pot

    Recipe

    Why You’ll Love This angel chicken crock pot Recipe

    What Makes This angel chicken crock pot So Irresistible

    On the day I learned the power of a slow cooker, I was juggling school pickup, a work call, and a missing sock. I tossed everything for this angel chicken crock pot dinner in the insert, clicked the lid, and let the creamy magic happen. By dinnertime, it was tender, velvety, and downright dreamy. This angel chicken crock pot recipe is the definition of easy dinner comfort food—homemade flavor with a hands-off slow cooker vibe. It’s the kind of one-pot meal that feels like you worked all afternoon, even when you didn’t. The sauce clings to pasta like a hug, and every bite is rich, mellow, and insanely satisfying.

    • Set-it-and-forget-it ease: minimal prep, maximum payoff.
    • Ultra-creamy sauce with Italian dressing mix for big flavor fast.
    • Family-friendly comfort food that tastes homemade.
    • Versatile: serve over angel hair, rice, or mashed potatoes.
    • Reliable slow cooker results—tender chicken every time.

    If you’re craving a cozy win tonight, this angel chicken crock pot dish is ready to slide into your weekly rotation—and right into the recipe card below.

    The buzz around angel chicken crock pot recipes is simple: the creamy texture, the easy recipe method, and the consistent slow cooker results. People love that this homemade version leans into pantry staples and delivers restaurant-worthy flavor on a weeknight. It’s an easy dinner that only needs a little prep, and it adapts beautifully to different diets and sides. If you love scoopable, saucy comfort food, this angel chicken crock pot is the moment.

    Need more slow cooker comfort? Try my white lasagna soup (crockpot) or this cozy slow cooker broccoli cheddar soup. Craving bold flavors another night? Don’t miss my slow cooker Korean BBQ beef.

    angel chicken crock pot Tips, Tricks & Expert Secrets

    Chef Tips for Perfect angel chicken crock pot Every Time

    During a cooking class, I once whisked cream cheese into a too-hot sauce and watched it separate faster than my patience. Lesson learned! To master angel chicken crock pot texture, a few small moves make a big difference.

    • Soften dairy first: Cube and soften cream cheese so it melts smoothly into your angel chicken crock pot sauce.
    • Layer smart: Chicken on the bottom, mushrooms on top, sauce over everything for even cooking and rich flavor.
    • Low and slow: Cooking on LOW gives your angel chicken crock pot that silky, tender finish.
    • Finish with a whisk: After cooking, whisk the sauce to make it glossy and restaurant-smooth.

    Smart Ingredient Swaps & Practical Cooking Advice

    • Gluten-aware: Use gluten-free cream soup and an Italian dressing mix labeled GF, or make a homemade version with broth, cornstarch, and spices.
    • Lighter spin: Swap regular cream cheese for Neufchâtel; stir in a spoonful of Greek yogurt off heat for tang.
    • Flavor boost: Add sun-dried tomatoes or a squeeze of lemon at the end to brighten this angel chicken crock pot sauce.
    • What not to do: Don’t boil the sauce or add cream cheese to a bubbling liquid—it can separate. Keep it warm, not boiling.

    With these cooking tips, your angel chicken crock pot becomes a foolproof, quick-fix dinner that tastes like you fussed.

    angel chicken crock pot Serving Ideas & Creative Variations

    How to Serve angel chicken crock pot for Maximum Enjoyment

    I love plating angel chicken crock pot over angel hair pasta in a big bowl and twirling it high for that “come-hither” presentation. For guests, I spoon extra sauce around the edges and finish with fresh parsley and Parmesan. It looks fancy, but it’s weeknight easy.

    • Pair with a crisp green salad and garlicky bread for a complete comfort-food spread.
    • Serve over rice or mashed potatoes for a cozier, stick-to-your-ribs take.
    • Beverage pairing: A lightly oaked Chardonnay or a lemony iced tea balances the creamy sauce.

    Plating suggestion: Twirl pasta into a nest, perch the saucy chicken on top, then add a sprinkle of parsley. Food photographers—shoot at 45° to capture the creamy sheen and steam.

    Flavor Twists and Seasonal Variations

    • Spinach & Mushroom: Fold in a handful of baby spinach during the last 10 minutes to wilt into the angel chicken crock pot sauce.
    • Sun-Dried Tomato & Basil: Add chopped sun-dried tomatoes and finish with fresh basil for a bright Italian twist.
    • Ranchy Kick: Swap the Italian dressing mix for ranch seasoning for a fun flavor variation.

    These serving ideas and seasonal twists keep your angel chicken crock pot fresh, fun, and endlessly shareable on social—your audience will love a creamy before-and-after with that glossy, plated sauce.

    angel chicken crock pot Storage & Troubleshooting Guide

    How to Store and Reheat angel chicken crock pot

    Leftovers are gold. I stash extra angel chicken crock pot sauce for quick lunches and emergency dinners.

    • Room temperature: Don’t leave out longer than 2 hours.
    • Fridge: Store in airtight containers for 3–4 days. Keep pasta separate to maintain texture.
    • Freezer: Freeze for up to 3 months in freezer bags laid flat. Thaw overnight in the fridge.
    • Reheat: Warm gently on the stovetop or in the microwave in short bursts, stirring often. Add a splash of broth or milk to loosen the sauce. Slow cooker on WARM works too for larger batches.

    Troubleshooting Common angel chicken crock pot Issues

    • Too watery: Remove the lid and cook on HIGH for 20–30 minutes, or whisk in a cornstarch slurry.
    • Too thick: Stir in 1/4–1/2 cup broth or milk until silky.
    • Curdled look: The sauce overheated. Whisk off heat and add a splash of warm milk; avoid boiling dairy next time.
    • Bland: Add a pinch of salt, a squeeze of lemon, or extra Italian seasoning to brighten your angel chicken crock pot.
    • Dry chicken: Use thighs for juicier results, or shred and fold back into the sauce to rehydrate.

    You’ve got this! With these storage tips and easy fixes, your angel chicken crock pot will keep tasting homemade and fresh every time.

    FAQs

    Can I use frozen chicken in angel chicken crock pot?

    For food safety and best texture, thaw chicken fully before cooking. Frozen chicken in a slow cooker can stay in the “danger zone” too long.

    Can I make angel chicken crock pot without canned soup?

    Yes. Whisk 1 1/2 cups chicken broth with 2 tablespoons cornstarch, 2 tablespoons butter, spices, and cream cheese for a quick homemade sauce.

    Can I cook angel chicken crock pot on high instead of low?

    Yes—cook on HIGH for 2–3 hours, or LOW for 4–5 hours, until the chicken reaches 165°F and is tender.

    How do I thicken angel chicken crock pot sauce?

    Simmer uncovered for 20–30 minutes, whisk in a cornstarch slurry, or melt in a bit more cream cheese for extra richness.

    Conclusion

    If you’re craving an easy dinner that tastes like a cozy hug, this angel chicken crock pot is your creamy, comforting answer. The homemade flavors bloom in the slow cooker while you live your life, and the results are mellow, rich, and family-approved. Plate it over angel hair pasta, spoon it onto rice, or pile it on mashed potatoes—the luscious sauce makes everything feel special. With reliable tips for texture, storage advice, and creative twists, your angel chicken crock pot will stay exciting week after week.

    Try this angel chicken at home and tag me so I can cheer you on! And if you need another slow cooker favorite, peek at my white lasagna soup (crockpot) for more cozy comfort food.

  • White Lasagna Soup (Crockpot) – Creamy, Irresistible Comfort

    White Lasagna Soup (Crockpot) – Creamy, Irresistible Comfort

    White Lasagna Soup (Crockpot) saved me on a night my timer failed, the dog stole my ricotta, and the kids were “starving” at 4 p.m. I tossed everything into the slow cooker, broke the noodles at the end, and stirred in a silky swirl of cream and cheese. The kitchen went quiet—always the sign of victory. White Lasagna Soup (Crockpot) became our midweek hero: creamy, comforting, and ridiculously easy. I even hid a second batch behind the yogurt for tomorrow’s lunch. Don’t tell.

    Explore more cozy slow cooker favorites like Crockpot Loaded Baked Potato Soup and my velvety Slow Cooker Broccoli Cheddar Soup. If you love dump-and-go dinners, check this roundup: Dump-and-Go Crockpot Soups.

    White Lasagna Soup (Crockpot)

    Recipe


    WHY YOU’LL LOVE THIS RECIPE

    What Makes This White Lasagna Soup (Crockpot) So Irresistible

    I was halfway through laundry when the craving hit: White Lasagna Soup (Crockpot). I tossed ingredients in the pot, set the dial, and let the house fill with the aroma of garlic and herbs. White Lasagna Soup (Crockpot) has that comforting magic—like lasagna’s creamy heart in soup form—without hovering over the stove. When the noodles go in at the end and that cheese swirl happens, it’s a mic-drop moment. If you love an easy dinner that tastes homemade and hugs your soul, this is it. White Lasagna Soup (Crockpot) does the heavy lifting, so you don’t have to.

    • Set-it-and-forget-it ease: craveable comfort food with almost zero babysitting.
    • Weeknight-friendly prep: pantry staples, simple steps, and a smooth finish.
    • Creamy, cheesy finish: ricotta, mozzarella, and Parmesan—hello, lasagna vibes.
    • Family-approved: kid-friendly flavors with a grown-up depth of herbs and garlic.
    • Flexible: easily make a gluten-free or lighter homemade version.

    Ready to ladle up the good stuff? Let’s get to the recipe card and start your pot of White Lasagna Soup (Crockpot).

    The internet loves cozy one-pot meals, and White Lasagna Soup (Crockpot) checks every box: creamy texture, classic flavors, and a hands-off cook. Food creators adore its camera-ready ribbons of noodles, melty cheese, and bright green spinach. Busy cooks love the reliable, easy recipe and the homemade taste. It’s the kind of comfort food that makes comments explode with “saving for later” and “making this tonight.” White Lasagna Soup (Crockpot) is a crowd-pleaser for a reason—it’s simple, soulful, and sensational.


    TIPS, TRICKS & EXPERT SECRETS

    Chef Tips for Perfect White Lasagna Soup (Crockpot) Every Time

    I once whisked cold cream cheese straight into a bubbling pot—cue little white floaties. Lesson learned. Now my White Lasagna Soup (Crockpot) is velvety every time with these quick fixes and cooking tips.

    • Warm the dairy: Heat heavy cream with cream cheese until smooth, then stir in for a silky finish to your White Lasagna Soup (Crockpot).
    • Season in layers: Salt the broth first, then adjust after cheese melts to keep flavors balanced.
    • Stir noodles once or twice: Broken lasagna can nestle together; a quick stir prevents clumps in this easy recipe.
    • Finish with lemon zest: The citrus brightens the homemade version and cuts through richness.

    Smart Ingredient Swaps & Practical Cooking Advice

    • Gluten-free: Use gluten-free lasagna noodles and check broth labels.
    • Lighter: Swap half-and-half for heavy cream, and reduce mozzarella by 1/4 cup.
    • Protein swap: Try rotisserie chicken stirred in at the end for a fast, quick fix.
    • What not to do: Don’t add dry noodles too early—overcooked pasta turns mushy and throws off the texture of White Lasagna Soup (Crockpot).

    Follow these practical, friendly steps and your White Lasagna Soup (Crockpot) will consistently deliver restaurant-level comfort with weeknight effort.


    SERVING IDEAS & CREATIVE VARIATIONS

    How to Serve White Lasagna Soup (Crockpot) for Maximum Enjoyment

    The first time I served White Lasagna Soup (Crockpot) to guests, I piled bowls with ricotta clouds and a sparkle of parsley. Silence, then spoon-scraping. For plating suggestions and serving ideas, think contrast and crunch—your cozy bowl, their instant second helping.

    • Pair with warm, crusty garlic bread or focaccia to scoop up every creamy drop.
    • Serve a crisp side salad with lemony vinaigrette to complement the rich, homemade flavor.
    • Pour a chilled Pinot Grigio or a sparkling lemonade to refresh the palate.

    Flavor Twists and Seasonal Variations

    • Herb garden twist: Finish White Lasagna Soup (Crockpot) with fresh basil and thyme for a fragrant upgrade.
    • Fall favorite: Add sautéed mushrooms and a pinch of nutmeg for an autumnal seasonal twist.
    • Pinterest-popular: Stir in pesto at the end for a bold, emerald swirl and eye-catching flavor variation.

    Content creators: top bowls with a ricotta quenelle, lemon zest, and a sprinkle of black pepper for scroll-stopping photos. White Lasagna Soup (Crockpot) is a stunner on Instagram and a winner at the table.


    STORAGE & TROUBLESHOOTING GUIDE

    How to Store and Reheat White Lasagna Soup (Crockpot)

    Leftovers are a gift. I store White Lasagna Soup (Crockpot) in a mason jar for quick lunches, and it reheats like a dream with a splash of broth.

    • Room temperature: Keep no more than 2 hours for food safety.
    • Fridge: Store in airtight containers up to 4 days. To keep noodles from softening, you can refrigerate them separately if you plan ahead.
    • Freezer: Freeze up to 2 months—best if you freeze without the noodles and dairy; add those fresh after reheating.
    • Reheat: Warm gently on the stovetop over low heat, adding a splash of broth or milk to loosen. Microwave in short bursts, stirring between intervals.

    Troubleshooting Common White Lasagna Soup (Crockpot) Issues

    • Too thick: Whisk in warm broth or milk until you reach a creamy, sippable consistency.
    • Too thin: Simmer uncovered for a few minutes or add a bit more cream cheese to enrich.
    • Watery flavor: Increase salt gradually and finish with extra Parmesan for depth.
    • Noodles too soft: Add them later next time and check at 15–20 minutes on High.
    • Grainy dairy: Always temper cream and cream cheese, then stir in off direct boil.

    With these storage tips and fixes, your White Lasagna Soup (Crockpot) will keep fresh, reheat beautifully, and taste just as cozy the next day. You’ve got this!


    FAQs

    Can I use rotisserie chicken?

    Yes. Stir in shredded rotisserie chicken during the last 10 minutes, just long enough to warm through before adding dairy.

    Do I have to cook noodles separately?

    No. Add broken lasagna noodles directly to the slow cooker for the final 20–30 minutes on High and stir once or twice.

    How can I make it gluten-free?

    Use gluten-free lasagna noodles and verify your broth and cheese labels are gluten-free.

    Can I lighten the soup?

    Use half-and-half instead of heavy cream and reduce mozzarella by 1/4 cup. It stays creamy and satisfying.


    Conclusion

    White Lasagna Soup (Crockpot) is the best kind of weeknight comfort food—simple, homemade, and deeply satisfying. The slow cooker does the heavy lifting while you get a silky, cheesy bowl of joy that tastes like your favorite white lasagna. This easy dinner brings cozy, family-friendly flavor to your table with minimal effort, and the leftovers reheat like a dream. Make White Lasagna Soup (Crockpot) once, and you’ll keep it on repeat for busy nights, game days, and casual company. Try it at home and tag me—can’t wait to see your steaming bowls and creative toppings!


  • Sugar Cookie Truffles – Irresistible and Comforting

    Sugar Cookie Truffles – Irresistible and Comforting

    Sugar Cookie Truffles saved my week. I was icing cupcakes while the dog stole a spatula, the timer beeped, and my kids asked when dessert would be ready. Sugar Cookie Truffles happened because I needed a fast, homemade treat without turning on the oven again. I crushed leftover cookies, mixed in cream cheese, and dipped the cutest little bites. The pan vanished at family movie night. Darleen Vance here, and yes, these no-bake wonders are as easy as they are delicious.

    Sugar Cookie Truffles

    Recipe

    WHY YOU’LL LOVE THIS RECIPE

    The first time I made Sugar Cookie Truffles, I was in my cozy kitchen wearing fuzzy socks and dodging a rogue sprinkle explosion. Sugar Cookie Truffles were my quick fix after a long day. They are a no-bake dessert that tastes like the holidays met a cream-cheese hug. The dough is soft and nostalgic, the shell has that satisfying snap, and the sprinkles make everyone smile. This homemade version captures pure comfort food energy in a bite-sized treat you can whip up anytime.

    • Quick prep with simple pantry ingredients and no oven time.
    • Creamy, cookie-dough-like centers with a crisp chocolate shell.
    • No-bake dessert that’s family-friendly and party-ready.
    • Easy recipe to customize with sprinkles, drizzles, or flavors.
    • Perfect make-ahead treat for gifting, potlucks, and sweet cravings.

    Sugar Cookie Truffles also deliver that homemade, bakery-style finish with minimal effort. If you’ve ever wanted a dessert that works for birthdays, cookie swaps, or a cozy night in after an easy dinner, this is it. And unlike a one-pan meal, there’s no stove or oven to babysit. Just mix, roll, dip, and delight. Ready to make Sugar Cookie Truffles that everyone will ask for by name? Let’s head to the recipe card.

    These Sugar Cookie Truffles are trending because they hit the sweet spot: no-bake convenience, nostalgic sugar cookie flavor, and a gorgeous finish that looks straight off Pinterest. Busy bakers love how this easy recipe turns store-bought cookies into something impressive. Content creators adore them because they photograph beautifully, and the flavors never go out of style. Whether you’re preparing a homemade dessert for a work party, school treat, or family night, Sugar Cookie Truffles deliver instant joy in a tiny package.

    TIPS, TRICKS & EXPERT SECRETS

    During a community bake sale, I learned the hard way that not all chocolate melts the same. My first batch of Sugar Cookie Truffles seized when I rushed the microwave. Lesson learned: patience, friends. Here are my favorite cooking tip takeaways for a smooth, professional finish at home.

    • Use room-temperature cream cheese so the Sugar Cookie Truffles filling mixes ultra-smooth without lumps.
    • Crush cookies very fine. Fine crumbs help the easy recipe hold together without cracking under the chocolate shell.
    • Chill the rolled centers 15–20 minutes. Slightly firm centers dip cleaner and set faster.
    • Use melting wafers or high-quality white chocolate. Stir every 20–30 seconds for a glossy coating.

    What not to do: Don’t overmix the filling after it comes together. Overmixing can make Sugar Cookie Truffles greasy and dense instead of creamy.

    Smart Ingredient Swaps & Practical Cooking Advice

    • For gluten-free Sugar Cookie Truffles, use crunchy gluten-free sugar cookies. The texture should be similar to regular cookies.
    • For a dairy-light option, swap dairy-free cream cheese and use dairy-free white baking chips. Add a teaspoon of coconut oil for a smoother melt.
    • Prefer less sweet? Add a pinch more salt or a splash of almond extract to balance the sweetness.
    • If your chocolate is too thick, thin it with 1 teaspoon coconut oil at a time until it flows like warm honey.

    These tips make your homemade version practically foolproof. Whether you’re making Sugar Cookie Truffles for a last-minute party or prepping a quick fix dessert to keep in the freezer, a few smart choices yield professional results.

    SERVING IDEAS & CREATIVE VARIATIONS

    I once brought a platter of Sugar Cookie Truffles to a neighbor’s game night and watched them vanish between rounds of charades. Presentation matters. Arrange the truffles on a simple white plate, add a few sparkling sprinkles, and you’ve got a party-worthy centerpiece in minutes. For a cozy night in, pair Sugar Cookie Truffles with warm drinks or a chilled glass of milk.

    • Pair with slow-sipper drinks like Mulled Apple Cider for an inviting seasonal spread.
    • Serve after an easy, comfort-forward dinner like Slow Cooker Mac & Cheese to complete the cozy mood.
    • Build a dessert board with cookies, berries, and a small bowl of crushed candy canes for dusting.

    Photography tip: For social shares, stack two Sugar Cookie Truffles to show the coating and center. A quick cross-section cut reveals that creamy, cookie-crumb interior readers love to see.

    Sugar Cookie Truffles
    Sugar Cookie Truffles

    Flavor Twists and Seasonal Variations

    • Birthday Cake: Add rainbow sprinkles to the filling and finish with a vanilla drizzle.
    • Gingerbread Cheer: Swap half the cookie crumbs with crunchy gingerbread cookies and add a pinch of cinnamon.
    • Peppermint Snowfall: Add peppermint extract to the filling and top with crushed candy canes.

    These flavor variations keep Sugar Cookie Truffles fresh for every season. For brunch gatherings, pair them with Overnight French Toast Casserole. For kid-approved parties, set out a tray next to these fun, family-friendly Jello cups and let guests build their dream dessert plate. However you serve them, Sugar Cookie Truffles prove that small bites can deliver big joy.

    STORAGE & TROUBLESHOOTING GUIDE

    When I stash Sugar Cookie Truffles for later, I have to hide them behind the veggies or they disappear overnight. Here’s how to keep your batch fresh and flawless.

    • Room Temperature: Up to 1 day in a cool, dry place if your kitchen is under 70°F. Otherwise, refrigerate.
    • Refrigerator: Store Sugar Cookie Truffles in an airtight container for 5–7 days. Layer with parchment to protect the coating.
    • Freezer: Freeze up to 2 months. Thaw in the fridge for best texture. They’re delicious slightly chilled.

    Reheating isn’t necessary for Sugar Cookie Truffles, but if the coating looks dull after chilling, let them sit at room temperature 10–15 minutes to soften slightly.

    • Too Dry or Crumbly Filling: Add 1–2 teaspoons cream cheese at a time until the mixture holds when pressed.
    • Watery or Loose Filling: Add more cookie crumbs by the tablespoon until the texture is dough-like.
    • Cracking Coating: Your centers may be too cold. Let rolled balls rest 5 minutes before dipping.
    • Thick Chocolate: Thin with a teaspoon of coconut oil and reheat gently in 15–20 second bursts.
    • Greasy Texture: Avoid overmixing once the dough comes together, and use full-fat brick cream cheese for stability.

    With the right storage advice and these quick fixes, your Sugar Cookie Truffles will look and taste bakery-level every time. You’ve got this, and I’m cheering you on.

    FAQs

    Can I use store-bought cookies?

    Yes. Crunchy store-bought sugar cookies work great and make this easy recipe even faster.

    Do I have to use white chocolate?

    No. Milk or dark chocolate is delicious, too. Choose melting wafers for the smoothest, glossy finish.

    How do I keep the coating from cracking?

    Let chilled centers rest a few minutes before dipping and avoid over-chilling. Thin thick chocolate with a little coconut oil.

    Can I make Sugar Cookie Truffles ahead?

    Absolutely. Refrigerate up to a week or freeze for up to two months. Add sprinkles after dipping for best color.

    Conclusion

    Sugar Cookie Truffles are the tiny treat with big comfort. As a no-bake dessert, they’re an easy recipe for busy days and cozy nights. From holiday trays to last-minute birthdays, Sugar Cookie Truffles deliver a homemade finish with creamy centers and a crisp, candy-like shell. Use the tips above to store, reheat, and fix texture fast, then get creative with flavor variations and serving ideas. I can’t wait to see your batch. Try it at home and tag me!